I explained in this article how you can execute IFTTT actions with the Amazon dash button. By changing a single line of code you can switch an FHEM device.
How does it work? By calling a URL (HHTP Post Request) you can tell FHEM to do soemthing. This way you can switch lights on or off, open or close shutters, turn remote contrles wall plugs on or off and a lot more.
The dash button is not suitable for every application as the button has a latency of 5 to 6 seconds until a FHEM device is switched.
What’s required:
- Raspberry Pi or Debian/Ubuntu Linux computer
- Amazon Dash Button
- Running FHEM
Here is a sample video how a Philips Hue lamp is turned on using a Amazon dash button and FHEM. Thanks to Hagen for that video.
Contents
Option 1: FHEM module dash_dhcp
- Works without additional software
- FHEM server can be connected to the network vial ethernet cable
- Multiple Amazon dash buttons can be embedded
Update your FHEM to the newest version and install the module dash_dhcp. Here is a short tutorial how you can implement a update button in the sidebar of the FHEM web interface.
Determine the MAC address of your Amazon dash button. Therefore, log into your router. I have a Fritzbox where all wifi devices are listed under WLAN -> Network. For Mac the free application LanScan can be used to run a scan of your network and detemrin the respective MAC address.
Open the FHEM configuration file fhem.cfg and add the following code. Replace the MAC address behind allowed with the one of your dash button. You can write multiple MAC addresses after each other if you separate them by
,. The MAC address should be written in small caps.define DashButton dash_dhcp attr DashButton allowed ac:66:be:e3:fb:fe attr DashButton port 6767 attr DashButton room dashbutton define n_DashButton1 notify DashButton:ac-66-be-e3-fb-fe..short IF ([YourFHEMDevice] eq "on") (set YourFHEMDevice off) ELSE (set YourFHEMDevice on)Replace in the
notifycommandYourFHEMDevicewith the name of your FHEM device that you want to switch on or off and make sure that the MAC adress is written with dashes. Don’t forget to save!Multiple dash buttons can be separated by commas.
attr DashButton allowed ac:66:be:e3:fb:fe,ac:66:be:e3:fa:31Now You need to forward the data from port 67 to port 6767. DHCP requests arrive always through port 67 and that port can only be accessed with root access rights. FHEM is usually started without root rights.
In case your FHEM server in implemened in the network via a wifi domgle execute the following command in the terminal.
sudo iptables -I PREROUTING -t nat -i wlan0 -p udp --src 0.0.0.0 --dport 67 -j DNAT --to 0.0.0.0:6767In case the FHEM server is implemented via a ethernet cable use the following command.
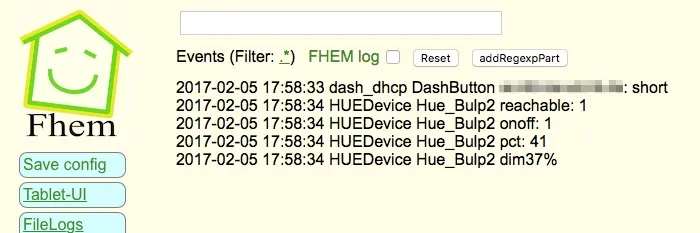
sudo iptables -I PREROUTING -t nat -i eth0 -p udp --src 0.0.0.0 --dport 67 -j DNAT --to 0.0.0.0:6767You should be now able to switch your FHEM device on or off with the Amazon dash button. In order to check if the dash button is recognized by FHEM you can use the Event monitor in the FHEM web interface in the left sidebar. After clicking the dash button, dash_dhcp DashButton ac-66-be-e3-fb-fe: short should appear in the monitor.
The forwarding of the ports via iptables needs to be set after a restart.
Install the application iptables-persistent that the fowarding is loaded automatically after a restart.
sudo apt-get update && sudo apt-get install -y iptables-persistentDuring the installation of iptables-persistent a couple of settings need to be made. Confirm all with YES.
You can now write the port forward for the dash button in the file rules.v4.
sudo nano /etc/iptables/rules.v4Add the forward before the last
COMMIT. (Ethernet cable)-I PREROUTING -t nat -i eth0 -p udp --src 0.0.0.0 --dport 67 -j DNAT --to 0.0.0.0:6767(WIFI Dongle)
-I PREROUTING -t nat -i wlan0 -p udp --src 0.0.0.0 --dport 67 -j DNAT --to 0.0.0.0:6767Exit the Nano text editor with ctrl+x and save the changes.
After a restart with
sudo rebootthe rules.v4 file is loaded automatically and the port forwarding should work.ALTERNATIVE In case the fowarding via rules.v4 does not work, you can try this alternative option. Open the /etc/rc.local file. This file is executed during every system start.
sudo nano /etc/rc.localand add the command for the forwarding before
exit 0. (Ethernet cable)sudo iptables -I PREROUTING -t nat -i eth0 -p udp --src 0.0.0.0 --dport 67 -j DNAT --to 0.0.0.0:6767(WIFI dongle)
sudo iptables -I PREROUTING -t nat -i wlan0 -p udp --src 0.0.0.0 --dport 67 -j DNAT --to 0.0.0.0:6767
Option 2: with NodeJS and Dasher
- FHEM Server can be connected to the network via ethernet cable
- Multiple Amazon dash buttons can be used
- Flexible as other services, such as, Zapier or IFTTT can be pinged via HTTP GET and POST Request.- Additional software is required
As first step the package lists need to be updated and the required applications git & libpcap-dev need to be installed.
sudo apt-get update && sudo apt-get install libpcap-devFurthermore, the current version of Node.js (v6.5.0) is required. Detailed Tutorial Add the Node.js source to your package list.
curl -sL https://deb.nodesource.com/setup_6.x | sudo -E bash -You can now install Node.js.
sudo apt-get install -y nodejsAs next step you can download and install the Node.js application “Dasher”. Navigate with
cd ~/into your home folder and copy Dasher from Github.git clone https://github.com/maddox/dasher.gitNavigate to the Dasher directory
cd dasherNow the required programs and dependencies of Dasher need to be installed.
npm installDasher requires the MAC address of your dash button which are easily found. Log into your router and have a look at the connected devices. You can also use the program “find-button” that is provided by Dasher.
script/find_button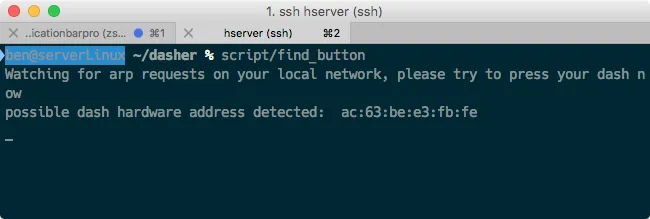 Press after “find-button” was started the dash button. The program should show the MAC address. Copy the MAC address and close the program with
 ctrl+con a Mac orstrg+cin Windows.Now you need to adjust the URL in the Dasher config/config.json file the way you want.
nano config/config.json{"buttons":[ { "name": "Dash1", "address": "ac:61:b3:e1:fa:fe", "url": "http://127.0.0.1:8083/fhem?cmd=set%20DashButton1%20toggle", "method": "POST", "json": true, "body": {"value1": "any value", "value2": "another value"} } ]}The IP
127.0.0.1points always to the local computer, i.e. himself. As alternative you can writehttp://localhost:8083/fhem?cmd=set%20DashButton1%20toggle.Start Dasher and press the button to check if everything works. If everything is fine the terminal should show “Dash1 pressed”. Dasher and your button work and FHEM can be configured. You can close the program with ctrl+c.
sudo npm run startConfigure FHEM for the Dash Button
Open the FHEM configuration file fhem.cfg and add the following code. Define in FHEM a Dummy for the dash button. Here is a good help for beginners.
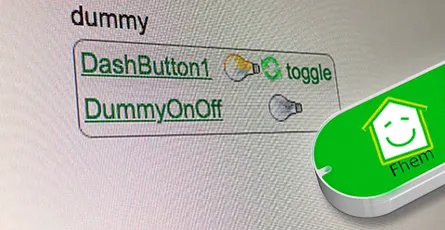
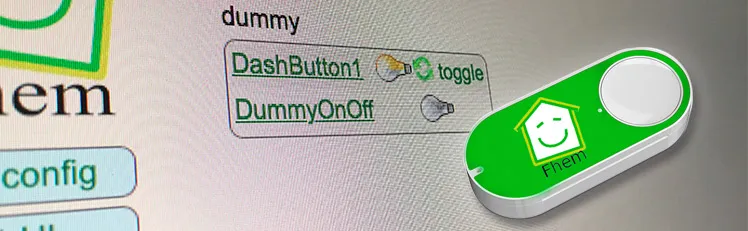
define DashButton1 dummy
attr DashButton1 webCmd toggle
Create a
notifythat turns your FHEM device on or off. ReplaceYourFHEMDevicewith the name of your FHEM device. Save the cfg file. In case you have closed Dasher, you can start it withsudo npm run startand press the dash button.define n_DashButton1 notify DashButton1.* IF ([YourFHEMDevice] eq "on") (set YourFHEMDevice off) ELSE (set YourFHEMDevice on)Explenation: The Dummy DashButton1 will be define n_DashButton1[name of the notify] notify[the command] DashButton1.*[in case of a change of the Dummy Reading, then] IF ([YourFHEMDevice] eq “on”) [check if Reading of YourFHEMDevice is on, then] (set YourFHEMDevice off) [set YourFHEMDevice Reading to off] ELSE (set YourFHEMDevice on) [otherwise set YourFHEMDevice Reading to on]
To configure the dash button to turn off multiple FHEM devices, use the following configuration. Again, replace
YourFHEMDeviceandYourFHEMDevice1with your FHEM devices names. You can write as many devices as you want behind each other as long as they are separated by;;.define n_DashButton1 notify DashButton1.* set YourFHEMDevice off;; set YourFHEMDevice1 offSet up Dasher Autostart
After every system start the Dasher Programm would need to be reconfigured by hand. Set up a Init script for Dasher that the Dasher runs as a service runs in the background and is started when the system is started. Tutorial
 You can see here roughly the time the setup needs to react.