- 14 Apr, 2026
- 4 min read
Setting up the Penpot MCP Server with Docker and Traefik (Self-Hosted)
A walkthrough of getting the official Penpot MCP server running as a Docker container behind a Traefik reverse proxy, so Claude Code (or any MCP client) can interact with a self-hosted Penpot instance. Environment:Self-hosted Penpot 2.14 via Docker Compose Traefik v2 reverse proxy Domain: custom subdomain (mcp.example.com) MCP client: Claude Code CLIArchitecture The @penpot/mcp package runs three services inside one container:Port Purpose4400 Plugin UI (Vite dev server) — serves manifest.json and plugin.js4401 MCP HTTP server — what Claude Code connects to4402 WebSocket server — what the Penpot browser plugin connects toThe browser plugin (loaded inside Penpot) connects via WebSocket to port 4402. Claude Code connects via HTTP to port 4401. The manifest and plugin JS are served from port 4400.Hickup 1: sh: pnpm: not found Problem: The penpot-mcp binary runs corepack pnpm run bootstrap on every startup. The bootstrap script spawns a subshell running pnpm -r install && pnpm run build && pnpm run start. Even after installing pnpm, the subshell couldn't find it. Attempts that failed:npm install -g pnpm — pnpm installed but not visible in bootstrap subshell corepack enable alone — creates a shim but doesn't download the actual pnpm binaryFix: Use corepack prepare pnpm@latest --activate — this actually downloads and activates the pnpm binary, not just a shim. Also switch from node:22-alpine (busybox ash) to node:22-slim (Debian) for more predictable shell PATH behavior. FROM node:22-slim ENV PNPM_HOME="/pnpm" ENV PATH="$PNPM_HOME:$PATH" RUN corepack enable && corepack prepare pnpm@latest --activate && npm install -g @penpot/mcp@latestHickup 2: Vite blocks the custom domain Problem: The plugin UI (port 4400) is a Vite dev server. Vite 6+ blocks requests with a Host header that isn't localhost. When Traefik forwarded https://mcp.example.com/manifest.json to the container, Vite returned: Blocked request. This host ("mcp.example.com") is not allowed. To allow this host, add "mcp.example.com" to `preview.allowedHosts` in vite.config.js.Fix: Add a Traefik middleware that rewrites the Host header to localhost:4400 before the request reaches Vite. Vite always allows localhost. - traefik.http.middlewares.penpot-mcp-host.headers.customrequestheaders.Host=localhost:4400 - traefik.http.routers.penpot-mcp-plugin.middlewares=penpot-mcp-hostHickup 3: Plugin manifest URL rejected by Penpot Problem: Penpot plugin manager said "The plugin doesn't exist or the URL is not correct" when entering the manifest URL. Root cause 1: Using http:// URL from an HTTPS Penpot instance. Browsers block mixed content — Penpot's frontend JS cannot fetch an HTTP resource from an HTTPS page. Always use https:// for the manifest URL. Root cause 2: The WebSocket URL (ws://localhost:4402) is burned into plugin.js at Vite build time via the WS_URI environment variable. Without setting this, the plugin tries to connect to ws://localhost:4402 — which fails as mixed content from an HTTPS origin. Fix: Set WS_URI in the container environment so Vite bakes the correct WSS URL into plugin.js during the startup build: environment: WS_URI: "wss://mcp.example.com/ws"Hickup 4: Wrong environment variable names Problem: The @penpot/mcp README documents several environment variables (PENPOT_MCP_SERVER_ADDRESS, MCP_PORT, PLUGIN_PORT, etc.) that are never actually read by the source code. Setting them has no effect. Variables that actually work: PENPOT_MCP_SERVER_HOST: "0.0.0.0" # bind address for MCP HTTP server PENPOT_MCP_SERVER_PORT: "4401" # MCP HTTP port PENPOT_MCP_WEBSOCKET_PORT: "4402" # WebSocket port PENPOT_MCP_PLUGIN_SERVER_HOST: "0.0.0.0" # bind address for Vite plugin server PENPOT_MCP_REMOTE_MODE: "true" # disables local filesystem tool WS_URI: "wss://mcp.example.com/ws" # WebSocket URL baked into plugin.jsHickup 5: WebSocket needs its own Traefik route Problem: Port 4402 (WebSocket) must be reachable as wss:// from the browser (mixed content rules apply). Simply exposing port 4402 on the host doesn't help — the browser can't use plain ws:// from an HTTPS page. Fix: Add a dedicated Traefik router for /ws that proxies to port 4402. Traefik handles WebSocket upgrades natively — no special configuration needed beyond routing the path. - traefik.http.middlewares.penpot-mcp-ws-strip.stripprefix.prefixes=/ws - traefik.http.routers.penpot-mcp-ws.rule=Host(`mcp.example.com`) && PathPrefix(`/ws`) - traefik.http.routers.penpot-mcp-ws.service=penpot-mcp-ws-svc - traefik.http.routers.penpot-mcp-ws.middlewares=penpot-mcp-ws-strip - traefik.http.routers.penpot-mcp-ws.priority=30 - traefik.http.services.penpot-mcp-ws-svc.loadbalancer.server.port=4402Final Working Docker Compose Service Replace mcp.example.com with your actual domain. penpot-mcp: build: context: . dockerfile_inline: | FROM node:22-slim RUN apt-get update && apt-get install -y --no-install-recommends \ ca-certificates git python3 make g++ \ && rm -rf /var/lib/apt/lists/* RUN corepack enable && corepack prepare pnpm@latest --activate RUN npm install -g @penpot/mcp@latest WORKDIR /usr/local/lib/node_modules/@penpot/mcp RUN corepack pnpm -r install CMD ["corepack", "pnpm", "run", "bootstrap"] container_name: penpot-mcp environment: PENPOT_MCP_SERVER_HOST: "0.0.0.0" PENPOT_MCP_SERVER_PORT: "4401" PENPOT_MCP_WEBSOCKET_PORT: "4402" PENPOT_MCP_REMOTE_MODE: "true" PENPOT_MCP_PLUGIN_SERVER_HOST: "0.0.0.0" WS_URI: "wss://mcp.example.com/ws" networks: - proxy-traefik-network restart: unless-stopped labels: - traefik.enable=true - traefik.docker.network=proxy-traefik-network # Router 1: MCP HTTP/SSE API (priority 20) - traefik.http.routers.penpot-mcp-api.rule=Host(`mcp.example.com`) && (PathPrefix(`/mcp`) || PathPrefix(`/sse`) || PathPrefix(`/messages`)) - traefik.http.routers.penpot-mcp-api.entrypoints=websecure - traefik.http.routers.penpot-mcp-api.tls=true - traefik.http.routers.penpot-mcp-api.tls.certresolver=myresolver - traefik.http.routers.penpot-mcp-api.service=penpot-mcp-api-svc - traefik.http.routers.penpot-mcp-api.priority=20 - traefik.http.services.penpot-mcp-api-svc.loadbalancer.server.port=4401 # Router 2: WebSocket bridge — /ws → port 4402 (priority 30) - traefik.http.middlewares.penpot-mcp-ws-strip.stripprefix.prefixes=/ws - traefik.http.routers.penpot-mcp-ws.rule=Host(`mcp.example.com`) && PathPrefix(`/ws`) - traefik.http.routers.penpot-mcp-ws.entrypoints=websecure - traefik.http.routers.penpot-mcp-ws.tls=true - traefik.http.routers.penpot-mcp-ws.tls.certresolver=myresolver - traefik.http.routers.penpot-mcp-ws.service=penpot-mcp-ws-svc - traefik.http.routers.penpot-mcp-ws.middlewares=penpot-mcp-ws-strip - traefik.http.routers.penpot-mcp-ws.priority=30 - traefik.http.services.penpot-mcp-ws-svc.loadbalancer.server.port=4402 # Router 3: Plugin UI / manifest.json / plugin.js catch-all (priority 10) # Rewrite Host header so Vite accepts the request - traefik.http.middlewares.penpot-mcp-host.headers.customrequestheaders.Host=localhost:4400 - traefik.http.routers.penpot-mcp-plugin.rule=Host(`mcp.example.com`) - traefik.http.routers.penpot-mcp-plugin.entrypoints=websecure - traefik.http.routers.penpot-mcp-plugin.tls=true - traefik.http.routers.penpot-mcp-plugin.tls.certresolver=myresolver - traefik.http.routers.penpot-mcp-plugin.middlewares=penpot-mcp-host - traefik.http.routers.penpot-mcp-plugin.service=penpot-mcp-plugin-svc - traefik.http.routers.penpot-mcp-plugin.priority=10 - traefik.http.services.penpot-mcp-plugin-svc.loadbalancer.server.port=4400Connecting Claude Code Add the MCP server globally: claude mcp add penpot -t http https://mcp.example.com/mcpOr edit ~/.claude.json directly under .mcpServers: "penpot": { "type": "http", "url": "https://mcp.example.com/mcp" }Installing the Plugin in PenpotOpen any Penpot file Main menu → Plugins → Manage plugins Add: https://mcp.example.com/manifest.json Open the plugin panel → click Connect to MCP serverOnce connected, Claude Code can create and manipulate shapes directly on the canvas.NotesThe bootstrap script runs pnpm -r install && pnpm run build && pnpm run start on every container start. Pre-installing deps in the image (RUN corepack pnpm -r install) cuts startup time significantly — the build step still runs at startup so WS_URI gets baked into plugin.js. Build time for the Docker image is ~5–10 minutes on first run (apt + npm + pnpm deps). An alternative, simpler MCP server using the Penpot REST API (no browser plugin required): zcube/penpot-mcp-server. Limitations vs @penpot/mcp: Uses the Penpot REST API — no direct canvas manipulation (can't create/move shapes in real time like the plugin API can) Self-hosted Penpot requires the enable-access-tokens feature flag set in your Penpot config before an access token can be generated Requires generating a personal access token in Penpot Settings and passing it as PENPOT_ACCESS_TOKEN No live design interaction — operations go through HTTP round-trips to the Penpot backend, not directly into the open design file

- 18 Sep, 2017
- 4 min read
Create Your Own 3D Printed Topographical Map - mini mountain raised relief maps
You climbed on top of one of the highest moutains and want to make a small 3D model of the landscape? Such a minature mountain is a nice gift for climbers, skier or a memory of a beautiful moment. In this tutorial you will learn how you can print a minature landscape with a 3D printer and what you need to take care of. Tombola You can win 1 of 3 3D printed model of the landscape or mountain of your choice with the size of 10 cm by 10 cm. Share this article pubicly on Facebook (until 22.10.2017) and write the area for the model and the link into the comment section below the article. Free shipping only to Germany. Buy Minature Landscape or Mountain If you do not have the possibility to print the model yourself I can happily provide you an offer (invoice including VAT). You can send inquiries via email or through the contact form. Models up to 23 cm width and length are possible. ContentsWhat is a Topographic Map? A topographic map is a map that is used to display exactly the landform (topography) and other visible details of the earth's surface. The landform is usually shown with contour lines which are completed with prominent spoit heights, such as peaks or summits, as well as the route of waters.How to Create a STL 3D Printing File from Google's Topographic Map? Option 1: Terrain2STLFree Quick and simple Crashes sometimes while using large areas No preview of the STL file Only rectangular selections can be created The simplest way to create a STL file from a topographic map is to use the website Terrain2STL.Search the desired area via drag&drop on the google map.Click on "Center to View" under Location. A red square will be shown in the middle of the map. This is the area that will be used for the 3D model.You can fine tune the details of the 3D model to the map in the section "Model Details". Box Size: Size of the marked area Box Scaling Factor: The marked are can be increased with this option, however, details in the 3D model will be reduced Box Rotation: The marked area can be rotated Vertical Scaling: Higher values increase the differences in heights in the 3D model The height of the ground can be set in the section "Water and Base Settings" -> "Base Height". Problems with Terrain2STL Unfortunately, the area for the model cannot be adjusted in wigth or height. If so, one could make a elongated map. An option would be to use a program such as Meshmixer to adjust the model to your own wishes and needs. During the generation of large models, Terrain2STL crashed sometimes. Nevertheless, the page is helpful and free of charge. You can support the developer here. Option 2: Sightline MapsFree Preview of the 3D model in the browser Colored 3D model (OBJ-Datei) will be exported STL file is too detailed an can be, depending of the selection, several GB large You can create the STL file on the website sightlinemaps.com The service is free, you only need to register with your email. In the following image all 4 steps are marked that are required to create a topographic STL file. The scale of the height can be adjusted on the next page. Download the single colour STL file for normal FDM and SLA printer. With the OBJ file you can create a coloured 3D print or use the topographic model in a 3D software. You will receive the Download link via email within 5 to 10 minutes.3D Print a Topographic Map with the Vase-Mode Why print the topographic map with the vase-mode? The main reason is that the printing time is reduced by almost the half and there will be no blobs at the end of the layers. Vase-Mode: 33 minures Normal: 52min (without Infill) When you print the model in the vase-mode, you need to align it vertically. This way, the details will be printed best (left image). In case you have problems during as your model falls over use a raft. 3D model of the Zugspitze, 5.5 cm x 6 cm x 0.8 cm, 50 min print duration, 0.1mm Layer height, Prusa i3 MK2 printer 3D model with a primer layer and a layer of white. ...and to make it look more naturally I painted the 3D model with acrylic paint.
- 10 Aug, 2017
- 6 min read
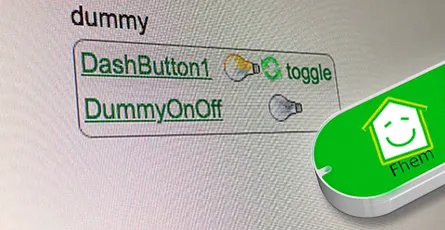
Controll FHEM devices with amazon dash button
I explained in this article how you can execute IFTTT actions with the Amazon dash button. By changing a single line of code you can switch an FHEM device. How does it work? By calling a URL (HHTP Post Request) you can tell FHEM to do soemthing. This way you can switch lights on or off, open or close shutters, turn remote contrles wall plugs on or off and a lot more. The dash button is not suitable for every application as the button has a latency of 5 to 6 seconds until a FHEM device is switched. What's required:Raspberry Pi or Debian/Ubuntu Linux computer Amazon Dash Button Running FHEMHere is a sample video how a Philips Hue lamp is turned on using a Amazon dash button and FHEM. Thanks to Hagen for that video.Contents Option 1: FHEM module dash_dhcpWorks without additional software FHEM server can be connected to the network vial ethernet cable Multiple Amazon dash buttons can be embeddedUpdate your FHEM to the newest version and install the module dash_dhcp. Here is a short tutorial how you can implement a update button in the sidebar of the FHEM web interface.Determine the MAC address of your Amazon dash button. Therefore, log into your router. I have a Fritzbox where all wifi devices are listed under WLAN -> Network. For Mac the free application LanScan can be used to run a scan of your network and detemrin the respective MAC address.Open the FHEM configuration file fhem.cfg and add the following code. Replace the MAC address behind allowed with the one of your dash button. You can write multiple MAC addresses after each other if you separate them by ,. The MAC address should be written in small caps.define DashButton dash_dhcp attr DashButton allowed ac:66:be:e3:fb:fe attr DashButton port 6767 attr DashButton room dashbuttondefine n_DashButton1 notify DashButton:ac-66-be-e3-fb-fe..short IF ([YourFHEMDevice] eq "on") (set YourFHEMDevice off) ELSE (set YourFHEMDevice on) Replace in the notify command YourFHEMDevice with the name of your FHEM device that you want to switch on or off and make sure that the MAC adress is written with dashes. Don't forget to save! Multiple dash buttons can be separated by commas.attr DashButton allowed ac:66:be:e3:fb:fe,ac:66:be:e3:fa:31Now You need to forward the data from port 67 to port 6767. DHCP requests arrive always through port 67 and that port can only be accessed with root access rights. FHEM is usually started without root rights. In case your FHEM server in implemened in the network via a wifi domgle execute the following command in the terminal.sudo iptables -I PREROUTING -t nat -i wlan0 -p udp --src 0.0.0.0 --dport 67 -j DNAT --to 0.0.0.0:6767 In case the FHEM server is implemented via a ethernet cable use the following command.sudo iptables -I PREROUTING -t nat -i eth0 -p udp --src 0.0.0.0 --dport 67 -j DNAT --to 0.0.0.0:6767You should be now able to switch your FHEM device on or off with the Amazon dash button. In order to check if the dash button is recognized by FHEM you can use the Event monitor in the FHEM web interface in the left sidebar. After clicking the dash button, dash_dhcp DashButton ac-66-be-e3-fb-fe: short should appear in the monitor. The forwarding of the ports via iptables needs to be set after a restart. Install the application iptables-persistent that the fowarding is loaded automatically after a restart.sudo apt-get update && sudo apt-get install -y iptables-persistent During the installation of iptables-persistent a couple of settings need to be made. Confirm all with YES. You can now write the port forward for the dash button in the file rules.v4. sudo nano /etc/iptables/rules.v4 Add the forward before the last COMMIT. (Ethernet cable)-I PREROUTING -t nat -i eth0 -p udp --src 0.0.0.0 --dport 67 -j DNAT --to 0.0.0.0:6767 (WIFI Dongle)-I PREROUTING -t nat -i wlan0 -p udp --src 0.0.0.0 --dport 67 -j DNAT --to 0.0.0.0:6767 Exit the Nano text editor with ctrl+x and save the changes. After a restart with sudo reboot the rules.v4 file is loaded automatically and the port forwarding should work. ALTERNATIVE In case the fowarding via rules.v4 does not work, you can try this alternative option. Open the /etc/rc.local file. This file is executed during every system start.sudo nano /etc/rc.local and add the command for the forwarding before exit 0. (Ethernet cable)sudo iptables -I PREROUTING -t nat -i eth0 -p udp --src 0.0.0.0 --dport 67 -j DNAT --to 0.0.0.0:6767 (WIFI dongle)sudo iptables -I PREROUTING -t nat -i wlan0 -p udp --src 0.0.0.0 --dport 67 -j DNAT --to 0.0.0.0:6767Option 2: with NodeJS and DasherFHEM Server can be connected to the network via ethernet cable Multiple Amazon dash buttons can be used Flexible as other services, such as, Zapier or IFTTT can be pinged via HTTP GET and POST Request.- Additional software is requiredAs first step the package lists need to be updated and the required applications git & libpcap-dev need to be installed. sudo apt-get update && sudo apt-get install libpcap-dev Furthermore, the current version of Node.js (v6.5.0) is required. Detailed Tutorial Add the Node.js source to your package list. curl -sL https://deb.nodesource.com/setup_6.x | sudo -E bash - You can now install Node.js. sudo apt-get install -y nodejsAs next step you can download and install the Node.js application "Dasher". Navigate with cd ~/ into your home folder and copy Dasher from Github. git clone https://github.com/maddox/dasher.git Navigate to the Dasher directory cd dasher Now the required programs and dependencies of Dasher need to be installed. npm installDasher requires the MAC address of your dash button which are easily found. Log into your router and have a look at the connected devices. You can also use the program "find-button" that is provided by Dasher. script/find_button Press after "find-button" was started the dash button. The program should show the MAC address. Copy the MAC address and close the program with ctrl+c on a Mac or strg+c in Windows.Now you need to adjust the URL in the Dasher config/config.json file the way you want. nano config/config.json{"buttons":[ { "name": "Dash1", "address": "ac:61:b3:e1:fa:fe", "url": "http://127.0.0.1:8083/fhem?cmd=set%20DashButton1%20toggle", "method": "POST", "json": true, "body": {"value1": "any value", "value2": "another value"} } ]} The IP 127.0.0.1 points always to the local computer, i.e. himself. As alternative you can write http://localhost:8083/fhem?cmd=set%20DashButton1%20toggle.Start Dasher and press the button to check if everything works. If everything is fine the terminal should show "Dash1 pressed". Dasher and your button work and FHEM can be configured. You can close the program with ctrl+c. sudo npm run startConfigure FHEM for the Dash Button Open the FHEM configuration file fhem.cfg and add the following code. Define in FHEM a Dummy for the dash button. Here is a good help for beginners.define DashButton1 dummy attr DashButton1 webCmd toggleCreate a notify that turns your FHEM device on or off. Replace YourFHEMDevice with the name of your FHEM device. Save the cfg file. In case you have closed Dasher, you can start it with sudo npm run start and press the dash button.define n_DashButton1 notify DashButton1.* IF ([YourFHEMDevice] eq "on") (set YourFHEMDevice off) ELSE (set YourFHEMDevice on) Explenation: The Dummy DashButton1 will be define n_DashButton1[name of the notify] notify[the command] DashButton1.*[in case of a change of the Dummy Reading, then] IF ([YourFHEMDevice] eq "on") [check if Reading of YourFHEMDevice is on, then] (set YourFHEMDevice off) [set YourFHEMDevice Reading to off] ELSE (set YourFHEMDevice on) [otherwise set YourFHEMDevice Reading to on] To configure the dash button to turn off multiple FHEM devices, use the following configuration. Again, replace YourFHEMDevice and YourFHEMDevice1 with your FHEM devices names. You can write as many devices as you want behind each other as long as they are separated by ;;.define n_DashButton1 notify DashButton1.* set YourFHEMDevice off;; set YourFHEMDevice1 offSet up Dasher Autostart After every system start the Dasher Programm would need to be reconfigured by hand. Set up a Init script for Dasher that the Dasher runs as a service runs in the background and is started when the system is started. Tutorial You can see here roughly the time the setup needs to react.
- 10 Aug, 2017
- 2 min read
Fhem config file (fhem.cfg) write protected
After the last major update of FHEM, the FHEM configurtion file (fhem.cfg) is write protected and cannot be changed. This protection was set in order to protect system settings and files to be changed by new users. If you click in the FHEM user interface onto Edit files and then fhem.cfg as you are used to you will see the content of the file but cannot edit it. The notification "You can enable saving this file by setting the editConfig attribute, but read the documentation first for the side effects." advises you to read the documentation before making any changes.If you are confident with the FHEM configuration file and know what you are doing you can cancel the write protection by setting the arribute editConfig to the value of 1. The easiest way to set the editConfig attribute to 1 is by typing the command attr WEB editConfig 1in the command text field in the upper region of the user interface and hitting ENTER.After that you just need to save the config file. Therefore, click onto Save config on the left side.Hint: Before making any changes to the fhem.cfg file make sure you make a backup copy of that file. In case anything goes wrong and you somehow destroy the configuration file you are able to revert to the initial state.Below you can find the initial, unedidted content of the fhem.cfg file of FHEM 5.7 attr global userattr cmdIcon devStateIcon devStateStyle icon sortby webCmd widgetOverride attr global autoload_undefined_devices 1 attr global logfile ./log/fhem-%Y-%m.log attr global modpath . attr global motd SecurityCheck:\ \ WEB,WEBphone,WEBtablet has no basicAuth attribute.\ telnetPort has no password/globalpassword attribute.\ \ Restart FHEM for a new check if the problem is fixed,\ or set the global attribute motd to none to supress this message.\attr global statefile ./log/fhem.save attr global updateInBackground 1 attr global verbose 3define telnetPort telnet 7072 globaldefine WEB FHEMWEB 8083 global attr WEB editConfig 1define WEBphone FHEMWEB 8084 global attr WEBphone stylesheetPrefix smallscreendefine WEBtablet FHEMWEB 8085 global attr WEBtablet stylesheetPrefix touchpad# Fake FileLog entry, to access the fhem log from FHEMWEB define Logfile FileLog ./log/fhem-%Y-%m.log fakelogdefine autocreate autocreate attr autocreate filelog ./log/%NAME-%Y.logdefine eventTypes eventTypes ./log/eventTypes.txt# Disable this to avoid looking for new USB devices on startup define initialUsbCheck notify global:INITIALIZED usb create
- 29 Apr, 2017
- 5 min read
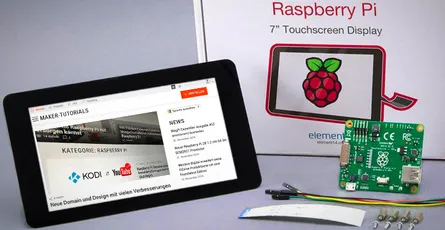
Official Raspberry Pi 7" Touch Screen LCD Display assembly guide - install and tips
This tutorial will show you how to assemble your Raspberry Pi Touchscreen, which power supply options are available and a few helpful hints. Required parts:original 7 inch LCD Touchscreen for Raspberry Pi A Raspberry Pi A+,B+, Pi 2, or Pi 3 Micro USB power adapter with a minimum of 2A Micro SD card with the most recent Raspbian, or Noobs versionContentsInstall/connect Raspberry Pi Touchscreen With the new 7 inch version the controller board is already connected to the display. You just need to connect the Raspberry Pi to the controller board.Connect the red jumper cable with the 5V pin and the black cable with GND of the touchscreen's controller board. This ways the Raspberry Pi is supplied with power through the touchscreen. Connect the flat ribbon cable (DSI) with the silverish contacts to the brown side. You can now attach the Raspberry Pi into the controller board and fix it with the screws. Attach now the red jumper cable to the GPIO pin 4 and the black cable to the GPIO pin 6. The flat ribbon cable (DSI) need to be plugged into the connector with the label "Display" (contacts to the inside). Finally you need to plug the micro usb power adapter into the controller board of the touchscreen. The setup may not be supplied with power through the Raspberry Pi as the internal fuse of the Raspberry Pi cannot handle the 400 mA that the touchscreen requires.It is possible to use the touchscreen and another screen (HDMI output) at the same time. Error Sources If the screen stays black after the start check the DSI cable (white flat ribbon cable). THE DSI connects the Raspberry Pi and the controller board of the touchscreen.Shut down the Raspberry Pi and check if the cable is connected in the correct direction. At the Raspberry Pi the silverish contacts need to point to the inside (white side of the connector). At the touch controller board the contacts need to point to the brown side of the connector.Update the operating system. sudo apt-get update && sudo apt-get dist-upgradeWhen downloading, the image can look blurry - that's normal.Alternative Power Supplies There are 3 possibilities to supply the touchscreen and the Raspberry Pi with power.Jumper Cable As described above, connect the +5V and Ground pin of the controller board of the touchscreen with the GPIO pins of the Raspberry Pi. Now the Raspberry Pi is supplied by power through the display. This variant is simple and cheap but it is impossible to attach a extention board.Y Micro USB cable You can use a micro USB Y-cable to supply both micro USB inputs at the same time. This way you can use a extension board at the Raspberry Pi requireing only one power supply.Two Power Supplies Use two micro USB poer supplies, to supply the touchscreen and the Raspberry Pi separately with power. If you use a power demanding extension board it could be required to use two power supplies. In that case the display and the Raspberry Pi need to be turned on at the same time!Rotate Image If you want to use the touchscreen in portrait mode or turned by 180° follow the steps below. I use the case from Pimoroni. For this the images needs to be rotated by 180°.Open the config.txt file with the Nano text editor. sudo nano /boot/config.txtAdd the following text at the beginning of the config.txt. lcd_rotate=2 lcd_rotate=0 Normal lcd_rotate=1 90 Degree lcd_rotate=2 180 Degree lcd_rotate=3 270 Degree lcd_rotate=0x10000 mirror horizontally lcd_rotate=0x20000 mirror verticallyQuite the editing with the shortcut ctrl+ and save the changes with y.The image should be rotated after a restart of the system. sudo rebootSet up Right Click The right click via touch needs to be set up. Two fingers for the "right mouse button" This tutorial describes how you can set up that a two-finger touch executes a right click. Long press of "right mouse button This option does not work with Raspbian Jessie.Open the file xorg.conf with the nano text editor. sudo nano /etc/X11/xorg.conf Section "InputClass" Identifier "calibration" Driver "evdev" MatchProduct "FT5406 memory based driver" Option "EmulateThirdButton" "1" Option "EmulateThirdButtonTimeout" "750" Option "EmulateThirdButtonMoveThreshold" "30" EndSection Close the editor with ctrl-x and confirm the changes with y.Restart the system sudo rebootInstall a On-Screen or Virtual Keyboard You can choose between different on-screen keyboards. I use Florence as the Matchbox keyboard has problems under Jessie and causes a constant CPU usage of 25%.Florence sudo apt-get install florence You can now activate the Florence virtual keyboard under Universal Access. In my case Florence crashed always which could be fixed after installing at-spi2-core. sudo apt-get install at-spi2-coreMatchbox Keyboard sudo apt-get install matchbox-keyboard Active the on-screen keyboard under " MENU > Accessories > Keyboard".Adjust Brightness of Backlight You can adjust the brightness of the backlight with the terminal.If you want to save power you can use the following command to adjust the brightness. sudo sh -c "echo 'Value of Brightness' >> /sys/class/backlight/rpi_backlight/brightness"Replace Value of Brightness with a number between 0 and 255. At 0 the backlight is off and at 255 the brightest value is achieved. Hide mouse poniter As descibed in the tutorial "Midori Browser in Fullscreen Mode" you can install the application unclutter to hide the mouse pointer. sudo apt-get install unclutterUnclutter starts automatically after a system start. The mouse pointer should disappear automatically after 1-2 seconds. Technical DataCompatible with Raspberry Pi A+, B+, 2 & 3 17,8 cm (7") touch display, capacitive Dimensions (LxWxH): 192.96 x 112.76mm Visible Area: 154.08 x 85.92mm Resolution: 800 x 480 Pixel Contrast: 500 Brightness: 250 cd/m2 24 bit Colours 10 Finger multi touch display Bachlight adjustable via PWM Backlight lifetime of 20000 hours Operation temperature: -20°C bis +70°C Storage temperature: -30°C bis +80°C Viewing angle: upper (50), lower (70), right (70), left (70)A technical drawing with detailled dimensions can be found here.
- 29 Apr, 2017
- 2 min read
Raspberry Ri Touch Screen setup right click with twofing - Raspbian Jessie
Unfortunately, the Raspberry Pi 7 Touchscreen does not support right-click or long touch if used with Raspbian Jessie. You can add this functionality by using a two-finger touch on the Touchscreen with the program Twofing.Contents Install TwofingYou need a few programs in order to compile Twofing. In case one of those programs is already installed apt-get will automatically recognize this.sudo apt-get update && sudo apt-get install build-essential libx11-dev libxtst-dev libxi-dev x11proto-randr-dev libxrandr-devDownload Twofing. wget http://plippo.de/dwl/twofing/twofing-0.1.2.tar.gzExtract the downloaded file. tar -xvzf twofing-0.1.2.tar.gzNavigate to the folder that was created during the extraction. cd twofing-0.1.2Start the compilation and install Twofing make && sudo make installOptional I used an original Raspberry Pi 7 Touchscreen with Raspberry Jessie and an error occured during the first start of Twofing.twofing, the two-fingered daemon Version 0.1.2.20120708/dev/twofingtouch: No such file or directory You can fix the error as following. Open the 70-touchscreen-egalax.rules file with the nano text editor. sudo nano /etc/udev/rules.d/70-touchscreen-egalax.rules Delete the complete content and add the following lines.KERNEL=="event*",ATTRS{name}=="FT5406 memory based driver",SYMLINK+="twofingtouch",RUN+="/bin/chmod a+r /dev/twofingtouch" Exit the text editor with CTRL+X and confirm the changes with YRestart the Raspberry Pi. sudo rebootDelete the obsolete folder of Twofing in the home folder. rm ~/twofing-0.1.2Start Twofing in debug mode and test with two fingers if the right-click works on the Touchscreen. twofing --debug You can exit the program with CTRL+C. When running the command through SSH and not directly on the Raspberry Pi, the command twofing --debug will not work. You must first set that Twofing uses the Touchscreen. Therefore, add the following command export DISPLAY=:0 and restart Twofing afterwards. twofing --debug In case you connected an additional monitor through HDMI you need to check the index number of the Touchscreen. You can get the index numbers of all connected monitors using who. Source: http://raspberrypi.stackexchange.com/a/27881/14517Twofing autostart In order to not start Twofing after a restart manually you can add a autostart file.Navigate to the autostart folder of your home folder. cd ~/.config/autostartCreate a file with the name twofing.desktop and open it. nano twofing.desktopAdd the following text to the file.[Desktop Entry] Type=Application Name=Twofing Exec=twofing StartupNotify=false Exit the text editor with CTRL+X and confirm the changes with Y
- 22 Apr, 2017
- 3 min read
Auto start Midori Browser in Fullscreen Kiosk Modus - Raspberry Pi Linux
I will show you in this tutorial how to start the Midori Browser in full screen mode (kiosk mode) automatically after the Raspberry booted. The graphical shell (desktop) of Rapsian will not be required or started. A pratical applicaton of this would be, for example, an info monitor on an exhibition. In this project, I want to realise a small contol center for FHEM. Therefore, a PiTFT with capacitive touch screen will be used. This, however, is covered in a later tutorial.This tutorial assumes that the Raspberyy Pi or Debian Linux computer starts in terminal/console mode and not in desktop mode loading the graphical shell. Contents Midori Full Screen AutostartRun the following command with the console to update the package list. After that the Midori browser and matchbox will be installed. sudo apt-get update && sudo apt-get install -y midori matchboxCreate a new shell script file with the name_startMidori.sh_ in the home folder and open the Nano text editor. Name and save location can be chosen as you like. nano startMidori.shAdd the following code and exit the Nano text editor ctr+x. To save the changes press Y and Enter.#!/bin/sh xset -dpms # disable DPMS (Energy Star) features. xset s off # disable screen saver xset s noblank # don't blank the video device matchbox-window-manager & midori -e Fullscreen -a https://wordpress-x0o8gcg88www8k084ks8k088.c.benroe.deMake the script excecutable. sudo chmod +x startMidori.shYou can test the script if you run the following command. sudo xinit ./startMidori.sh You can exit the Midori browser with the key combinationCTRL + ALT + F1. In case you called the scriped via SSH, you can exit the script via CTRL + c.In order to automatically excecute the script when the Raspberry starts we need to edit the rc.local file. This script is excecuted when the Raspberry starts. sudo nano /etc/rc.local Add the following code before exit 0. For HDMI: sudo xinit /home/pi/startMidori.sh & For PiTFT: FRAMEBUFFER=/dev/fb1 xinit /home/pi/startMidori.sh & The & at the end is important that the subsequent lines are excecuted. You can run the script with a time delay if you sourround the command in brackets and preprend /bin/sleep 10 && schreibst. The 10 means a delay of 10 seconds. (/bin/sleep 10 && xinit /home/pi/startMidori.sh) &Unfortunately, the system needs to sign in automatically to be able to run the script. You can set this up easily if you use Raspbian Jessie using sudo raspi-config and the selecting Console Autologin under boot options. You need to use the following command to the console if you use and older Raspbian version. sudo nano /etc/inittab Search the following line 1:2345:respawn:/sbin/getty 115200 tty1 and comment it with #. #1:2345:respawn:/sbin/getty 115200 tty1 After this line add the following command. 1:2345:respawn:/bin/login -f pi tty1 /dev/tty1 2>&1 This line enables that the user pi logs in without authentication.Now you just need to restart the Raspberry pi … sudo reboot … and the Midori browser should open with the desired webpage in full screen mode. You will exit the Midori Browser using CTRL + ALT + F1.Optional: Rotate screen If you want to show the screen in vertical mode or rotate by 180 degrees you can set this up using the following steps.Open the config.txt file with the Nano editor sudo nano /boot/config.txtAdd the following test at the beginning of the config.txt file. display_rotate=2 display_rotate=0 Normal display_rotate=1 90 degrees display_rotate=2 180 degrees display_rotate=3 270 degrees display_rotate=0x10000 Mirror horizontal display_rotate=0x20000 Mirror verticalExit the editing with the shortcut ctrl+x and save the changes with y.After a restart the screen will be shown rotated as you wanted. sudo rebootOptional: Hide mouse pointerInstall the program unclutter. sudo apt-get install unclutterAdd unclutter & to the startMidori.sh script. sudo nano startMidori.sh#!/bin/sh xset -dpms # disable DPMS (Energy Star) features. xset s off # disable screen saver xset s noblank # don't blank the video device unclutter & matchbox-window-manager & midori -e Fullscreen -a https://wordpress-x0o8gcg88www8k084ks8k088.c.benroe.deA detailed article about "[Raspberry Pi: Run Applications at System Start](http://Raspberry Pi: Programme beim Systemstart ausführen)"
- 22 Apr, 2017
- 2 min read
Automatic mount hard drive or usb stick on Raspberry Pi
Requirements:Raspbian or similar distributionUSB hard drive or Memory stick with a partition (NTFS/Fat32/HFS+/Ext4)As a first step you need to update the package lists of Raspbian and install the drivers for NTFS and HFS+. sudo apt-get update && sudo apt-get -y install ntfs-3g hfsutils hfsprogsCreate a new folder in the directory /media in which you later on will mount the memory stick or USB hard drive. You can name the folder as you like, however, do not use special characters or spaces. Furthermore, change the owner of the folder to pi. In case you use a different user name you need to replace pi in the command below by the name you use.sudo mkdir /media/usbhdd sudo chown pi /media/usbhdd "In oder to attach a file system a mount point has to exist. A mount point is an empty folder through which additional file systems are mouted and accessed." ubuntuusers.deAttach the storage medium to the Raspberry.Now you need the path to the partition of the storage medium (in this case it is /dev/sda1). sudo fdisk -lFor the moment you manually include the storage medium with the following command. Replace /dev/sda1 with the path to the partion of the storage medium that we just figured. Ext4 sudo mount /dev/sda1 /media/usbhdd NTFS sudo mount -t ntfs-3g -o uid=pi,gid=pi /dev/sda1 /media/usbhdd/ HFS+ sudo mount -t hfsplus -o force.uid=pi,gid=pi /dev/sda1 /media/usbhdd/ FAT32 sudo mount -t vfat -o uid=pi,gid=pi /dev/sda1 /media/usbhdd/ From this point on you can already access the storage medium with cd /media/usbhdd/.</>We need the UUID of the hard drive that the storage medium will be automatically mounted after a restart. Enter the following command into the console: sudo blkid "UUID stands for Universally Unique Identifier and is a standard to identify information in computers. Each Linux file system has a UUID through which it can be identified. As an alternative the file systems can be identified through a device file /dev/sdaX but the labels can change in this case. " ubuntuusers.deOpen the file fstab with the Nano text editor sudo nano /etc/fstab and add one of the lines for your file system. Replace the UUID that you determined in the previous step. Exit the Nano editor afterwards with Strg+x (Win) ctrl+x (Mac) and confirm the changes with y or j ( depending on your language settings.#Ext4 UUID=13aa0627-fb13-4d2f-8d3f-53aea43b9439 /media/usbhdd ext4 defaults 0 0#NTFS UUID=10BF-F2D6 /media/usbhdd/ ntfs-3g defaults,umask=000,users 0 0#HFS+ UUID=10BF-F2D6 /media/usbhdd/ hfsplus defaults,umask=000,users 0 0#FAT32 UUID=10BF-F2D6 /media/usbhdd/ vfat defaults,umask=000,users 0 0 More information about fstab can be found here.Done! You can now access your files on the usb hard drive or memory stick and the drive will be mounted automatically after a restart.
- 22 Apr, 2017
- 1 min read
Enable UART Port on Raspberry Pi
By standard the UART interface is configured as serial console. If you want to use the UART interface for other things, e.g. for a GPS module, the standard function needs to be deactivated. Open the cmdline.txt file with the Nano text editor. sudo nano /boot/cmdline.txt and remove the following part from the file. console=ttyAMA0,115200 kgdboc=ttyAMA0,115200 The content of the file should look like this dwc_otg.lpm_enable=0 console=tty1 root=/dev/mmcblk0p2 rootfstype=ext4 elevator=deadline rootwait Exit the editor with ctrl+x and save the changes using y.Open inittab sudo nano /etc/inittab and search for the following line. T0:23:respawn:/sbin/getty -L ttyAMA0 115200 vt100 Insert a # at the beginning of the line to comment this line. Doing so the line should look like this. #T0:23:respawn:/sbin/getty -L ttyAMA0 115200 vt100 Exit the editor the same ways as in the previous step.From Kernel 3.18.x on the following step must be excecuted aditionally. sudo nano /boot/config.txt Search for the following line and remove the # at the beginning of the line. #dtparam=spi=on Exit the editor the same ways as in the previous step. Show kernel version uname -aRestart RPI. sudo reboot
- 22 Jan, 2017
- 1 min read
FHEM Tip #1: update and restart button in FHEM sidebar
Click on Edit files in the side bar and then fhem.cfgCopy the following code into the fhem.cfg file and click on save fhem.cfg. attr WEB menuEntries Update,cmd=update,UpdateCheck,cmd=update+check,Restart,cmd=shutdown+restartAfter the page was reloaded, three new menue entries should appear in the side bar, namelyUpdate: updated FHEM to the most recent version (requires restart) UpdateCheck: show the latest changes Restart: restart the FHEMIf you cannot edit the fhem.cfg file please have a look at this short tutorial.

- 22 Jan, 2017
- 1 min read
Guide to Installing Node.js on a Raspberry Pi
Node.js is a open source platform to create network applications using JavaScript. The applications are executed on the server and not as usual on the client in the browser. Integrated modules, such as the HTTP-module, enable the realisation of web servers. Additional modules can be simply installed using the supplied package manager npm. Update 04.09.2016: - Added further, alternative guideContent Install Node.js - Option #1 (Raspberry Pi B+ and older)As a first step you need to download the ARM package that is optimised for Node.js.wget http://node-arm.herokuapp.com/node_latest_armhf.debNode.js can now be installed usingsudo dpkg -i node_latest_armhf.debNode.js and the package manager npm are now installed. You can check the installed version unsing node -v. Install Node.js - Option #2 (Raspberry Pi 2/3 and newer)Add the Node.js source to your package list.curl -sL https://deb.nodesource.com/setup_6.x | sudo -E bash -Node.js can now be installed usingsudo apt-get install -y nodejs You can check the installed version unsing nodejs -v.Test Node.js with a "Hello World" applicationCreate a JavaScript file usingsudo nano helloWorld.js and add the following code:var http = require('http'); http.createServer(function (request,response) { response.writeHead(200, {'Content-Type': 'text/plain'}); response.end('Hello World!\n'); }).listen(8000) console.log('Web Server running at http://127.0.0.1:8000');Execute the script with:node helloWorld.jsOpen the browser and go to the address.http://IP-Adresse-des-Raspberry:8000/

- 22 Jan, 2017
- 3 min read
Spin Down and Manage Hard Drive Power on Raspberry Pi - sleep hdd hd-idle
This is an example how you to set the hard drive into a standby or hibernate mode after a defined time. This saves power and protects the hard drive in continuous or server use. Requirements:A mounted USB hard drive (Tutorial)As a first step we need to update the package lists of Raspbian. We further need to install hdparm. sudo apt-get update && sudo apt-get -y install hdparmTo figure the name under which the hard drive is mounted in the system we need to use the following command. In this example, it is /dev/sda sudo fdisk -lWe check the current power mode status. In case it returns the status unknown, it is impossible to set the hard drive to a standby mode. Your HDD does not support spin down/hd-idle. sudo hdparm -C /dev/sda "-C shows the current "Power-Mode-Status" of an IDE hard drive. The return value can have the following states:"unknown" - The hard drive does not support the command "active"/"idle" - Standard operation "standby" - Low power mode, the hard drive does not spin or even sleeps completely The options -S, -y, -Y and -Z can be used to change the IDE power mode. wiki.debianforum.deWe use the parameter -y to set the hard drive to the standby mode. The hard drive should now be completely quiet. The command sudo hdparm -C /dev/sda can be used to check if the hard drive is in standy mode. As soon as the hard drive is accessed it should start to spin again. sudo hdparm -y /dev/sdaNow we need the UUID of the hard drive. Type the following command into the console and note the UUID of the hard drive. sudo blkidOpen the hdparm config file with the text editor Nano. sudo nano /etc/hdparm.conf Replace yourUUID with the previously noted UUID and add the text shown below at the end of the file. Exit the Nano text editor afterwards with Strg+x (Win) ctrl+x (Mac) and confirm the changes with y or j (depending on your language settings)./dev/disk/by-uuid/yourUUID { spindown_time = 240 } The number behind spindown_time tells after what time the hard drive will be set to its standby mode. Choose the time not to short as a continuous start-up of the hard drive will harm its motor and mechanics. 0 = Standy activated 60 = 5Min (60*5Sec=300Sec=5Min) 240 = 20Min (240*5Sec=1200Sec=20Min) From 240 the calcuation changes 241 = 30Min (1*30Min) 242 = 60Min (2*30Min)Now restart the system with the command shown below. After that the hard drive will automatically go into standby mode after the time you have set. sudo reboot
- 21 Jan, 2017
- 2 min read
Install FHEM on a Raspberry Pi or Debian Linux
What is FHEM? FHEM is a open source server for home automation that is written in Perl. It can perform repeating tasks at home, such as, switching lights, heating, rolling shutters. It can also record an visualise data such as temperature, humidity, power consumption. Optional Step (Rasperry Pi only): sudo raspi-configSelect the menu Expand FilesystemAfter that Internationalisation Options -> Change Timezone and select the time zone of the current location (this is important for the correct time settings in FHEM)We can now proceed with the installation of FHEMUpdate the packages, install updates, remove unnecessary packages and reboot the system. sudo apt-get update && sudo apt-get upgrade -y && sudo apt-get autoremove -y && sudo rebootInstall required packages sudo apt-get -f install && sudo apt-get install perl libdevice-serialport-perl libio-socket-ssl-perl libwww-perl libxml-simple-perl -yDownload and install the current FHEM version (Replace 5.7 in the code snippet with the current version number) http://fhem.de/fhem.html#Download) sudo wget http://fhem.de/fhem-5.7.deb && sudo dpkg -i fhem-5.7.debDelete installation file sudo rm fhem-5.7.debSetting user access rights for the FHEM folder cd /opt sudo chmod -R a+w fhemAdd the current user and FHEM to the group tty to gain read/write access for this device (it is important later on when receiver are connected via USB, e.g. CUL) sudo usermod -a -G tty pi && sudo usermod -a -G tty fhem Replace pi in the code snippet by the currently used user name. You can get the current user name through the terminal command whoami.Open the url http://192.168.x.y:8083/fhem/ in a browser of your choice and the FHEM web interface should appear (Replace xy with the IP adress of the Raspberry Pi).Hint: The FHEM configuration file "fhem.cfg" is read-only after a fresh installation of FHEM. I describe how you can change the write protection in the following article. https://wordpress-x0o8gcg88www8k084ks8k088.c.benroe.de/fhem-konfigurations-datei-fhem-cfg-kann-nicht-bearbeitet-werden/

- 20 Jan, 2017
- 1 min read
Show sunrise and sunset time in FHEM
In this tutorial I will guide you how to show the sunrise time in FHEM Prerequesites: - a working FHEM version Open the FHEM configuration file (fhem.cfg) under Edit files.Add the following global attributes to set your location. attr global latitude 51.345753 attr global longitude 12.38213 Replace the latitude and longitude values with your desired location. The decimal values of your location can be determined here.To save the values for sunrise and sunset we are going to create two dummies define Sunrise dummy define Sunset dummyAs the values need to be generated every day after 12 pm we define the following function define sun_riseSet_timer at *03:00:00 { my $s = sunrise();; fhem("set Sunrise $s");; $s = sunset();; fhem("set Sunset $s");; } This way, the next time of sunrise and sunsets will be set every day at 0.05 am to the dummies.Now we need to assign the room "Weather" to the dummies attr Sonnenaufgang room Weather attr Sonnenuntergang room WeatherFinally, your code should look like this:attr global latitude 51.339695 attr global longitude 12.373075############## Sunrise/Sunset ###################define Sunrise dummy attr Sunrise room Weatherdefine Sunset dummy attr Sunset room Weatherdefine sun_riseSet_timer at *00:05:00 { my $s = sunrise();; fhem("set Sunrise $s");; $s = sunset();; fhem("set Sunset $s");; }You can use the following commands if you want to know the brightness of the sunrise or sundown sunrise("REAL"); #Sun rises or sets at horizon sunrise("CIVIL"); #The sun is behind the horizon but it is still bright sunrise("NAUTIC") #Shapes can be still distinguished against the horizon (e.g. on the sea) sunrise("ASTRONOMIC") #It is completely darkMore information to sunrise() can be found on the Commandref page. Please leave a comment if you have questions or ideas.
- 06 Jul, 2016
- 1 min read
Install Discourse with Docker in a Subfolder with SSL and serve other content with nginx under the same domain
Discourse is a great free and open-source forum software. There is an Linux installation guide with docker, but Discourse runs with a subdomain like discourse.example.com. I want Discourse run in a subfolder like example.com/forum. There is a guide how to do this, but how to configure the nginx server to serve other content (example.com/index.html or example.com/otherContent) on the same machine?install discourse with docker on a linux server https://github.com/discourse/discourse/blob/master/docs/INSTALL-cloud.mdchange the port of the docker container and setup SSL with Let's Encrypt (don't use the subdomain like discourse.example.com use example.com) https://www.digitalocean.com/community/tutorials/how-to-install-discourse-behind-nginx-on-ubuntu-14-04create a folder for all the other content for your sitesudo mkdir -p /var/www/example.com/htmlif necessary change the owner to you or www-data sudo chown -R www-data:www-data /var/www/example.com/htmlThis is the root folder for your domain example.com Dont create a forum folder here, it will cause a conflict with the discourse docker redirect!change the /etc/nginx/sites-enabled/discourse to this and replace http://discourse.example.com with your url (use main url not subdomain)server { listen 80; server_name example.com; return 301 https://example.com$request_uri; } server { listen 443 ssl spdy; server_name example.com; ssl_certificate /etc/letsencrypt/live/example.com/fullchain.pem; ssl_certificate_key /etc/letsencrypt/live/example.com/privkey.pem; ssl_protocols TLSv1 TLSv1.1 TLSv1.2; ssl_ciphers 'ECDHE-RSA-AES128-GCM-SHA256:ECDHE-ECDSA-AES128-GCM-SHA256:ECDHE-RSA-AE$ ssl_prefer_server_ciphers on; location / { root /var/www/example.com/html; } location /forum/ { proxy_pass http://example.com:25654/; proxy_read_timeout 90; proxy_redirect http://example.com:25654/ https://example.com/; } }restart nginxsudo service nginx restartIf you go to example.com/forum your Discourse site should appear and if you go to example.com you should see your index.html (if you created one).