Node.js is a open source platform to create network applications using JavaScript. The applications are executed on the server and not as usual on the client in the browser. Integrated modules, such as the HTTP-module, enable the realisation of web servers. Additional modules can be simply installed using the supplied package manager npm.
Update 04.09.2016: - Added further, alternative guide
Content
Install Node.js - Option #1 (Raspberry Pi B+ and older)
As a first step you need to download the ARM package that is optimised for Node.js.
wget http://node-arm.herokuapp.com/node_latest_armhf.debNode.js can now be installed using
sudo dpkg -i node_latest_armhf.deb
Node.js and the package manager npm are now installed. You can check the installed version unsing node -v.
Install Node.js - Option #2 (Raspberry Pi 2/3 and newer)
Add the Node.js source to your package list.
curl -sL https://deb.nodesource.com/setup_6.x | sudo -E bash -Node.js can now be installed using
sudo apt-get install -y nodejsYou can check the installed version unsing
nodejs -v.
Test Node.js with a “Hello World” application
Create a JavaScript file using
sudo nano helloWorld.jsand add the following code:
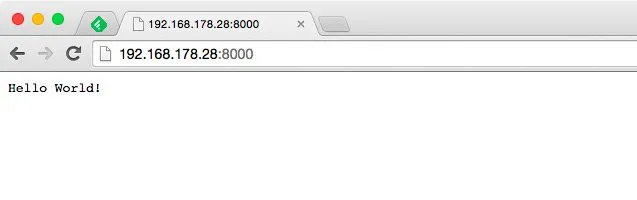
var http = require('http');
http.createServer(function (request,response) {
 response.writeHead(200, {'Content-Type': 'text/plain'});
 response.end('Hello World!\n');
}).listen(8000)
console.log('Web Server running at http://127.0.0.1:8000');
Execute the script with:
node helloWorld.jsOpen the browser and go to the address.
http://IP-Adresse-des-Raspberry:8000/