Requirements:
Raspbian or similar distribution
USB hard drive or Memory stick with a partition (NTFS/Fat32/HFS+/Ext4)
As a first step you need to update the package lists of Raspbian and install the drivers for NTFS and HFS+.
sudo apt-get update && sudo apt-get -y install ntfs-3g hfsutils hfsprogsCreate a new folder in the directory /media in which you later on will mount the memory stick or USB hard drive. You can name the folder as you like, however, do not use special characters or spaces. Furthermore, change the owner of the folder to pi. In case you use a different user name you need to replace pi in the command below by the name you use.
sudo mkdir /media/usbhdd
sudo chown pi /media/usbhdd
“In oder to attach a file system a mount point has to exist. A mount point is an empty folder through which additional file systems are mouted and accessed.” ubuntuusers.de
Attach the storage medium to the Raspberry.
Now you need the path to the partition of the storage medium (in this case it is
/dev/sda1).sudo fdisk -l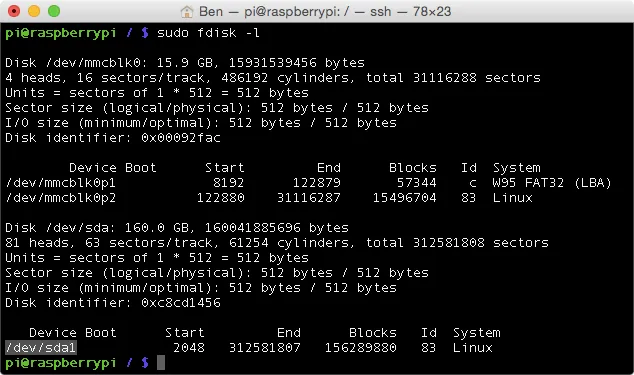
For the moment you manually include the storage medium with the following command. Replace
/dev/sda1with the path to the partion of the storage medium that we just figured.Ext4
sudo mount /dev/sda1 /media/usbhddNTFS
sudo mount -t ntfs-3g -o uid=pi,gid=pi /dev/sda1 /media/usbhdd/HFS+
sudo mount -t hfsplus -o force.uid=pi,gid=pi /dev/sda1 /media/usbhdd/FAT32
sudo mount -t vfat -o uid=pi,gid=pi /dev/sda1 /media/usbhdd/From this point on you can already access the storage medium with
cd /media/usbhdd/.</>We need the UUID of the hard drive that the storage medium will be automatically mounted after a restart. Enter the following command into the console:
sudo blkid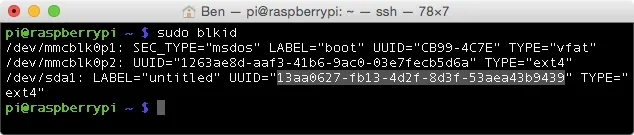
“UUID stands for Universally Unique Identifier and is a standard to identify information in computers.
Each Linux file system has a UUID through which it can be identified. As an alternative the file systems can be identified through a device file /dev/sdaX but the labels can change in this case. ” ubuntuusers.de
Open the file fstab with the Nano text editor
sudo nano /etc/fstaband add one of the lines for your file system. Replace the UUID that you determined in the previous step. Exit the Nano editor afterwards with
Strg+x(Win)ctrl+x(Mac) and confirm the changes withyorj (depending on your language settings.#Ext4 UUID=13aa0627-fb13-4d2f-8d3f-53aea43b9439 /media/usbhdd ext4 defaults 0 0 #NTFS UUID=10BF-F2D6 /media/usbhdd/ ntfs-3g defaults,umask=000,users 0 0 #HFS+ UUID=10BF-F2D6 /media/usbhdd/ hfsplus defaults,umask=000,users 0 0 #FAT32 UUID=10BF-F2D6 /media/usbhdd/ vfat defaults,umask=000,users 0 0More information about fstab can be found here.
Done! You can now access your files on the usb hard drive or memory stick and the drive will be mounted automatically after a restart.