Showing Posts From
Power supply
- 04 Mar, 2018
- 5 Min. Lesezeit
Raspberry Pi Touchscreen installieren und anschließen + Tipps & Tricks
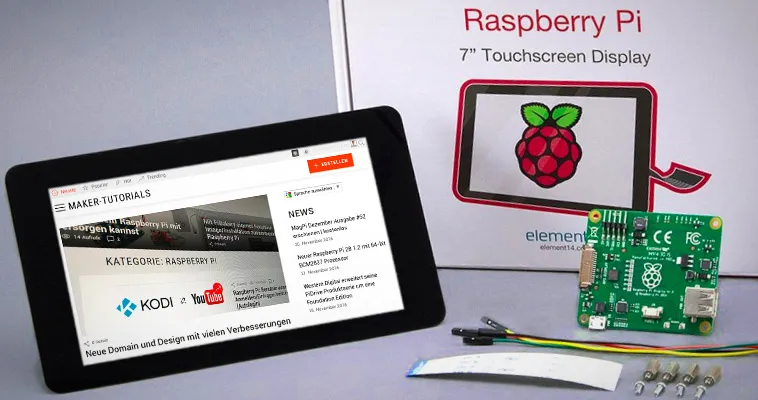
In dieser Anleitung wird beschrieben, wie du dein Raspberry Pi Touchscreen zusammenbaust, welche verschiedenen Varianten der Stromversorgung es gibt und ein paar hilfreiche "Tipps & Tricks". Benötigte Teile:original 7Zoll LCD Touchscreen für Raspberry Pi (Amazon) ein Raspberry Pi A+,B+, Pi 2, oder Pi 3 Micro USB Netzteil mit min. 2A Micro SD Karte mit der neusten Raspbian, oder Noobs VersionInhaltRaspberry Pi Touchscreen installieren/anschließen Bei den neueren 7 Zoll Touchscreen ist das Controller Board schon am Display angeschlossen. Du musst nur noch den Raspberry Pi mit dem Controller Board verbinden.Verbinde das rote Jumper-Kabel mit dem 5V Pin und das Schwarze mit GND des Controller Board vom Touchscreen. Der Raspberry Pi wird so über das Touchscreen mit Strom versorgt. Steck das Flachbandkabel (DSI) mit den silbernen Kontakten zur braunen Seite ein. Jetzt kannst du den Raspberry Pi auf das Controller Board schrauben.Stecke jetzt das rot Jumper-Kabel an den GPIO Pin 4 und das Schwarz an GPIO Pin 6. Das Flachbandkabel (DSI) muss noch in die Buchse mit der Aufschrift „Display“ gesteckt werden (Kontakte nach innen). Als letztes schließt du das Micro-USB Netzteil an das Controller Board des Touchscreen. Das Setup darf nicht über den Raspberry Pi Micro USB Strom betrieben werden, da die interne Sicherung vom Raspberry nicht für die 400mA, die das Touchscreen benötigt, ausgelegt ist.Es ist möglich das Touchscreen und ein Monitor (HDMI Ausgang) gleichzeitig zu verwenden. Fehlerquellen Wenn nach dem start der Bildschirm schwarz bleibt, überprüfe das DSI Kabel (weißes Flachbandkabel). Das DSI Kabel verbindet den Raspberry Pi und das Controller Board des Touch Screen.Fahre den Raspberry Pi herunter und überprüf ob das DSI Kabel richtig herum eingesteckt wurde. Am Raspberry Pi müssen die silbernen Kontakte vom Kabel nach innen zeigen (weiße Seite der Buchse). Am Touch Controller Board müssen die Kontakte zur braunen Seite der Buchse zeigen.Aktualisiere das Betriebssystem sudo apt-get update && sudo apt-get dist-upgradeBeim herunterfahren kann es vorkommen, dass das Bild verschwommen aussieht. Das ist normal.alternative Stromversorgung Es gibt 3 Varianten wie du das Touchscreen und den Raspberry Pi mit Strom versorgen kannst.Jumper Kabel Wie weiter oben beschrieben, verbinde den +5V und GND Pin vom Controller Board des Touchscreen mit den GPIO Pins des Raspberry Pi. Jetzt wird der Raspberry Pi über das Display mit Strom versorgt. Diese Variante ist einfach und günstig, aber es ist nicht mehr möglich eine Erweiterungsplatine anzuschließen.Y Micro USB Kabel Du kannst ein Micro USB Y-Kabel verwenden, um beide Micro-USB Eingänge gleichzeitig mit Strom zu versorgen. Damit kannst du eine Erweiterungsplatine am Raspberry Pi verwenden und benötigst nur ein Netzteil.Zwei Netzteile Verwende zwei Micro USB Netzteile, um das Touchscreen und den Raspberry Pi getrennt mit Strom zu versorgen. Wenn du eine stromhungrige Erweiterungsplatine verwendest, kann es sein, dass du zwei Netzteile verwenden musst. Dabei muss darauf geachtet werden, dass Display und Raspberry Pi im selben Moment eingeschaltet werden!Bild drehen Möchtest du das Touchscreen im Hochformat, oder um 180 Grad gedreht verwenden, führe folgende Schritte aus. Ich verwende das Gehäuse von Pimoroni. Hier muss das Bild um 180° gedreht werden.Öffne die config.txt Datei mit dem Nano Editor sudo nano /boot/config.txtFüge folgenden Text am Anfang der config.txt Datei ein. lcd_rotate=2 lcd_rotate=0 Normal lcd_rotate=1 90 Grad lcd_rotate=2 180 Grad lcd_rotate=3 270 Grad lcd_rotate=0x10000 horizontal spiegeln lcd_rotate=0x20000 vertikal spiegelnBeende die Eingabe mit dem Shortcut CTRL+X und speichere die Änderung mit Y.Nach einem Neustart sollte das Bild gedreht angezeigt werden. sudo rebootRechtsklick einrichten Der Rechtsklick per touch muss erst aktiviert werden. Zwei Finger für "rechte Maustaste" In diesem Artikel wird beschrieben, wie du mit einem zwei Finger-Touch einen Rechtsklick auslösen kannst. Langes Drücken für "rechte Maustaste" Diese Variante funktioniert nicht mit Raspbian Jessie.Öffne die Datei xorg.conf mit dem Nano Texteditor. sudo nano /etc/X11/xorg.conf Section "InputClass" Identifier "calibration" Driver "evdev" MatchProduct "FT5406 memory based driver" Option "EmulateThirdButton" "1" Option "EmulateThirdButtonTimeout" "750" Option "EmulateThirdButtonMoveThreshold" "30" EndSection Schließe den Editor mit CTRL+X und bestätige die Änderung mit Y.Starte neu sudo rebootBildschirmtastatur/Virtual Keyboard installieren Du kannst zwischen zwei verschiedenen Bildschirmtastaturen wählen. Ich verwende Florence, da das Matchbox Keyboard unter Jessie Probleme macht und dauerhafte eine CPU Auslastung von 25% verursacht.Florence sudo apt-get install florence Jetzt kannst das Florence Virtual Keyboard unter Universal Access aktivieren. Bei mir ist unter Raspbian Jessi Florence immer abgestürzt. Installiere at-spi2-core, um den Crash zu beheben. sudo apt-get install at-spi2-coreMatchbox Keyboard sudo apt-get install matchbox-keyboard Aktiviere die Bildschirmtastatur unter " MENU > Accessories > Keyboard".Hintergrundbeleuchtung Helligkeit einstellen Du kannst die Helligkeit der Hintergrundbeleuchtung über den Terminal einstellen. Wenn du Strom sparen willst, kannst du die Helligkeit mit folgendem Befehl variieren. sudo sh -c "echo 'Helligkeitswert' >> /sys/class/backlight/rpi_backlight/brightness"Ersetze Helligkeitswert mit einer Zahl zwischen 0 und 255. Bei 0 ist die Hintergrundbeleuchtung aus und bei 255 ist sie am hellsten. Update: Hinzugefügt am 04.03.2018 Mit dem kleine Programm "Backlight Controls" wird ein kleines Icon unten rechts neben der Uhr angezeigt. Damit kannst du komfortabel zwischen einem Tag und einem Nacht Modus wechseln. Es besteht auch die Möglichkeit ein Bildschirmfoto/Screenshot zu machen. Mauszeiger ausblenden Wie im Tutorials "Midori Browser im Vollbild Modus" kannst du das Programm unclutter installieren, um den Mauszeiger auszublenden. sudo apt-get install unclutterUnclutter startet automatisch nach dem Neustart. Der Mauszeiger sollte nach 1-2 Sekunden automatisch verschwinden. Technische DatenKompatibel mit Raspberry Pi A+, B+, 2 & 3 17,8 cm (7") Touch-Display, kapazitiv Maße (LxBxH): 192.96 x 112.76mm sichtbarer Bereich: 154.08 x 85.92mm Auflösung: 800 x 480 Pixel Kontrastwert: 500 Helligkeit: 250 cd/m2 24 bit Farben 10 Finger-Multi-Touch-Display Hintergrundbeleuchtung einstellbar über PWM Hintergrundbeleuchtung Lebensdauer 20000 Stunden Betriebstemperatur: -20°C bis +70°C Lagerungstemperatur: -30°C bis +80°C Betrachtungswinkel: oben (50), unten (70), rechts (70), links (70)Ein technische Zeichnung mit genauen Abmessungen findest du hier.
- 29 Apr, 2017
- 5 min read
Official Raspberry Pi 7" Touch Screen LCD Display assembly guide - install and tips
This tutorial will show you how to assemble your Raspberry Pi Touchscreen, which power supply options are available and a few helpful hints. Required parts:original 7 inch LCD Touchscreen for Raspberry Pi A Raspberry Pi A+,B+, Pi 2, or Pi 3 Micro USB power adapter with a minimum of 2A Micro SD card with the most recent Raspbian, or Noobs versionContentsInstall/connect Raspberry Pi Touchscreen With the new 7 inch version the controller board is already connected to the display. You just need to connect the Raspberry Pi to the controller board.Connect the red jumper cable with the 5V pin and the black cable with GND of the touchscreen's controller board. This ways the Raspberry Pi is supplied with power through the touchscreen. Connect the flat ribbon cable (DSI) with the silverish contacts to the brown side. You can now attach the Raspberry Pi into the controller board and fix it with the screws. Attach now the red jumper cable to the GPIO pin 4 and the black cable to the GPIO pin 6. The flat ribbon cable (DSI) need to be plugged into the connector with the label "Display" (contacts to the inside). Finally you need to plug the micro usb power adapter into the controller board of the touchscreen. The setup may not be supplied with power through the Raspberry Pi as the internal fuse of the Raspberry Pi cannot handle the 400 mA that the touchscreen requires.It is possible to use the touchscreen and another screen (HDMI output) at the same time. Error Sources If the screen stays black after the start check the DSI cable (white flat ribbon cable). THE DSI connects the Raspberry Pi and the controller board of the touchscreen.Shut down the Raspberry Pi and check if the cable is connected in the correct direction. At the Raspberry Pi the silverish contacts need to point to the inside (white side of the connector). At the touch controller board the contacts need to point to the brown side of the connector.Update the operating system. sudo apt-get update && sudo apt-get dist-upgradeWhen downloading, the image can look blurry - that's normal.Alternative Power Supplies There are 3 possibilities to supply the touchscreen and the Raspberry Pi with power.Jumper Cable As described above, connect the +5V and Ground pin of the controller board of the touchscreen with the GPIO pins of the Raspberry Pi. Now the Raspberry Pi is supplied by power through the display. This variant is simple and cheap but it is impossible to attach a extention board.Y Micro USB cable You can use a micro USB Y-cable to supply both micro USB inputs at the same time. This way you can use a extension board at the Raspberry Pi requireing only one power supply.Two Power Supplies Use two micro USB poer supplies, to supply the touchscreen and the Raspberry Pi separately with power. If you use a power demanding extension board it could be required to use two power supplies. In that case the display and the Raspberry Pi need to be turned on at the same time!Rotate Image If you want to use the touchscreen in portrait mode or turned by 180° follow the steps below. I use the case from Pimoroni. For this the images needs to be rotated by 180°.Open the config.txt file with the Nano text editor. sudo nano /boot/config.txtAdd the following text at the beginning of the config.txt. lcd_rotate=2 lcd_rotate=0 Normal lcd_rotate=1 90 Degree lcd_rotate=2 180 Degree lcd_rotate=3 270 Degree lcd_rotate=0x10000 mirror horizontally lcd_rotate=0x20000 mirror verticallyQuite the editing with the shortcut ctrl+ and save the changes with y.The image should be rotated after a restart of the system. sudo rebootSet up Right Click The right click via touch needs to be set up. Two fingers for the "right mouse button" This tutorial describes how you can set up that a two-finger touch executes a right click. Long press of "right mouse button This option does not work with Raspbian Jessie.Open the file xorg.conf with the nano text editor. sudo nano /etc/X11/xorg.conf Section "InputClass" Identifier "calibration" Driver "evdev" MatchProduct "FT5406 memory based driver" Option "EmulateThirdButton" "1" Option "EmulateThirdButtonTimeout" "750" Option "EmulateThirdButtonMoveThreshold" "30" EndSection Close the editor with ctrl-x and confirm the changes with y.Restart the system sudo rebootInstall a On-Screen or Virtual Keyboard You can choose between different on-screen keyboards. I use Florence as the Matchbox keyboard has problems under Jessie and causes a constant CPU usage of 25%.Florence sudo apt-get install florence You can now activate the Florence virtual keyboard under Universal Access. In my case Florence crashed always which could be fixed after installing at-spi2-core. sudo apt-get install at-spi2-coreMatchbox Keyboard sudo apt-get install matchbox-keyboard Active the on-screen keyboard under " MENU > Accessories > Keyboard".Adjust Brightness of Backlight You can adjust the brightness of the backlight with the terminal.If you want to save power you can use the following command to adjust the brightness. sudo sh -c "echo 'Value of Brightness' >> /sys/class/backlight/rpi_backlight/brightness"Replace Value of Brightness with a number between 0 and 255. At 0 the backlight is off and at 255 the brightest value is achieved. Hide mouse poniter As descibed in the tutorial "Midori Browser in Fullscreen Mode" you can install the application unclutter to hide the mouse pointer. sudo apt-get install unclutterUnclutter starts automatically after a system start. The mouse pointer should disappear automatically after 1-2 seconds. Technical DataCompatible with Raspberry Pi A+, B+, 2 & 3 17,8 cm (7") touch display, capacitive Dimensions (LxWxH): 192.96 x 112.76mm Visible Area: 154.08 x 85.92mm Resolution: 800 x 480 Pixel Contrast: 500 Brightness: 250 cd/m2 24 bit Colours 10 Finger multi touch display Bachlight adjustable via PWM Backlight lifetime of 20000 hours Operation temperature: -20°C bis +70°C Storage temperature: -30°C bis +80°C Viewing angle: upper (50), lower (70), right (70), left (70)A technical drawing with detailled dimensions can be found here.