Showing Posts From
Home automation
- 05 May, 2019
- 8 Min. Lesezeit
Xiaomi Roborock Saugroboter mit Raspberry Pi hacken/rooten (ohne cloud upload)
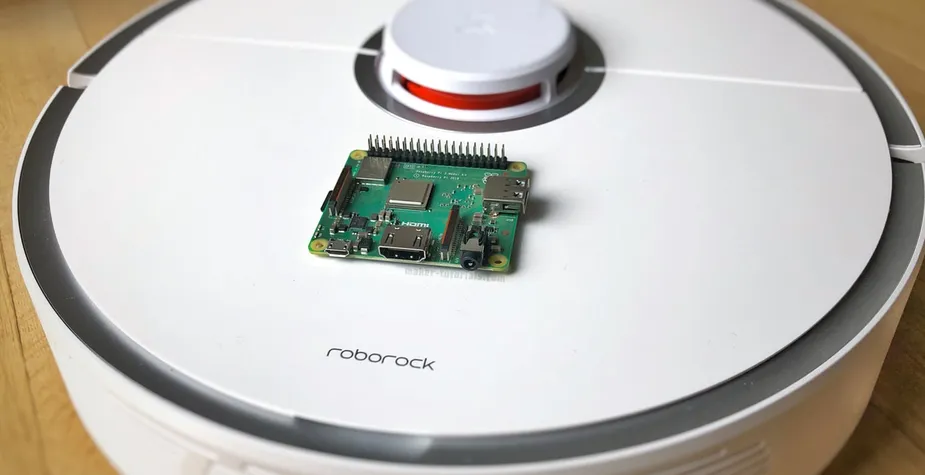
Ziel dieser Anleitung ist es, den Xiaomi/Roborock Saugroboter ohne Internet/Cloud zu betreiben. Es sollen keine persönlichen Daten hochgeladen werden können.Unterstützte Geräte: alle Roborock mit LDS (S5, S50, S55), Xiaomi MiEin Saug- und Wischroboter ist eine sehr große Hilfe bei einer großen Wohnung. Da die Preise in diesem Jahr stark gesunken sind, habe ich angefangen verschiedenen Modelle zu vergleichen. Die Funktion, dass der Saugroboter die Räume mit einem Laser abscannen kann und eine Karte der Wohnung erstellt, war mir wichtig. So kann der Saugroboter selbständig durch die Wohnung navigieren und die Räume schneller saugen, als ein Saugroboter der nach dem Zufallsprinzip vorgeht. Leider "benötigen" die Saugroboter mit Raumerkennung eine aktive Internetverbindung, um zu funktionieren. Damit habe ich ein großes Problem, da alle persönlichen Daten in die Cloud des Herstellers hochgeladen werden. Man hat keine Wahl ob bzw. welche Daten man freigibt. Mir ist es ein Rätsel warum das mit der deutschen Datenschutzverordnung möglich ist. Nach einer Recherche, habe ich das Dustcloud Projekt gefunden, mit der es möglich ist, Xiaomi/Roborock Saugroboter zu rooten. Mit dem Root-Zugang hat man uneingeschränkten Zugriff auf das System des Saugroboters und kann beliebige Software darauf installieren. Damit du den Saugroboter im eigenen Netzwerk steuern kannst, wird die Web-App Valetudo auf dem Saugroboter installiert. Benötigt wird:Roborock mit LDS (S5, S50, S55), Xiaomi Mi Raspberry Pi (A+ ist ausreichend) mit Micro-SD Kart, Monitor, Maus u TastaturDie Anleitung muss auf einem Linux (Debian) System ausgeführt werden (Windows/Mac OSX nicht möglich). Deshalb benötigst du den Raspberry Pi. Alternativ kannst du auch eine Virtuelle Machine mit Debian verwenden. Bei einigen Schritten kann es zu Problemen kommen, da die Programme mit der Netzwerkverbindung der Virtual Machine nicht zurecht kommen. Ich übernehme keine Haftung für Schäden. Beachte auch das die Garantie des Gerätes verfällt. Es ist möglich die original Firmware wieder auf das Gerät zu spielen. Inhalt Update 19.05.2019: Deutsche Sprachdatei hinzugefügt (Schritt 12) 15.09.2019: Python Befehle an Python 3 angepasst Firmware Flashen Teil. Danke an Benjamin und den anderen Hilfreichen Kommentatoren. Dustcloud/Dummycloud, Valetudo und Firmware herunterladenInstalliere Raspbian auf deinem Raspberry Pi. Eine einfache Anleitung findest du hier. Schritt 1 in dieser Anleitung ist ausreichend. WLAN kannst du im Raspbian Desktop einstellen.Aktualisiere die Paketlisten um die neuesten Software Versionen installieren zu können. Danach werden ein paar Programme installiert, die zum "rooten" benötigt werden. (&& verbindet zwei Befehle) sudo apt-get update && sudo apt-get install -y ccrypt git wget unzip dos2unixErstell einen Ordern mit dem Name rockrobo im Heimverzeichnis (/home/pi) und navigiere in den neu erstellten Ordner. mkdir ~/rockrobo && cd ~/rockroboKlone/kopiere das Dustcloud Repository in den aktuellen Ordner (rockrobo) mit Git. git clone https://github.com/dgiese/dustcloud.gitErstelle im rockrobo Ordner einen neuen Ordner valetudo und navigiere hinein. mkdir valetudo && cd valetudoJetzt musst du die aktuelle Valetudo Datei in den valetudo Ordner herunterladen. Geh dazu auf die Valetudo Release Seite. Dort sind alle Versionen aufgelistet. Bei mir ist es die Version 0.3.1. Scroll etwas nach unten bis zur "Assets" Auflistung. Kopiere dort den Link zur "valetudo" Datei. Ersetze dann den Link nach dem wget Befehl. wget https://github.com/Hypfer/Valetudo/releases/download/0.3.1/valetudo Nachdem du den Befehl ausgeführt hast, sollte sich eine Datei "valetudo" im aktuellen Ordner Befinden. Das kannst du mit dem Befehl ls prüfen.Erstell im valetudo Ordner einen neuen Ordner, mit dem Namen deployment und navigiere hinein. mkdir deployment && cd deploymentLade die valetudo.conf Datei herunter. wget https://github.com/Hypfer/Valetudo/raw/master/deployment/valetudo.confErstell im deployment Ordner einen neuen Ordner, mit dem Namen etc und navigiere hinein. mkdir etc && cd etc Lade die hosts und die rc.local Datei herunter. wget https://github.com/Hypfer/Valetudo/raw/master/deployment/etc/hostswget https://github.com/Hypfer/Valetudo/raw/master/deployment/etc/rc.local In der hosts Datei sind alle bekannten Xiaomi/mi.com/RoboRock Server vermerkt. Dies verhindert das deine Daten in die Cloud hochgeladen werden. In der rc.local Datei wird festgelegt, dass der Datenaustausch mit der Xiaomi/mi.com/RoboRock Cloud auf die interne Dummycloud umgeleitet wird. So wird dem RoboRock System vorgegaukelt das es nach "Hause telefoniert".Navigiere zurück in die oberste Ebene des rockrobo Ordners cd ~/rockrobo und erstelle dort einen neuen Ordner mit dem Namen rrlogd-patcher. Navigiere hinein. mkdir rrlogd-patcher && pushd rrlogd-patcher Lade die patcher.py Datei herunter. wget https://raw.githubusercontent.com/JohnRev/rrlogd-patcher/master/patcher.py Das Python script rrlogd-patcher sorgt dafür das die Cleaning Logs nicht verschlüsselt werden. Das ist nötig um sie später in der Valetudo App anzeigen zu lassen.Navigiere wieder zurück in die oberste Ebene des rockrobo Ordners cd ~/rockrobo und erstelle einen neuen Ordner mit dem Namen firmware und navigiere hinein. mkdir firmware && cd firmware Schau auf der Dustcloud Seite nach, welche die aktuellste getestete Firmware vom Roborock ist. Achte darauf das du die richtige Generation wählst (Roborock S5 ist z.B. Gen2). Ersetze den letzten Teil der URL (v11_001810.fullos.pkg) mit dem Dateinamen deiner Firmwareversion. wget https://cdn.awsbj0.fds.api.mi-img.com/rubys/updpkg/v11_001810.fullos.pkg Wenn du die Firmware nicht herunterladen konntest, probier einen anderen Server. Nicht alle Versionen sind auf allen Servern verfügbar.Du benötigst noch eine Sprachdatei. Diese findest du hier. Lade mit folgendem Befehl die deutsche Sprachdatei herunter (in den Firmware Ordner). wget https://dustbuilder.xvm.mit.edu/pkg/voice/de.pkgDein rockrobo Ordner sollte jetzt folgende Struktur haben.rockrobo/ ├── dustcloud │ ├── cloudprotocol.pdf │ ├── devices │ ├── docker │ ├── dummycloud │ ├── dustcloud │ ├── LICENSE │ ├── Pipfile │ ├── Pipfile.lock │ ├── presentations │ └── README.md ├── firmware │ ├── v11_001810.fullos.pkg │ └── de.pkg ├── rrlogd-patcher │ └── patcher.py └── valetudo ├── deployment │ └── etc │ ├── hosts │ └── rc.local └── valetudoSSH Key erstellen Der SSH Key wird benötigt, um dich später mit deinem gerooteten Roborock per SSH zu verbinden.Prüfe ob schon ein SSH Key existiert. Wenn die Meldung angezeigt wird, dass die Datei oder Verzeichnis nicht gefunden wurde, gibt es noch keinen SSH Key. cat ~/.ssh/id_rsa.pubErstelle einen neuen SSH Key mit folgendem Befehl. ssh-keygen Speicherort (~/.ssh/id_rsa) mit Enter bestätigen. Das Passwort kannst du leer lassen und mit zwei mal Enter Bestätigen.Firmware "patchen" und Image erstellen Bevor du die Firmware auf den Roborock kopierst, muss sie "gepatched" werden. Sonst hast du später keinen Root-Zugang zum Roborock und der Saugroboter kann nicht ohne Xiaomi Cloud betrieben werden.Navigiere wieder in den rockrobo Ordner cd ~/rockrobo und erstelle einen neuen Ordner image und navigiere hinein. mkdir image && cd imageFühre jetzt den Befehl aus, der die Firmware patch/rootet. Für eine bessere Übersicht habe ich den Befehl in mehrere Zeilen aufgeteilt. Durch Backslash \ am Ende jeder Zeile kannst du den Befehl so in dein Terminal einfügen und er wird als eine Zeile interpretiert. Wichtig ist noch, dass du den Dateiname der zuvor gespeicherten Firmware anpasst (bei mir v11_001810.fullos.pkg).sudo ../dustcloud/devices/xiaomi.vacuum/firmwarebuilder/imagebuilder.sh \ --firmware=../firmware/v11_001810.fullos.pkg \ --soundfile=../firmware/de.pkg \ --public-key=$HOME/.ssh/id_rsa.pub \ --valetudo-path=../valetudo \ --disable-firmware-updates \ --ntpserver=fritz.box \ --rrlogd-patcher=../rrlogd-patcher/patcher.py \ --replace-adbd Hier der selbe Befehlt in einer langen Zeile, falls du Probleme hast.sudo ../dustcloud/devices/xiaomi.vacuum/firmwarebuilder/imagebuilder.sh --firmware=../firmware/v11_001810.fullos.pkg --soundfile=../firmware/de.pkg --public-key=$HOME/.ssh/id_rsa.pub --valetudo-path=../valetudo --disable-firmware-updates --ntpserver=fritz.box --rrlogd-patcher=../rrlogd-patcher/patcher.py --replace-adbd Falls du keine Fritzbox hast, entferne die Zeile mit dem Parameter --ntpserver, oder ersetze fritz.box mit der IP des NTP Server.--firmware: gibt an wo die original Firmware gespeichert ist --soundfile: gibt an wo die Sprachdatei gespeichert ist, die später vom Saugroboter verwendet werden soll (hier englisch) --public-key: gibt an wo der Public SSH Key gespeichert ist --valetudo-path: gibt an wo das Valetudo Programm gespeichert ist --disable-firmware-updates: schaltet automatische Firmware Updates aus (wichtig da sonst der root Zugang verloren gehen kann) --ntpserver: IP des NTP Servers (Zeitserver) --rrlogd-patcher: gibt an wo das rrlogd-patcher script gespeichert ist --replace-adbd: falls etwas schief geht, kannst du noch per USB auf den Saugroboter zugreifenFirmware auf den Roborock Saugroboter flashen Jetzt muss das patchte Firmware Image auf den Roborock Saugroboter kopiert (flashen) werden.Installiere die benötigten Programme. sudo apt-get install -y python3 python3-pip python3-venv python3-dev libffi-dev libssl-devOptional: Erstell eine virtuelle Umgebung für die Python Pakete. Eine genaue Erklärung findest du in den Kommentaren. python3 -m venv .venvInstalliere wheel, damit weitere Pakete automatisch installiert werden können. pip3 install wheelInstalliere python-miio pip3 install python-miioSetze jetzt das WLAN des Roborock zurück, indem du die Zwei Tasten rechts und links neben dem Power Knopf gleichzeitig gedrückt hälst. Du kannst auch die Reset Taste unter der Klappe gedrückt halten.Verbind jetzt den Raspberry Pi mit dem WLAN des RoboRock. roborock-vacuum-s5-…. Wenn der Raspberry Pi mit dem WLAN des Roborock verbunden ist, kannst du die Firmware übertragen (flashen). Wichtig ist das du den Dateinamen der Firmware anpasst. Lass dir den Namen mit ls anzeigen. ls outputpython3 ~/rockrobo/dustcloud/devices/xiaomi.vacuum/firmwarebuilder/flasher.py -f output/v11_001810.fullos.pkg Diesen Befehl im images Ordner ausführen. ~/roborock/images Die Firmware wird übertragen. Danach wird sie auf dem RoboRock installiert. Das dauert ca. 5-10min. Den Saugroboter währenddessen nicht ausschalten! Wenn der Roborock die Start-Melodie abspielt, weisst du das die Installation beendet ist.Valetudo Webapp öffnen/ WLAN Einstellen, Roborock Steuern Auf dem Xiaomi Saugroboter läuft jetzt die Firmware mit Root-Zugang, die Valetudo Web-App und Dummycloud. Wenn dein Computer noch mit dem Roborock WLAN verbunden ist, kannst du im Browser die URL http://192.168.8.1 aufrufen. Saugroboter mit deinem WLAN verbinden. In der Valetudo Web-App unter Settings -> WIFI -> WIFI Settings kannst du deinen WLAN Namen und Passwort eingeben. Nach dem Bestätigen des Button "Save new Wifi configuration", startet der Saugroboter neu und verbindet sich mit deinem WLAN Netzwerk (das Roborock eigene WIFI verschwindet). Verbinde dein Computer mit dem zuvor eingestelltem WIFI und rufe die URL http://rockrobo/ auf.Valetudo App startet nicht/ ist nicht erreichbar. Falls die Valetudo Web-App sich nicht im Browser öffnet, kann es sein das sie manuell gestartet werden muss. Verbinde dich dazu per SSH mit deinem Roborock Saugroboter. Dein Computer muss mit dem WIFI des Roborock verbunden sein. Führe folgenden Befehl im Terminal aus, um dich per SSH zu verbinden. Es sollte der selbe Computer/Raspberry Pi sein, auf dem du vorher den SSH Key erstellt hast, oder du kopierst den Public SSH Key auf einen anderen Rechner. ssh root@rockrobo Starte jetzt valetudo service. service valetudo start
- 10 Aug, 2017
- 6 min read
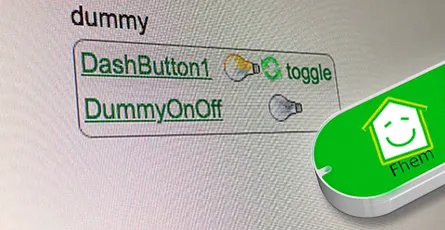
Controll FHEM devices with amazon dash button
I explained in this article how you can execute IFTTT actions with the Amazon dash button. By changing a single line of code you can switch an FHEM device. How does it work? By calling a URL (HHTP Post Request) you can tell FHEM to do soemthing. This way you can switch lights on or off, open or close shutters, turn remote contrles wall plugs on or off and a lot more. The dash button is not suitable for every application as the button has a latency of 5 to 6 seconds until a FHEM device is switched. What's required:Raspberry Pi or Debian/Ubuntu Linux computer Amazon Dash Button Running FHEMHere is a sample video how a Philips Hue lamp is turned on using a Amazon dash button and FHEM. Thanks to Hagen for that video.Contents Option 1: FHEM module dash_dhcpWorks without additional software FHEM server can be connected to the network vial ethernet cable Multiple Amazon dash buttons can be embeddedUpdate your FHEM to the newest version and install the module dash_dhcp. Here is a short tutorial how you can implement a update button in the sidebar of the FHEM web interface.Determine the MAC address of your Amazon dash button. Therefore, log into your router. I have a Fritzbox where all wifi devices are listed under WLAN -> Network. For Mac the free application LanScan can be used to run a scan of your network and detemrin the respective MAC address.Open the FHEM configuration file fhem.cfg and add the following code. Replace the MAC address behind allowed with the one of your dash button. You can write multiple MAC addresses after each other if you separate them by ,. The MAC address should be written in small caps.define DashButton dash_dhcp attr DashButton allowed ac:66:be:e3:fb:fe attr DashButton port 6767 attr DashButton room dashbuttondefine n_DashButton1 notify DashButton:ac-66-be-e3-fb-fe..short IF ([YourFHEMDevice] eq "on") (set YourFHEMDevice off) ELSE (set YourFHEMDevice on) Replace in the notify command YourFHEMDevice with the name of your FHEM device that you want to switch on or off and make sure that the MAC adress is written with dashes. Don't forget to save! Multiple dash buttons can be separated by commas.attr DashButton allowed ac:66:be:e3:fb:fe,ac:66:be:e3:fa:31Now You need to forward the data from port 67 to port 6767. DHCP requests arrive always through port 67 and that port can only be accessed with root access rights. FHEM is usually started without root rights. In case your FHEM server in implemened in the network via a wifi domgle execute the following command in the terminal.sudo iptables -I PREROUTING -t nat -i wlan0 -p udp --src 0.0.0.0 --dport 67 -j DNAT --to 0.0.0.0:6767 In case the FHEM server is implemented via a ethernet cable use the following command.sudo iptables -I PREROUTING -t nat -i eth0 -p udp --src 0.0.0.0 --dport 67 -j DNAT --to 0.0.0.0:6767You should be now able to switch your FHEM device on or off with the Amazon dash button. In order to check if the dash button is recognized by FHEM you can use the Event monitor in the FHEM web interface in the left sidebar. After clicking the dash button, dash_dhcp DashButton ac-66-be-e3-fb-fe: short should appear in the monitor. The forwarding of the ports via iptables needs to be set after a restart. Install the application iptables-persistent that the fowarding is loaded automatically after a restart.sudo apt-get update && sudo apt-get install -y iptables-persistent During the installation of iptables-persistent a couple of settings need to be made. Confirm all with YES. You can now write the port forward for the dash button in the file rules.v4. sudo nano /etc/iptables/rules.v4 Add the forward before the last COMMIT. (Ethernet cable)-I PREROUTING -t nat -i eth0 -p udp --src 0.0.0.0 --dport 67 -j DNAT --to 0.0.0.0:6767 (WIFI Dongle)-I PREROUTING -t nat -i wlan0 -p udp --src 0.0.0.0 --dport 67 -j DNAT --to 0.0.0.0:6767 Exit the Nano text editor with ctrl+x and save the changes. After a restart with sudo reboot the rules.v4 file is loaded automatically and the port forwarding should work. ALTERNATIVE In case the fowarding via rules.v4 does not work, you can try this alternative option. Open the /etc/rc.local file. This file is executed during every system start.sudo nano /etc/rc.local and add the command for the forwarding before exit 0. (Ethernet cable)sudo iptables -I PREROUTING -t nat -i eth0 -p udp --src 0.0.0.0 --dport 67 -j DNAT --to 0.0.0.0:6767 (WIFI dongle)sudo iptables -I PREROUTING -t nat -i wlan0 -p udp --src 0.0.0.0 --dport 67 -j DNAT --to 0.0.0.0:6767Option 2: with NodeJS and DasherFHEM Server can be connected to the network via ethernet cable Multiple Amazon dash buttons can be used Flexible as other services, such as, Zapier or IFTTT can be pinged via HTTP GET and POST Request.- Additional software is requiredAs first step the package lists need to be updated and the required applications git & libpcap-dev need to be installed. sudo apt-get update && sudo apt-get install libpcap-dev Furthermore, the current version of Node.js (v6.5.0) is required. Detailed Tutorial Add the Node.js source to your package list. curl -sL https://deb.nodesource.com/setup_6.x | sudo -E bash - You can now install Node.js. sudo apt-get install -y nodejsAs next step you can download and install the Node.js application "Dasher". Navigate with cd ~/ into your home folder and copy Dasher from Github. git clone https://github.com/maddox/dasher.git Navigate to the Dasher directory cd dasher Now the required programs and dependencies of Dasher need to be installed. npm installDasher requires the MAC address of your dash button which are easily found. Log into your router and have a look at the connected devices. You can also use the program "find-button" that is provided by Dasher. script/find_button Press after "find-button" was started the dash button. The program should show the MAC address. Copy the MAC address and close the program with ctrl+c on a Mac or strg+c in Windows.Now you need to adjust the URL in the Dasher config/config.json file the way you want. nano config/config.json{"buttons":[ { "name": "Dash1", "address": "ac:61:b3:e1:fa:fe", "url": "http://127.0.0.1:8083/fhem?cmd=set%20DashButton1%20toggle", "method": "POST", "json": true, "body": {"value1": "any value", "value2": "another value"} } ]} The IP 127.0.0.1 points always to the local computer, i.e. himself. As alternative you can write http://localhost:8083/fhem?cmd=set%20DashButton1%20toggle.Start Dasher and press the button to check if everything works. If everything is fine the terminal should show "Dash1 pressed". Dasher and your button work and FHEM can be configured. You can close the program with ctrl+c. sudo npm run startConfigure FHEM for the Dash Button Open the FHEM configuration file fhem.cfg and add the following code. Define in FHEM a Dummy for the dash button. Here is a good help for beginners.define DashButton1 dummy attr DashButton1 webCmd toggleCreate a notify that turns your FHEM device on or off. Replace YourFHEMDevice with the name of your FHEM device. Save the cfg file. In case you have closed Dasher, you can start it with sudo npm run start and press the dash button.define n_DashButton1 notify DashButton1.* IF ([YourFHEMDevice] eq "on") (set YourFHEMDevice off) ELSE (set YourFHEMDevice on) Explenation: The Dummy DashButton1 will be define n_DashButton1[name of the notify] notify[the command] DashButton1.*[in case of a change of the Dummy Reading, then] IF ([YourFHEMDevice] eq "on") [check if Reading of YourFHEMDevice is on, then] (set YourFHEMDevice off) [set YourFHEMDevice Reading to off] ELSE (set YourFHEMDevice on) [otherwise set YourFHEMDevice Reading to on] To configure the dash button to turn off multiple FHEM devices, use the following configuration. Again, replace YourFHEMDevice and YourFHEMDevice1 with your FHEM devices names. You can write as many devices as you want behind each other as long as they are separated by ;;.define n_DashButton1 notify DashButton1.* set YourFHEMDevice off;; set YourFHEMDevice1 offSet up Dasher Autostart After every system start the Dasher Programm would need to be reconfigured by hand. Set up a Init script for Dasher that the Dasher runs as a service runs in the background and is started when the system is started. Tutorial You can see here roughly the time the setup needs to react.
- 21 Jan, 2017
- 2 min read
Install FHEM on a Raspberry Pi or Debian Linux
What is FHEM? FHEM is a open source server for home automation that is written in Perl. It can perform repeating tasks at home, such as, switching lights, heating, rolling shutters. It can also record an visualise data such as temperature, humidity, power consumption. Optional Step (Rasperry Pi only): sudo raspi-configSelect the menu Expand FilesystemAfter that Internationalisation Options -> Change Timezone and select the time zone of the current location (this is important for the correct time settings in FHEM)We can now proceed with the installation of FHEMUpdate the packages, install updates, remove unnecessary packages and reboot the system. sudo apt-get update && sudo apt-get upgrade -y && sudo apt-get autoremove -y && sudo rebootInstall required packages sudo apt-get -f install && sudo apt-get install perl libdevice-serialport-perl libio-socket-ssl-perl libwww-perl libxml-simple-perl -yDownload and install the current FHEM version (Replace 5.7 in the code snippet with the current version number) http://fhem.de/fhem.html#Download) sudo wget http://fhem.de/fhem-5.7.deb && sudo dpkg -i fhem-5.7.debDelete installation file sudo rm fhem-5.7.debSetting user access rights for the FHEM folder cd /opt sudo chmod -R a+w fhemAdd the current user and FHEM to the group tty to gain read/write access for this device (it is important later on when receiver are connected via USB, e.g. CUL) sudo usermod -a -G tty pi && sudo usermod -a -G tty fhem Replace pi in the code snippet by the currently used user name. You can get the current user name through the terminal command whoami.Open the url http://192.168.x.y:8083/fhem/ in a browser of your choice and the FHEM web interface should appear (Replace xy with the IP adress of the Raspberry Pi).Hint: The FHEM configuration file "fhem.cfg" is read-only after a fresh installation of FHEM. I describe how you can change the write protection in the following article. https://wordpress-x0o8gcg88www8k084ks8k088.c.benroe.de/fhem-konfigurations-datei-fhem-cfg-kann-nicht-bearbeitet-werden/

- 20 Jan, 2017
- 1 min read
Show sunrise and sunset time in FHEM
In this tutorial I will guide you how to show the sunrise time in FHEM Prerequesites: - a working FHEM version Open the FHEM configuration file (fhem.cfg) under Edit files.Add the following global attributes to set your location. attr global latitude 51.345753 attr global longitude 12.38213 Replace the latitude and longitude values with your desired location. The decimal values of your location can be determined here.To save the values for sunrise and sunset we are going to create two dummies define Sunrise dummy define Sunset dummyAs the values need to be generated every day after 12 pm we define the following function define sun_riseSet_timer at *03:00:00 { my $s = sunrise();; fhem("set Sunrise $s");; $s = sunset();; fhem("set Sunset $s");; } This way, the next time of sunrise and sunsets will be set every day at 0.05 am to the dummies.Now we need to assign the room "Weather" to the dummies attr Sonnenaufgang room Weather attr Sonnenuntergang room WeatherFinally, your code should look like this:attr global latitude 51.339695 attr global longitude 12.373075############## Sunrise/Sunset ###################define Sunrise dummy attr Sunrise room Weatherdefine Sunset dummy attr Sunset room Weatherdefine sun_riseSet_timer at *00:05:00 { my $s = sunrise();; fhem("set Sunrise $s");; $s = sunset();; fhem("set Sunset $s");; }You can use the following commands if you want to know the brightness of the sunrise or sundown sunrise("REAL"); #Sun rises or sets at horizon sunrise("CIVIL"); #The sun is behind the horizon but it is still bright sunrise("NAUTIC") #Shapes can be still distinguished against the horizon (e.g. on the sea) sunrise("ASTRONOMIC") #It is completely darkMore information to sunrise() can be found on the Commandref page. Please leave a comment if you have questions or ideas.