Showing Posts From
Fhem
- 10 Aug, 2017
- 6 min read
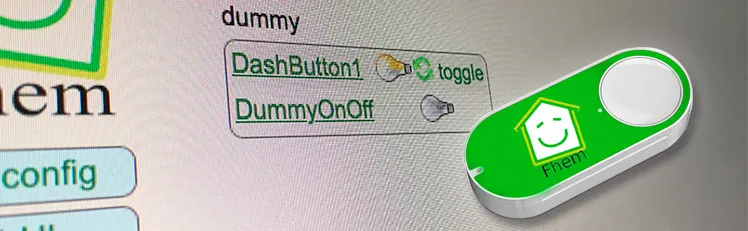
Controll FHEM devices with amazon dash button
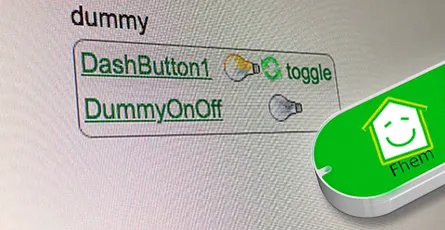
I explained in this article how you can execute IFTTT actions with the Amazon dash button. By changing a single line of code you can switch an FHEM device. How does it work? By calling a URL (HHTP Post Request) you can tell FHEM to do soemthing. This way you can switch lights on or off, open or close shutters, turn remote contrles wall plugs on or off and a lot more. The dash button is not suitable for every application as the button has a latency of 5 to 6 seconds until a FHEM device is switched. What's required:Raspberry Pi or Debian/Ubuntu Linux computer Amazon Dash Button Running FHEMHere is a sample video how a Philips Hue lamp is turned on using a Amazon dash button and FHEM. Thanks to Hagen for that video.Contents Option 1: FHEM module dash_dhcpWorks without additional software FHEM server can be connected to the network vial ethernet cable Multiple Amazon dash buttons can be embeddedUpdate your FHEM to the newest version and install the module dash_dhcp. Here is a short tutorial how you can implement a update button in the sidebar of the FHEM web interface.Determine the MAC address of your Amazon dash button. Therefore, log into your router. I have a Fritzbox where all wifi devices are listed under WLAN -> Network. For Mac the free application LanScan can be used to run a scan of your network and detemrin the respective MAC address.Open the FHEM configuration file fhem.cfg and add the following code. Replace the MAC address behind allowed with the one of your dash button. You can write multiple MAC addresses after each other if you separate them by ,. The MAC address should be written in small caps.define DashButton dash_dhcp attr DashButton allowed ac:66:be:e3:fb:fe attr DashButton port 6767 attr DashButton room dashbuttondefine n_DashButton1 notify DashButton:ac-66-be-e3-fb-fe..short IF ([YourFHEMDevice] eq "on") (set YourFHEMDevice off) ELSE (set YourFHEMDevice on) Replace in the notify command YourFHEMDevice with the name of your FHEM device that you want to switch on or off and make sure that the MAC adress is written with dashes. Don't forget to save! Multiple dash buttons can be separated by commas.attr DashButton allowed ac:66:be:e3:fb:fe,ac:66:be:e3:fa:31Now You need to forward the data from port 67 to port 6767. DHCP requests arrive always through port 67 and that port can only be accessed with root access rights. FHEM is usually started without root rights. In case your FHEM server in implemened in the network via a wifi domgle execute the following command in the terminal.sudo iptables -I PREROUTING -t nat -i wlan0 -p udp --src 0.0.0.0 --dport 67 -j DNAT --to 0.0.0.0:6767 In case the FHEM server is implemented via a ethernet cable use the following command.sudo iptables -I PREROUTING -t nat -i eth0 -p udp --src 0.0.0.0 --dport 67 -j DNAT --to 0.0.0.0:6767You should be now able to switch your FHEM device on or off with the Amazon dash button. In order to check if the dash button is recognized by FHEM you can use the Event monitor in the FHEM web interface in the left sidebar. After clicking the dash button, dash_dhcp DashButton ac-66-be-e3-fb-fe: short should appear in the monitor. The forwarding of the ports via iptables needs to be set after a restart. Install the application iptables-persistent that the fowarding is loaded automatically after a restart.sudo apt-get update && sudo apt-get install -y iptables-persistent During the installation of iptables-persistent a couple of settings need to be made. Confirm all with YES. You can now write the port forward for the dash button in the file rules.v4. sudo nano /etc/iptables/rules.v4 Add the forward before the last COMMIT. (Ethernet cable)-I PREROUTING -t nat -i eth0 -p udp --src 0.0.0.0 --dport 67 -j DNAT --to 0.0.0.0:6767 (WIFI Dongle)-I PREROUTING -t nat -i wlan0 -p udp --src 0.0.0.0 --dport 67 -j DNAT --to 0.0.0.0:6767 Exit the Nano text editor with ctrl+x and save the changes. After a restart with sudo reboot the rules.v4 file is loaded automatically and the port forwarding should work. ALTERNATIVE In case the fowarding via rules.v4 does not work, you can try this alternative option. Open the /etc/rc.local file. This file is executed during every system start.sudo nano /etc/rc.local and add the command for the forwarding before exit 0. (Ethernet cable)sudo iptables -I PREROUTING -t nat -i eth0 -p udp --src 0.0.0.0 --dport 67 -j DNAT --to 0.0.0.0:6767 (WIFI dongle)sudo iptables -I PREROUTING -t nat -i wlan0 -p udp --src 0.0.0.0 --dport 67 -j DNAT --to 0.0.0.0:6767Option 2: with NodeJS and DasherFHEM Server can be connected to the network via ethernet cable Multiple Amazon dash buttons can be used Flexible as other services, such as, Zapier or IFTTT can be pinged via HTTP GET and POST Request.- Additional software is requiredAs first step the package lists need to be updated and the required applications git & libpcap-dev need to be installed. sudo apt-get update && sudo apt-get install libpcap-dev Furthermore, the current version of Node.js (v6.5.0) is required. Detailed Tutorial Add the Node.js source to your package list. curl -sL https://deb.nodesource.com/setup_6.x | sudo -E bash - You can now install Node.js. sudo apt-get install -y nodejsAs next step you can download and install the Node.js application "Dasher". Navigate with cd ~/ into your home folder and copy Dasher from Github. git clone https://github.com/maddox/dasher.git Navigate to the Dasher directory cd dasher Now the required programs and dependencies of Dasher need to be installed. npm installDasher requires the MAC address of your dash button which are easily found. Log into your router and have a look at the connected devices. You can also use the program "find-button" that is provided by Dasher. script/find_button Press after "find-button" was started the dash button. The program should show the MAC address. Copy the MAC address and close the program with ctrl+c on a Mac or strg+c in Windows.Now you need to adjust the URL in the Dasher config/config.json file the way you want. nano config/config.json{"buttons":[ { "name": "Dash1", "address": "ac:61:b3:e1:fa:fe", "url": "http://127.0.0.1:8083/fhem?cmd=set%20DashButton1%20toggle", "method": "POST", "json": true, "body": {"value1": "any value", "value2": "another value"} } ]} The IP 127.0.0.1 points always to the local computer, i.e. himself. As alternative you can write http://localhost:8083/fhem?cmd=set%20DashButton1%20toggle.Start Dasher and press the button to check if everything works. If everything is fine the terminal should show "Dash1 pressed". Dasher and your button work and FHEM can be configured. You can close the program with ctrl+c. sudo npm run startConfigure FHEM for the Dash Button Open the FHEM configuration file fhem.cfg and add the following code. Define in FHEM a Dummy for the dash button. Here is a good help for beginners.define DashButton1 dummy attr DashButton1 webCmd toggleCreate a notify that turns your FHEM device on or off. Replace YourFHEMDevice with the name of your FHEM device. Save the cfg file. In case you have closed Dasher, you can start it with sudo npm run start and press the dash button.define n_DashButton1 notify DashButton1.* IF ([YourFHEMDevice] eq "on") (set YourFHEMDevice off) ELSE (set YourFHEMDevice on) Explenation: The Dummy DashButton1 will be define n_DashButton1[name of the notify] notify[the command] DashButton1.*[in case of a change of the Dummy Reading, then] IF ([YourFHEMDevice] eq "on") [check if Reading of YourFHEMDevice is on, then] (set YourFHEMDevice off) [set YourFHEMDevice Reading to off] ELSE (set YourFHEMDevice on) [otherwise set YourFHEMDevice Reading to on] To configure the dash button to turn off multiple FHEM devices, use the following configuration. Again, replace YourFHEMDevice and YourFHEMDevice1 with your FHEM devices names. You can write as many devices as you want behind each other as long as they are separated by ;;.define n_DashButton1 notify DashButton1.* set YourFHEMDevice off;; set YourFHEMDevice1 offSet up Dasher Autostart After every system start the Dasher Programm would need to be reconfigured by hand. Set up a Init script for Dasher that the Dasher runs as a service runs in the background and is started when the system is started. Tutorial You can see here roughly the time the setup needs to react.
- 10 Aug, 2017
- 2 min read
Fhem config file (fhem.cfg) write protected
After the last major update of FHEM, the FHEM configurtion file (fhem.cfg) is write protected and cannot be changed. This protection was set in order to protect system settings and files to be changed by new users. If you click in the FHEM user interface onto Edit files and then fhem.cfg as you are used to you will see the content of the file but cannot edit it. The notification "You can enable saving this file by setting the editConfig attribute, but read the documentation first for the side effects." advises you to read the documentation before making any changes.If you are confident with the FHEM configuration file and know what you are doing you can cancel the write protection by setting the arribute editConfig to the value of 1. The easiest way to set the editConfig attribute to 1 is by typing the command attr WEB editConfig 1in the command text field in the upper region of the user interface and hitting ENTER.After that you just need to save the config file. Therefore, click onto Save config on the left side.Hint: Before making any changes to the fhem.cfg file make sure you make a backup copy of that file. In case anything goes wrong and you somehow destroy the configuration file you are able to revert to the initial state.Below you can find the initial, unedidted content of the fhem.cfg file of FHEM 5.7 attr global userattr cmdIcon devStateIcon devStateStyle icon sortby webCmd widgetOverride attr global autoload_undefined_devices 1 attr global logfile ./log/fhem-%Y-%m.log attr global modpath . attr global motd SecurityCheck:\ \ WEB,WEBphone,WEBtablet has no basicAuth attribute.\ telnetPort has no password/globalpassword attribute.\ \ Restart FHEM for a new check if the problem is fixed,\ or set the global attribute motd to none to supress this message.\attr global statefile ./log/fhem.save attr global updateInBackground 1 attr global verbose 3define telnetPort telnet 7072 globaldefine WEB FHEMWEB 8083 global attr WEB editConfig 1define WEBphone FHEMWEB 8084 global attr WEBphone stylesheetPrefix smallscreendefine WEBtablet FHEMWEB 8085 global attr WEBtablet stylesheetPrefix touchpad# Fake FileLog entry, to access the fhem log from FHEMWEB define Logfile FileLog ./log/fhem-%Y-%m.log fakelogdefine autocreate autocreate attr autocreate filelog ./log/%NAME-%Y.logdefine eventTypes eventTypes ./log/eventTypes.txt# Disable this to avoid looking for new USB devices on startup define initialUsbCheck notify global:INITIALIZED usb create
- 22 Apr, 2017
- 3 min read
Auto start Midori Browser in Fullscreen Kiosk Modus - Raspberry Pi Linux
I will show you in this tutorial how to start the Midori Browser in full screen mode (kiosk mode) automatically after the Raspberry booted. The graphical shell (desktop) of Rapsian will not be required or started. A pratical applicaton of this would be, for example, an info monitor on an exhibition. In this project, I want to realise a small contol center for FHEM. Therefore, a PiTFT with capacitive touch screen will be used. This, however, is covered in a later tutorial.This tutorial assumes that the Raspberyy Pi or Debian Linux computer starts in terminal/console mode and not in desktop mode loading the graphical shell. Contents Midori Full Screen AutostartRun the following command with the console to update the package list. After that the Midori browser and matchbox will be installed. sudo apt-get update && sudo apt-get install -y midori matchboxCreate a new shell script file with the name_startMidori.sh_ in the home folder and open the Nano text editor. Name and save location can be chosen as you like. nano startMidori.shAdd the following code and exit the Nano text editor ctr+x. To save the changes press Y and Enter.#!/bin/sh xset -dpms # disable DPMS (Energy Star) features. xset s off # disable screen saver xset s noblank # don't blank the video device matchbox-window-manager & midori -e Fullscreen -a https://wordpress-x0o8gcg88www8k084ks8k088.c.benroe.deMake the script excecutable. sudo chmod +x startMidori.shYou can test the script if you run the following command. sudo xinit ./startMidori.sh You can exit the Midori browser with the key combinationCTRL + ALT + F1. In case you called the scriped via SSH, you can exit the script via CTRL + c.In order to automatically excecute the script when the Raspberry starts we need to edit the rc.local file. This script is excecuted when the Raspberry starts. sudo nano /etc/rc.local Add the following code before exit 0. For HDMI: sudo xinit /home/pi/startMidori.sh & For PiTFT: FRAMEBUFFER=/dev/fb1 xinit /home/pi/startMidori.sh & The & at the end is important that the subsequent lines are excecuted. You can run the script with a time delay if you sourround the command in brackets and preprend /bin/sleep 10 && schreibst. The 10 means a delay of 10 seconds. (/bin/sleep 10 && xinit /home/pi/startMidori.sh) &Unfortunately, the system needs to sign in automatically to be able to run the script. You can set this up easily if you use Raspbian Jessie using sudo raspi-config and the selecting Console Autologin under boot options. You need to use the following command to the console if you use and older Raspbian version. sudo nano /etc/inittab Search the following line 1:2345:respawn:/sbin/getty 115200 tty1 and comment it with #. #1:2345:respawn:/sbin/getty 115200 tty1 After this line add the following command. 1:2345:respawn:/bin/login -f pi tty1 /dev/tty1 2>&1 This line enables that the user pi logs in without authentication.Now you just need to restart the Raspberry pi … sudo reboot … and the Midori browser should open with the desired webpage in full screen mode. You will exit the Midori Browser using CTRL + ALT + F1.Optional: Rotate screen If you want to show the screen in vertical mode or rotate by 180 degrees you can set this up using the following steps.Open the config.txt file with the Nano editor sudo nano /boot/config.txtAdd the following test at the beginning of the config.txt file. display_rotate=2 display_rotate=0 Normal display_rotate=1 90 degrees display_rotate=2 180 degrees display_rotate=3 270 degrees display_rotate=0x10000 Mirror horizontal display_rotate=0x20000 Mirror verticalExit the editing with the shortcut ctrl+x and save the changes with y.After a restart the screen will be shown rotated as you wanted. sudo rebootOptional: Hide mouse pointerInstall the program unclutter. sudo apt-get install unclutterAdd unclutter & to the startMidori.sh script. sudo nano startMidori.sh#!/bin/sh xset -dpms # disable DPMS (Energy Star) features. xset s off # disable screen saver xset s noblank # don't blank the video device unclutter & matchbox-window-manager & midori -e Fullscreen -a https://wordpress-x0o8gcg88www8k084ks8k088.c.benroe.deA detailed article about "[Raspberry Pi: Run Applications at System Start](http://Raspberry Pi: Programme beim Systemstart ausführen)"
- 22 Jan, 2017
- 1 min read
FHEM Tip #1: update and restart button in FHEM sidebar
Click on Edit files in the side bar and then fhem.cfgCopy the following code into the fhem.cfg file and click on save fhem.cfg. attr WEB menuEntries Update,cmd=update,UpdateCheck,cmd=update+check,Restart,cmd=shutdown+restartAfter the page was reloaded, three new menue entries should appear in the side bar, namelyUpdate: updated FHEM to the most recent version (requires restart) UpdateCheck: show the latest changes Restart: restart the FHEMIf you cannot edit the fhem.cfg file please have a look at this short tutorial.
- 21 Jan, 2017
- 2 min read
Install FHEM on a Raspberry Pi or Debian Linux
What is FHEM? FHEM is a open source server for home automation that is written in Perl. It can perform repeating tasks at home, such as, switching lights, heating, rolling shutters. It can also record an visualise data such as temperature, humidity, power consumption. Optional Step (Rasperry Pi only): sudo raspi-configSelect the menu Expand FilesystemAfter that Internationalisation Options -> Change Timezone and select the time zone of the current location (this is important for the correct time settings in FHEM)We can now proceed with the installation of FHEMUpdate the packages, install updates, remove unnecessary packages and reboot the system. sudo apt-get update && sudo apt-get upgrade -y && sudo apt-get autoremove -y && sudo rebootInstall required packages sudo apt-get -f install && sudo apt-get install perl libdevice-serialport-perl libio-socket-ssl-perl libwww-perl libxml-simple-perl -yDownload and install the current FHEM version (Replace 5.7 in the code snippet with the current version number) http://fhem.de/fhem.html#Download) sudo wget http://fhem.de/fhem-5.7.deb && sudo dpkg -i fhem-5.7.debDelete installation file sudo rm fhem-5.7.debSetting user access rights for the FHEM folder cd /opt sudo chmod -R a+w fhemAdd the current user and FHEM to the group tty to gain read/write access for this device (it is important later on when receiver are connected via USB, e.g. CUL) sudo usermod -a -G tty pi && sudo usermod -a -G tty fhem Replace pi in the code snippet by the currently used user name. You can get the current user name through the terminal command whoami.Open the url http://192.168.x.y:8083/fhem/ in a browser of your choice and the FHEM web interface should appear (Replace xy with the IP adress of the Raspberry Pi).Hint: The FHEM configuration file "fhem.cfg" is read-only after a fresh installation of FHEM. I describe how you can change the write protection in the following article. https://wordpress-x0o8gcg88www8k084ks8k088.c.benroe.de/fhem-konfigurations-datei-fhem-cfg-kann-nicht-bearbeitet-werden/

- 20 Jan, 2017
- 1 min read
Show sunrise and sunset time in FHEM
In this tutorial I will guide you how to show the sunrise time in FHEM Prerequesites: - a working FHEM version Open the FHEM configuration file (fhem.cfg) under Edit files.Add the following global attributes to set your location. attr global latitude 51.345753 attr global longitude 12.38213 Replace the latitude and longitude values with your desired location. The decimal values of your location can be determined here.To save the values for sunrise and sunset we are going to create two dummies define Sunrise dummy define Sunset dummyAs the values need to be generated every day after 12 pm we define the following function define sun_riseSet_timer at *03:00:00 { my $s = sunrise();; fhem("set Sunrise $s");; $s = sunset();; fhem("set Sunset $s");; } This way, the next time of sunrise and sunsets will be set every day at 0.05 am to the dummies.Now we need to assign the room "Weather" to the dummies attr Sonnenaufgang room Weather attr Sonnenuntergang room WeatherFinally, your code should look like this:attr global latitude 51.339695 attr global longitude 12.373075############## Sunrise/Sunset ###################define Sunrise dummy attr Sunrise room Weatherdefine Sunset dummy attr Sunset room Weatherdefine sun_riseSet_timer at *00:05:00 { my $s = sunrise();; fhem("set Sunrise $s");; $s = sunset();; fhem("set Sunset $s");; }You can use the following commands if you want to know the brightness of the sunrise or sundown sunrise("REAL"); #Sun rises or sets at horizon sunrise("CIVIL"); #The sun is behind the horizon but it is still bright sunrise("NAUTIC") #Shapes can be still distinguished against the horizon (e.g. on the sea) sunrise("ASTRONOMIC") #It is completely darkMore information to sunrise() can be found on the Commandref page. Please leave a comment if you have questions or ideas.
- 10 Sep, 2016
- 6 Min. Lesezeit
FHEM Geräte mit Amazon Dash Button schalten/steuern - raspberry pi home automation
In diesem Artikel haben ich erklärt, wie du IFTTT Aktionen mit dem Amazon Dash Button auslösen kannst. Durch abändern einer Zeile kannst du jedes beliebige FHEM Geräte schalten. Wie das funktioniert? Durch aufrufen einer URL (HTTP Post Request), kann man FHEM sagen das es etwas machen soll. So kannst du Lichter ein/aus schalten, Rollläden öffnen/schließen, Funksteckdosen ein/aus schalten und vieles mehr. Der Dash Button eignet sich nicht für alle Anwendungsfälle, da der Button eine Verzögerung von ca. 5-6 Sekunden hat, bis das FHEM Gerät geschalten wird. Was wird benötigt:Raspberry Pi oder Debian/Ubuntu Linux Rechner Amazon Dash Button laufendes FHEMHier ein Beispielvideo, wie mit einem Amazon Dash Button und FHEM eine Phillips Hue Lampe einschaltet. Vielen Dank an Hagen für das Video.Inhalt Variante 1: FHEM Modul dash_dhcpfunktioniert ohne zusätzliche Software FHEM Server kann per LAN-Kabel mit dem Netzwerk verbunden sein es können mehrere Amazon Dash Buttons eingebunden werdenAktualisiere dein FHEM, dass es auf dem neusten Stand ist und das Modul dash_dhcp installiert ist. Hier eine kurze Anleitung wie du ein Update Button in die Seitenleiste der FHEM Web-Oberfläche einbindest.Finde die MAC Adresse deines Amazon Dash Button heraus. Schau dazu in deinen Router. Ich habe einen Fritzbox. Dort sind alles WIFI Geräte unter WLAN -> Funknetz aufgelistet. Für Mac gibt es das kostenlose Programm LanScan.Öffne die FHEM Konfigurationsdatei fhem.cfg und füge folgenden Code hinzu. Ersetze die MAC Adresse hinter allowed mit der deines Dash Button. Du kannst mehrere MAC Adressen mit einem , getrennt hintereinander schreiben. Die MAC Adresse sollte in Kleinbuchstaben geschrieben werden.define DashButton dash_dhcp attr DashButton allowed ac:66:be:e3:fb:fe attr DashButton port 6767 attr DashButton room dashbuttondefine n_DashButton1 notify DashButton:ac-66-be-e3-fb-fe..short IF ([DeinFhemGeraet] eq "on") (set DeinFhemGeraet off) ELSE (set DeinFhemGeraet on) Ersetze im notify Befehl DeinFhemGeraet mit dem Namen deines FHEM Gerätes was du an/aus schalten möchtest und achte darauf das hier die MAC Adresse mit Bindestrichen geschrieben wird. Speichern nicht vergessen! Mehrere Dash Button kannst du mit einem Komma trennen.attr DashButton allowed ac:66:be:e3:fb:fe,ac:66:be:e3:fa:31Du musst noch die Daten vom Port 67 auf den Port 6767 weiterleiten. Die DHCP Anfragen kommen über den Port 67 rein und auf diesen Port hat nur ROOT Zugriffsrechte. FHEM wird standardmäßig nicht mit ROOT Rechten gestartet. Ist dein FHEM Server über eine WLAN Stick mit dem Netzwerk verbunden, dann gibt folgenden Befehl in den Terminal ein.sudo iptables -I PREROUTING -t nat -i wlan0 -p udp --src 0.0.0.0 --dport 67 -j DNAT --to 0.0.0.0:6767 Falls der FHEM Server über ein Netzwerkkabel verbunden ist, verwende folgenden Befehl.sudo iptables -I PREROUTING -t nat -i eth0 -p udp --src 0.0.0.0 --dport 67 -j DNAT --to 0.0.0.0:6767Jetzt solltest du dein FHEM Gerät mit dem Amazon Dash Button ein und ausschalten können. Um zu Prüfen ob der Dash Button von FHEM erkannt wird, kannst du in der FHEM Weboberfläche links auf Event monitor klicken. Nach dem drücken des Dash Button, sollte dash_dhcp DashButton ac-66-be-e3-fb-fe: short erscheinen. Die Umleitung der Ports mittels iptables muss nach einem Neustart neu eingerichtet werden. Installieren das Programm iptables-persistent, damit die Portumleitung nach einem Neustart automatisch geladen wird.sudo apt-get update && sudo apt-get install -y iptables-persistent Während der Installation von iptables-persistent werden ein paar Einstellungen abgefragt. Bestätige alle mit JA. Jetzt kannst du die Portumleitung für den Dash Button in die rules.v4 Datei schreiben. sudo nano /etc/iptables/rules.v4 Füge die Umleitung vor dem letzten COMMIT ein. (Netzwerkkabel)-I PREROUTING -t nat -i eth0 -p udp --src 0.0.0.0 --dport 67 -j DNAT --to 0.0.0.0:6767 (WIFI Stick)-I PREROUTING -t nat -i wlan0 -p udp --src 0.0.0.0 --dport 67 -j DNAT --to 0.0.0.0:6767 Beende den Nano Editor mit ctrl+x und bestätige das Speichern. Nach einem Neustart sudo reboot wird die Datei rules.v4 automatisch geladen und die Portumleitung sollte funktionieren. ALTERNATIVE Falls die Weiterleitung über die rules.v4 Datei nicht funktioniert, hier eine alternative Variante. Öffne die /etc/rc.local Datei. Diese wird bei jedem Neustart ausgeführt.sudo nano /etc/rc.local und füge den Befehl für die Weiterleitung vor exit 0 ein. (Netzwerkkabel)sudo iptables -I PREROUTING -t nat -i eth0 -p udp --src 0.0.0.0 --dport 67 -j DNAT --to 0.0.0.0:6767 (WIFI Stick)sudo iptables -I PREROUTING -t nat -i wlan0 -p udp --src 0.0.0.0 --dport 67 -j DNAT --to 0.0.0.0:6767Variante 2: mit NodeJS und DasherFHEM Server kann per LAN-Kabel mit dem Netzwerk verbunden sein es können mehrere Amazon Dash Buttons eingebunden werden flexibel da per HTTP GET und POST Request andere Service wie Zapier oder IFTTT "angepingt" werden können.- zusätzliche Software erforderlichAls erstes werden die Paketlisten neu eingelesen und installieren die benötigten Programme git & libpcap-dev. sudo apt-get update && sudo apt-get install libpcap-dev Du benötigst des weiteren die aktuelle Version von Node.js (v6.5.0). Ausführliche Anleitung Node.js Quelle zu deinen Paketlisten hinzufügen. curl -sL https://deb.nodesource.com/setup_6.x | sudo -E bash - Jetzt kannst du Node.js installieren. sudo apt-get install -y nodejsAls nächstes kannst du das Node.js Programm "Dasher" herunterladen und installieren. Navigiere mit cd ~/ in dein Home-Verzeichnis und kopiere Dasher von Github. git clone https://github.com/maddox/dasher.git Navigiere in das Dasher Verzeichnis cd dasher Jetzt müssen noch die von Dasher benötigten Programme/Dependencies installiert werden. npm installDasher benötigt die MAC Address von deinem Dash Button. Diese kannst du einfach herausfinden. Log dich in dein Router ein und schau unter verbundene Geräte. Du kannst auch das mitgelieferte Programm "find_button" verwenden. script/find_button Drück nach dem Start von "find_button" den Dash Button. Es sollte dir die MAC-Adresse angezeigt werden. Kopiere dir die MAC-Adresse und beende das Programm mit ctrl+c am Mac, oder strg+c bei Windows.Jetzt musst du nur noch die URL in der Dasher config/config.json Datei nach deinen Wünschen anpassen. nano config/config.json{"buttons":[ { "name": "Dash1", "address": "ac:61:b3:e1:fa:fe", "url": "http://127.0.0.1:8083/fhem?cmd=set%20DashButton1%20toggle", "method": "POST", "json": true, "body": {"value1": "any value", "value2": "another value"} } ]} Die IP 127.0.0.1 zeigt immer auf den Lokalen Rechner (also ihn selbst). Alternativ kannst du auch http://localhost:8083/fhem?cmd=set%20DashButton1%20toggle schreiben.Starte Dasher und drück den Knopf um zu testen ob alles funktioniert. Wenn alles funktioniert, sollte im Terminal „Dash1 pressed“ stehen. Dasher und dein Dash Button funktionieren. Jetzt kannst du FHEM konfigurieren. Mit ctrl+c kannst du das Programm beenden. sudo npm run startFHEM für den Dash Button konfigurieren Öffne die FHEM Konfigurationsdatei fhem.cfg und füge folgenden Code hinein. Definiere in FHEM einen Dummy für den Dash Button. Hier eine gute Einsteigerhilfe.define DashButton1 dummy attr DashButton1 webCmd toggleErstelle ein notify der dein FHEM Gerät ein/aus schaltet. Ersetze DeinFhemGeraet durch den Namen deines FHEM Gerätes. Speicher die cfg Datei. Falls du Dasher geschlossen hast, starte es mit sudo npm run start und drück den Dash Button.define n_DashButton1 notify DashButton1.* IF ([DeinFhemGeraet] eq "on") (set DeinFhemGeraet off) ELSE (set DeinFhemGeraet on) Erklärung: Der Dummy DashButton1 wird define n_DashButton1[Name des Notify] notify[der Befehl] DashButton1.*[wenn eine Änderung des Dummy Reading, dann] IF ([DeinFhemGeraet] eq "on") [überprüfe ob Reading von DeinFhemGeraet gleich on ist, dann] (set DeinFhemGeraet off) [setze DeinFhemGeraet Reading auf off] ELSE (set DeinFhemGeraet on) [andernfalls setze DeinFhemGeraet Reading auf on] Um den Dash Button als Ausschalter für mehrere FHEM Geräte zu konfigurieren, verwende diese Konfiguration. Ersetze wieder DeinFhemGeraet1 und DeinFhemGeraet1 mit dem FHEM Gerätenamen. Du kannst so viele Geräte hintereinander schreiben. Sie müssen nur immer mit ;; getrennt werden.define n_DashButton1 notify DashButton1.* set DeinFhemGeraet1 off;; set DeinFhemGeraet1 offDasher Autostart einrichten Nach jedem Neustart musst du das Dasher Programm von Hand starten. Richte ein Init Script für Dasher ein, damit Dasher als Service im Hintergrund läuft und bei einem Neustart gestartet wird. Anleitung Hier sieht man ungefähr wie die Reaktionszeit ist. Auf blog.moneybag.de gibt es eine andere Variante die nicht mit dem ARP Request funktioniert, sondern mit LAN-PING.
- 10 Dec, 2015
- 2 Min. Lesezeit
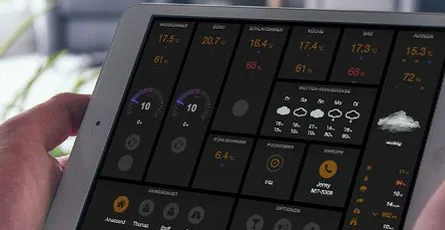
FHEM Tablet UI #2: wie index.html anpassen/bearbeiten
In dem vorherigen Beitrag habe ich gezeigt wie du die FHEM Tablet-UI installierst. Um den Inhalt der Tablet optimierte Oberfläche anzupassen, muss man die index.html im Ordner /opt/fhem/www/tablet/ bearbeiten. In diesem Artikel erkläre ich, wie du die index.html Datei am einfachsten anpassen kannst und welche Programme du davor benötigst. Alle Varianten funktionieren mit Windows, Mac OSX oder Linux. InhaltMethode 1: Terminal/Kommandozeile und Nano Texteditor Methode 2: via SFTP mit Filezilla und Atom TexteditorMethode 1: Terminal/Kommandozeile und Nano Texteditorgeeignet um schnell kleine Änderungen an einer Datei vorzunehmen keine zusätzliche Software erforderlich die Maus kann nicht verwendet werden keine SyntaxhervorhebungMelde dich per SSH an dem Computer an auf dem FHEM läuft. Für Windows kannst du zum Beispiel Putty verwenden und für Mac OSX den Terminal. ssh xxx@zzz.zzzz.zzz.zz Ersetze xxx mit deinem Benutzernamen und zzz.zzzz.zzz.zz mit der IP Adresse. Bei mir sieht der Befehl so aus ssh pi@192.168.178.99Navigiere zum Ordner mit der zu bearbeitenden Datei. cd /opt/fhem/www/tablet/Öffne die Datei mit dem Nano Texteditor und verändere den Inhalt. nano index.htmlMit der Tastenkombinationctrl+o(Mac)/strg+o(Windows) kannst du die Datei Speichern. Mit ctrl+x(Mac)/strg+x(Windows) kannst du den Texteditor beenden und gegebenenfalls speichern. Tablet-UI index.html Datei im Nano Editor (Mac Terminal) geöffnet Methode 2: via SFTP mit Filezilla und Atom Texteditoreinfacheres Bearbeiten da die Maus benutzt werden kann Vorteile des Atom Editor nutzen (Syntaxhervorhebung, Autovervollständigung) zusätzliche Software erforderlichLade dir Filezilla (FTP/SFTP) und Atom (Texteditor) für dein Betriebssystem herunter und installiere sie. Öffne Filezilla und geh in die Einstellungen. Unter Bearbeiten von Dateien, stell den Atom Editor als Standarteditor ein und Immer Standarteditor verwenden(siehe Bild). Stell eine Verbindung mit Filezille her. Ersetze die Daten in den Feldern mit deinen Daten. Der Standart SFTP/SSH Port ist 22. Navigiere zum Tablet-UI Ordner /opt/fhem/www/tablet/ und mach ein Rechtsklick Ansehen/Bearbeiten auf die index.html Datei. Danach Lokale Datei verwerfen, dann Datei neu herunterladen und bearbeiten auswählen. Jetzt sollte sich die Datei im Atom Editor öffnen. Wenn du jetzt die veränderte Datei im Atom Editor speicherst fragt dich Filezille, ob sie zurück auf den Server geladen werden soll. Klick auf Ja. Dies kannst du jetzt so oft wiederholen bis du die Datei im Editor schließt, oder sie lokal an einem anderen Ort speicherst. Tablet-UI index.html Datei im Atom.io Editor geöffnet Es kann sein das du die geänderte index.html Datei nicht speichern kannst, da du nicht die benötigten Benutzerrechte besitzt. Das kannst du ändern indem du dich als Besitzer der Datei einträgst. Navigiere in den Ordner wo sich die index.html befindet cd /opt/fhem/www/tablet und ändere den Besitzer der Datei. Ersetze Mr-T mit deinen Benutzernamen. Der Befehl whoami gibt dir deinen aktuellen Benutzernamen aus. sudo chown Mr-T index.html
- 28 Nov, 2015
- 2 Min. Lesezeit
FHEM Konfigurations Datei (fhem.cfg) kann nicht bearbeitet werden (Schreibschutz)
Seit dem letzten großen Update von FHEM, ist die FHEM Konfigurationsdatei (fhem.cfg) nach der Installation schreibgeschützt und kann nicht verändert werden. Diese Sperre soll Neulinge davor schützen wichtige Systemdateien zu verändern. Klickt man wie gewohnt in der FHEM Oberfläche auf Edit files und dann fhem.cfg sieht man den Inhalt dieser Datei, aber er kann nicht verändert werden. Ein Hinweis "You can enable saving this file by setting the editConfig attribute, but read the documentation first for the side effects." weisst uns darauf hin, dass wir die Dokumentation lesen sollen.Wenn du vertraut mit der FHEM Konfigurationsdatei bist und weisst was du tust, kannst du den Schreibschutz aufheben indem du das Attribute editConfig auf 1 setzt. Am einfachsten kannst du das editConfig Attribut auf 1 setzen wenn du diesen Befehl attr WEB editConfig 1oben in das Befehls-Textfeld ein gibst und ENTER drückst.Danach musst du die config Datei noch speichern. Dazu klickst du links auf Save config.Tipp: Bevor du Veränderungen an der fhem.cfg Datei machst, solltest du dir immer eine Kopie davon speichern. Wenn etwas schief läuft und du dir deine Konfigurations-Datei zerstörst, kannst du so ganz einfach den ursprünglichen Zustand wiederherstellen.Hier noch der unveränderte Inhalt der fhem.cfg von FHEM 5.7 attr global userattr cmdIcon devStateIcon devStateStyle icon sortby webCmd widgetOverride attr global autoload_undefined_devices 1 attr global logfile ./log/fhem-%Y-%m.log attr global modpath . attr global motd SecurityCheck:\ \ WEB,WEBphone,WEBtablet has no basicAuth attribute.\ telnetPort has no password/globalpassword attribute.\ \ Restart FHEM for a new check if the problem is fixed,\ or set the global attribute motd to none to supress this message.\attr global statefile ./log/fhem.save attr global updateInBackground 1 attr global verbose 3define telnetPort telnet 7072 globaldefine WEB FHEMWEB 8083 global attr WEB editConfig 1define WEBphone FHEMWEB 8084 global attr WEBphone stylesheetPrefix smallscreendefine WEBtablet FHEMWEB 8085 global attr WEBtablet stylesheetPrefix touchpad# Fake FileLog entry, to access the fhem log from FHEMWEB define Logfile FileLog ./log/fhem-%Y-%m.log fakelogdefine autocreate autocreate attr autocreate filelog ./log/%NAME-%Y.logdefine eventTypes eventTypes ./log/eventTypes.txt# Disable this to avoid looking for new USB devices on startup define initialUsbCheck notify global:INITIALIZED usb create
- 14 Jun, 2015
- 1 Min. Lesezeit
FHEM Tablet UI #1: optimierte Tablet Benutzeroberfläche einrichten
FHEM Tablet UI ist eine optimierte Benutzeroberfläche für FHEM. Es werden keine weiteren Programme benötigt außer eine laufende FHEM Version. [DEMO] Voraussetzung:laufendes FHEM Raspberry muss mit dem Internet verbunden seinUpdate (13.01.16) Punkt 1-3 kannst du überspringen, wenn du folgende Befehle oben in das Befehls-Eingabefeld von FHEM kopierst und mit Enter bestätigst. update all https://raw.githubusercontent.com/knowthelist/fhem-tablet-ui/master/controls_fhemtabletui.txtPunkt 5 kannst du mit diesem Befehl überspringen. define TABLETUI HTTPSRV ftui/ ./www/tablet Tablet-UIJetzt noch rechts auf Save config klicken.Lade dir die .zip mit den benötigten Dateien von Github herunter.wget https://github.com/knowthelist/fhem-tablet-ui/archive/master.zipEntpacke die .zip Datei und lösche sie danach. unzip master.zip && rm master.zipKopiere den Ordner tablet in den fhem/www Ordner.cp -r ./fhem-tablet-ui-master/www/tablet /opt/fhem/www/Erstelle eine Kopie der index-example.html Datei und benne sie in index.html um.sudo cp /opt/fhem/www/tablet/index-example.html /opt/fhem/www/tablet/index.htmlFüge deiner fhem.cfg Datei folgende Zeile hinzu. Du kannst dies über die Weboberfläche von FHEM tun (Edit files -> fhem.cfg) define TABLETUI HTTPSRV ftui/ ./www/tablet/ Tablet-UI oder per Konsole mit dem Nano Text Editor. nano /opt/fhem/fhem.cfg Beenden kannst du Nano mit ctrl+x und dann y enterRufe jetzt http://ip-des-raspberry:8083/fhem/ftui/ auf deinem Tablet auf. Das Tablet muss sich im selben Netzwerk wie der Raspberry befinden. Weitere Informationen zu FHEM Tablet UI findet ihr hier: FHEM Wiki FAQ FHEM Forum In den nächsten Tagen werden weitere Beiträge folgen, wie du die Tablet UI Oberfläche nach deinen Wünschen anpasst. Bitte Anregungen und Tipps in die Kommentare schreiben.
- 13 Feb, 2015
- 1 Min. Lesezeit
FHEM Tipp #1: Update und Neustart Button in der Seitenleiste
klickt auf Edit files in der Seitenleiste und dann fhem.cfgkopiert folgenden Code in die fhem.cfg Datei und klickt danach auf den save fhem.cfg Button. attr WEB menuEntries Update,cmd=update,UpdateCheck,cmd=update+check,Restart,cmd=shutdown+restartNach einem Reload der Seite, sollten jetzt drei neue Einträge in der Seitenleiste sein.Update: updated FHEM auf die neuste Version (Neustart danach erforderlich) UpdateCheck: zeigt dir die neusten Änderungen an Restart: startet FHEM neuFalls du die fhem.cfg Datei nicht bearbeiten kannst, schau dir diese kurze Anleitung an.
- 08 Feb, 2015
- 1 Min. Lesezeit
FHEM 5.8 auf dem Raspberry Pi oder Debian installieren
Was ist FHEM? FHEM ist ein in perl geschriebener Server für die Heimautomatisierung. Man kann mit FHEM häufig auftretende Aufgaben automatisieren, wie z.B. Lampen, Rollläden, Heizung und vieles mehr schalten, oder Ereignisse wie Temperatur, Feuchtigkeit, Stromverbrauch protokollieren und visualisieren. Für weitere Ideen siehe diesen Link. Optional: sudo raspi-configMenüeintrag Expand Filesystem auswählendanach Internationalisation Options -> Change Timezone und Zeitzone für den aktuellen Standpunkt auswählen (wichtig für die korrekte Zeitangabe in FHEM)Jetzt kommen wir zur installation von FHEMaktualisieren des Systemssudo apt-get update && sudo apt-get upgrade -ybenötigte Pakete installieren sudo apt-get -f install && sudo apt-get install perl libdevice-serialport-perl libio-socket-ssl-perl libwww-perl libxml-simple-perl libjson-perl sqlite3 libdbd-sqlite3-perl libtext-diff-perl -yaktuelle FHEM Version herunterladen und installieren (5.8 mit der aktuellsten Versionsnummer ersetzen http://fhem.de/fhem.html#Download) sudo wget http://fhem.de/fhem-5.8.deb && sudo dpkg -i fhem-5.8.debInstallationsdatei löschen sudo rm fhem-5.8.debZugriffsrechte für den Ordner fhem setzencd /opt sudo chmod -R a+w fhemdem aktuellen Benutzer und fhem der Gruppe tty hinzufügen um Lese/Schreibrechte für dieses Gerät zu geben (später wichtig wenn Empfänger per USB angeschlossen werden wie z.B. CUL)sudo usermod -a -G tty pi && sudo usermod -a -G tty fhem pi durch den aktuell verwendeten Benutzernamen ersetzen. Mit dem Befehlt whoami könnt ihr euch den Namen anzeigen lassen.im Browser http://192.168.x.y:8083/fhem/ (xy mit der IP des Raspberry ersetzten) aufrufen und das FHEM Webinterface sollte erscheinenTipp: Nach der Neu Installation von FHEM ist die FHEM Konfigurationsdatei "fhem.cfg" schreibgeschützt und kann nicht verändert werden. In diesem Artikel beschreibe ich, wie du den Schreibschutz aufheben kannst. https://wordpress-x0o8gcg88www8k084ks8k088.c.benroe.de/fhem-konfigurations-datei-fhem-cfg-kann-nicht-bearbeitet-werden/
- 24 Sep, 2014
- 1 Min. Lesezeit
Uhrzeit des Sonnenaufgang/ Sonnenuntergang in FHEM anzeigen
In diesem Tutorial zeige ich dir, wie du die Uhrzeit des Sonnenaufgang und Sonnenuntergang in FHEM anzeigen lassen kannst. Voraussetzung: - eine laufende FHEM Version Öffnet die Konfigurationsdatei (fhem.cfg) von FHEM.Fügt folgende Globale Attribute hinzu um euren Standort festzulegen. attr global latitude 51.345753 attr global longitude 12.38213 Ersetzt die latitude und longitude Angaben mit eurem Standort. Hier könnt ihr die dezimal Werte für eueren Standort herausfinden.Um die Werte für Sonnenauf- und Sonnenuntergang zu speichern, erstellen wir zwei Dummy’s define Sonnenaufgang dummy define Sonnenuntergang dummyDa die Werte jeden Tag nach 0Uhr neu generiert werden müssen, erstellen wir folgende Funktion define sun_riseSet_timer at *00:05:00 { my $s = sunrise();; fhem("set Sonnenaufgang $s");; $s = sunset();; fhem("set Sonnenuntergang $s");; } Jeden Tag um 0:05Uhr wird die Uhrzeit für die nächsten Sonnenaufgang/Sonnenuntergang den Dummy’s zugewiesen.Nun weisen wir den Dummy’s noch den Raum Wetter zu. attr Sonnenaufgang room Wetter attr Sonnenuntergang room WetterAm Ende müsste euer hinzugefügter Code so aussehen.attr global latitude 51.339695 attr global longitude 12.373075############## Sunrise/Sunset ###################define Sonnenaufgang dummy attr Sonnenaufgang room Wetterdefine Sonnenuntergang dummy attr Sonnenuntergang room Wetterdefine sun_riseSet_timer at *00:05:00 { my $s = sunrise();; fhem("set Sonnenaufgang $s");; $s = sunset();; fhem("set Sonnenuntergang $s");; }Wenn ihr einen bestimmten Helligkeitsgrad des Sonnenaufgang/Sonnenuntergang wissen möchtet könnt ihr folgende Befehle verwenden. sunrise("REAL"); #Sonne geht am Horizont auf oder unter sunrise("CIVIL"); #Sonne ist hinter dem Horizont, aber es ist noch Hell sunrise("NAUTIC") #Umrisse können noch gegen den Horizont wahrgenommen werden (z.B auf dem Meer) sunrise("ASTRONOMIC") #es ist komplett dunkelWeiter Informationen zu sunrise() findet ihr auf der Commandref Seite. Habt ihr Fragen oder Anregungen hinterlasst ein Kommentar