
- 23 Dec, 2017
- 4 Min. Lesezeit
Bitcoin, Ethereum, Litecoin, oder Bitcoin Cash auf Coinbase einfach und sicher kaufen/verkaufen
Inhalt Coinbase Konto Einrichten, Verifizieren und Zahlungsmittel hinzufügen.Erstelle einen Account auf der Coinbase.com Seite. Achte darauf das du deine richtige E-Mail Adresse angibst und ein sicheres Passwort wählst. Wenn du dich über diesen Link (https://www.coinbase.com/join/5a220fe39bca3b012fe8cbe3) bei Coinbase registrierst und Kryptowährung im Wert von min. 85€ kaufst/verkaufst, erhalten wir beide Bitcoins im Wert von 8€ kostenlos.Du erhältst eine E-Mail von Coinbase, um deine E-Mail Adresse zu bestätigen. Klicke auf den blauen Button mit dem Text "E-Mail-Adresse bestätigen".Du wirst jetzt gebeten deine Handy Nummer anzugeben. Diese dient dann zur Zwei-Faktor-Authentifizierung. Das erhöht die Sicherheit deines Accounts. Keine Sorge du erhältst keine Werbe SMS. Um bei Coinbase Bitcoin oder Ethereum kaufen/verkaufen zu können, musst du leider ein paar weitere Schritte durchführen. Das ist bei den meisten Anbietern wie Bitstamp, oder Kracken gleich aufwändig. Dies ist leider notwendig, um Geldwäsche und anderen Betrügereien vorzubeugen. Scroll auf dem Dashboard etwas nach unten und klicke auf "Verifizieren Sie Ihre Identität". Du hast jetzt die Wahl dich mit deinem Reisepass, Führerschein, oder Ausweis zu verifizieren. Ich habe den Ausweis (Foto ID) gewählt, da dort die Adresse mit vermerkt ist. Achte darauf das auf dem Foto alles gut lesbar ist. Bei einem vorherigen Versuch mit dem Führerschein wurde die Verifizierung abgelehnt. Durch den Ansturm auf die Kryptowährungen dauert die Verifizierung etwas länger. Auf Coinbase wurde bei mir die Verifizierung am schnellsten abgeschlossen (6 Stunden). Bei Bitstamp warte ich nach 2 Wochen immer noch auf eine Bestätigung und Kracken hatte die Verifizierung komplett geschlossen.Der letzte Schritt um die Einrichtung deines Kontos abzuschließen, ist es eine Zahlungsmethode hinzuzufügen. Du hast die Möglichkeit deine Kreditkarte oder ein Bankkonto anzugeben. Unter Einstellungen -> Zahlungsmethoden kannst du ein Zahlungsmittel hinzufügen. Kreditkarte als Zahlungsmittel Aktuell unterstützt Coinbase Kreditkarten von den Anbietern Visa, MasterCard und Maestro. Wenn du deine Kreditkartendaten angegeben hast, kannst du Bitcoin (BTC), Ethereum (ETH), Litecoin (LTC), oder Bitcoin Cash (BCH) bis zu einem wöchentlichen Wert von 500€ kaufen. Achtung beim Kauf mit Kreditkarte entstehen höhere Gebühren (3,99%) und sollte nur für kleinere Beträge genutzt werden, bei denen es schnell gehen soll. Bankkonto als Zahlungsmittel Mit dem Bankkonto kannst du höhere Beträge an Kryptowährung auf Coinbase kaufen und sparst auch an Gebühren. Einzahlungen an Coinbase per Bankkonto (SEPA) sind gebührenfrei. Auszahlungen kosten günstige 0,15€ pro SEPA Auftrag. Wenn du ein Bankkonto hinzugefügt hast, wirst du aufgefordert einen geringen Betrag auf das Coinbase Bankkonto zu überweisen. Dadurch wird sichergestellt das du der Eigentümer dieses Bankkonto bist. Ich habe 3cent überwiesen und am nächsten Werktag wurde es auch schon bestätigt. Das Coinbase Konto ist auf einer Bank in ESTONIA/Estland. Das ist normal, nicht wundern. Ich habe nicht gewartet bis mein Konto verifiziert wurde und sofort einen mittleren Betrag hinterher Überwiesen, da ich in Eile war. Es hat geklappt und wurde auch am nächsten Werktag auf Coinbase gutgeschrieben. Achte unbedingt auf den Betreff der Überweisung! Du erhältst eine Referenznummer für den Betreff, wenn du auf Konten -> EUR Wallet -> Einzahlen klickst.Kaufen und verkaufen von Bitcoin (BTC), Ethereum (ETH), Litecoin (LTC), oder Bitcoin Cash (BCH) Coinbase bietet eine übersichtliche und sichere Möglichkeit Bitcoin, Ethereum, Litecoin, oder Bitcoin Cash zu kaufen/verkaufen. Es ist aber nicht die Methode Kryptowährung zum besten Preis zu kaufen oder verkaufen. Klick auf Kaufen/Verkaufen. Auf dieser Seite kannst du in 5 Schritten Kryptowährung kaufen und verkaufen.wähle die gewünschte Kryptowährung aus (Bitcoin, Ethereum, Litecoin, oder Bitcoin Cash) wähle eine Zahlungsmethode (Kreditkarte, EUR Wallet) leg fest wieviel du kaufen möchtest überprüfe die Gebührentabelle (Kreditkarte->hohe Gebühren, EUR Wallet/SEPA günstig) klick auf den Button "Sofortkauf von ..." um den Kauf abzuschließenSicherheitwähle ein Passwort mit min. 8 Zeichen, Groß- und Kleinbuchstaben, Zahlen und min. einem Sonderzeichen wie .,!?*+- aktiviere die Zwei-Faktor-Authentifizierung sende deine Kryptowährung an eine sichere Hardware Wallet wie den Ledger Nano S, oder Trezor WalletErfahrung und Meinungdie Seite ist übersichtlich aufgebaut und einfach zu bedienen durch die Zwei-Faktor-Authentifizierung ist dein Konto recht gut abgesichert die Verifizierung wurde am schnellsten von allen Anbietern bestätigt (Kracken, Bitstamp) vertrauenswürdiges Unternehmen mit Firmensitz in England günstige Gebühren in Verbindung mit dem SEPA Verfahren schnelle Abwicklung mit SEPA innerhalb von einem WerktagWer nicht warten möchte, kann auf Changelly.com direkt ohne Verifizierung folgende Kryptowährung mit Kreditkarte kaufen. Ethereum (ETH), Monero (XMR), Zcash (ZEC), Dash (DASH), Ether Classic (ETC), Litecoin (LTC), Dogecoin (DOGE), Bitcoin Cash (BCH), Bitcoin Gold (BTG), DigiByte (DGB), Expanse (EXP), GameCredits (GAME), Lisk (LSK), Gulden (NLG), Nxt, PotCoin (POT), Power Ledger (POWR), Syscoin (SYS), TokenCard (TKN), DigitalNote (XDN) Changelly berechnet eine Tauschgebühr von 0,5%

- 03 Dec, 2017
- 1 Min. Lesezeit
Raspbian/Debian Linux Version herausfinden (Wheezy, Jessi oder Stretch) - Raspberry Pi Debian
Befehle mit denen du System Informationen, Versionsnummer und Versionsnamen vom Raspberry Pi Betriebssystem Raspbian anzeigen lassen kannst. Inhaltuname - System Information uname -a Mit diesem Befehl kannst du dir alle wichtigen System Informationen anzeigen lassen. Du kannst dir auch die Informationen separat anzeigen lassen.Kernel Name: uname -s Network Hostname: uname -n Kernel Release: uname -r Kernel Version: uname -v Hardware Name: uname -m Prozessor Typ: uname -p Hardware Platform: uname -i Betriebssystem: uname -ocat - Debian Version cat /etc/debian_version Möchtest du die Debian Versionsnummer herausfinden, dann kannst du diesen Befehl verwenden.lsb_release - Raspbian Versions Namen lsb_release -a Dieser Befehl gibt dir genauere Information zur verwendeten Raspbian Version.Falls du weitere wichtige Befehle kennst, schreib sie in die Kommentare um den anderen zu helfen.
- 19 Oct, 2017
- 4 Min. Lesezeit
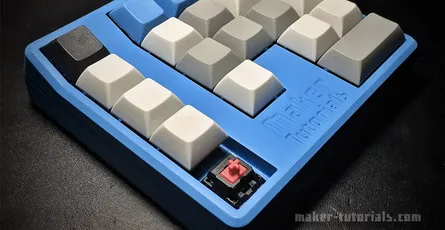
Gamepad/Macro Pad mit Mechanische Cherry MX Tasten 3D drucken - Arduino Pro Micro
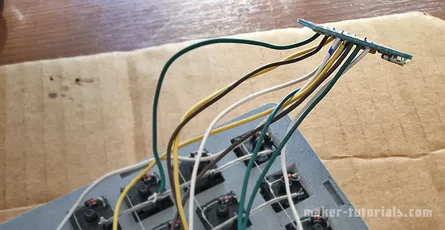
Bau dir dein eigenes Gamepad mit mechanischen Tasten zusammen.Benötigte Teile:1x Arduino Pro Micro (Amazon ca. 10, Aliexpress ca. 4€) 21x mechanische Tastatur Taster Cherry MX oder Gateron Switches (Amazon, Aliexpress, Keycapsss.com deutscher Shop) 21x 1n4148 Dioden (Amazon ca. 3€, Aliexpress ca. 1€ ca. 1m Litze/Kabel ca. 26AWG Gamepad Case (3D-Druck Vorlage) Keycaps kaufen, oder selbst mit 3D-Drucker drucken (Thingiverse: DSA Keycap Set) Lötkolben und LötzinnTastatur Zubehör wie Cherry MX Switches und Keycaps gibt es auch beim deutschen Lieferanten keycapsss.com kaufen. InhaltGehäuse mit einem 3D-Drucker drucken Das Gehäuse kannst du mit einem 3D-Drucker selbst ausdrucken. Die Dateien habe ich auf Thingiverse hochgeladen. Es werden keine Supports benötigt. Ich empfehle eine Layer Höhe von 0.2-0.1 und ein Infill von ca. 20%. Das Gehäuse benötigt eigentlich keine Schrauben, da eine Clip-Verbindung eingebaut ist. Wer Schrauben verwenden möchte, benötigt 3x M3x12 Schrauben. Damit das Gamepad nicht verrutscht kannst du Gummifüße am Boden ankleben. Diese findest du bei Ikea, im Baumarkt, oder auf Amazon. :) Falls du keine 3D-Drucker hast, kannst du mich über das Kontaktformular anschreiben und ich kann dir ein Angebot machen. Falls mehrere an einem komplett Set interessiert sind, kann ich dies auch zusammenstellen und zum verkauf anbieten. Das Gehäuse wurde mit Fusion 360 von Autodesk erstellt. Falls du Ideen hast wie man das Gehäuse verbessern kann, schreib ein Kommentar unter den Artikel.Tasten verlöten (Keyboard Matrix) Als erstes steckst du alle Taster in das Gamepad Gehäuse. Achte darauf das die Pins an dem Taster oben sind (siehe Bilder weiter unten). Um das Anlöten der Dioden zu vereinfachen, solltest du die Dioden zurechtbiegen. Lass die Dioden in der Papierhalterung und biege sie an einer Tischkante wie auf dem Foto (achte auf die Richtung der schwarzen Markierung an den Dioden). Löte an jeden Taster eine Diode an den oberen linken Pin (achte auf die Richtung der schwarzen Markierung an den Dioden). Nachdem du alle Dioden angelötet hast, entferne den überstehenden Draht an der blauen Markierung. Biege den Diodendraht wie auf dem Bild zu Zeilen und löte die Dioden in jeweils einer Reihe zusammen. In der Reihe 3 und 4 (Reihennummer beginnt bei 0) benötigst du ein Zwischenstück aus Draht. Löte die Taster jetzt in Spalten zusammen. Verbinde dazu den rechten Pin am Taster mit dem rechten Pin am Taster darunter. Dazu benötigst du ca. 2cm lange Kabelstücke wie auf dem Bild. Die Enden kannst du mit einem scharfen Messer abisolieren. Tipp: Wer öfters Lötet, dem kann ich nur die Abisolierzange von Knipex empfehlen. Sie ist zwar teuer, aber funktioniert sehr gut im Gegensatz zu billigen Abisolierzangen. An jede Zeile und Spalte musst du ein Kabel anlöten, welche später mit den Eingängen des Arduino Pro Micro verbunden werden. Auf dem Bild habe ich dir markiert, wo ich die Kabel angelötet habe. Wenn du verstanden hast wie die Reihen und Spalten funktionieren, kannst du die Kabel auch an einer anderen Stelle anlöten. Tipp: Verwende am besten farbige Kabel, um sie besser unterscheiden zu können. Löte jetzt die Kabel von der Keyboard Matrix an die Ports des Arduino Pro Micro. Du könntest auch eine andere Portbelegung wählen, aber achte in späteren Schritten darauf das du diese dann deiner Portbelegung anpasst. Reihen und Spalten beginnen mit 0. Der grüne Text im Bild sind die Namen der Ports des Arduino Pro Micro die du im nächsten Schritt benötigst. Keyboard/Gamepad Firmware aufspielen Der Arduino Pro Micro muss mit einer angepassten Firmware geflasht werden. In diesem Beitrag (Arduino Pro Micro als Keyboard/Tastatur Controller – Teensy 2.0 alternative) wird Schritt für Schritt erklärt wie du die Firmware auf den Arduino Pro Micro flasht/speicherst. Du musst nur in Schritt 3 darauf achten das du die Pins/Ports wie folgt belegst. Befolge die Anleitung bis Schritt 3. Nachdem du auf Import geklickt hast, ändere die Pinbelegung im Tab PINS wie auf dem nachfolgendem Screenshot. Im Screenshot sind zwei Angaben falsch! Row 3 = C6 Column 3 = F7 Bevor du das Gehäuse zusammen baust, teste ob alle Tasten wie gewünscht funktionieren. Nimm etwas doppelseitiges Klebeband und befestige den Arduino am Gehäuse. Jetzt kannst du das Gehäuse zusammenbauen und dein neues selbstgebautes Gamepad mit mechanischen Tasten ausprobieren. Welche Cherry/Gateron Taster Von den Cherry MX bzw. Gateron (günstiger Version der Cherry Taster) gibt es verschiedene Varianten.Cherry MX Rot: leichter Widerstand, ohne haptisches Feedback Cherry MX Blau: mittlerer Widerstand, haptisches Feedback und klick Geräusch Cherry MX Braun: mittlerer Widerstand, haptisches Feedback ohne klick GeräuschFür das Gamepad rate ich zu den roten Tastern, da das klick Geräusch beim Spielen stört und der leichte Widerstand ein schnelleres betätigen der Taste ermöglicht.

- 18 Sep, 2017
- 4 min read
Create Your Own 3D Printed Topographical Map - mini mountain raised relief maps
You climbed on top of one of the highest moutains and want to make a small 3D model of the landscape? Such a minature mountain is a nice gift for climbers, skier or a memory of a beautiful moment. In this tutorial you will learn how you can print a minature landscape with a 3D printer and what you need to take care of. Tombola You can win 1 of 3 3D printed model of the landscape or mountain of your choice with the size of 10 cm by 10 cm. Share this article pubicly on Facebook (until 22.10.2017) and write the area for the model and the link into the comment section below the article. Free shipping only to Germany. Buy Minature Landscape or Mountain If you do not have the possibility to print the model yourself I can happily provide you an offer (invoice including VAT). You can send inquiries via email or through the contact form. Models up to 23 cm width and length are possible. ContentsWhat is a Topographic Map? A topographic map is a map that is used to display exactly the landform (topography) and other visible details of the earth's surface. The landform is usually shown with contour lines which are completed with prominent spoit heights, such as peaks or summits, as well as the route of waters.How to Create a STL 3D Printing File from Google's Topographic Map? Option 1: Terrain2STLFree Quick and simple Crashes sometimes while using large areas No preview of the STL file Only rectangular selections can be created The simplest way to create a STL file from a topographic map is to use the website Terrain2STL.Search the desired area via drag&drop on the google map.Click on "Center to View" under Location. A red square will be shown in the middle of the map. This is the area that will be used for the 3D model.You can fine tune the details of the 3D model to the map in the section "Model Details". Box Size: Size of the marked area Box Scaling Factor: The marked are can be increased with this option, however, details in the 3D model will be reduced Box Rotation: The marked area can be rotated Vertical Scaling: Higher values increase the differences in heights in the 3D model The height of the ground can be set in the section "Water and Base Settings" -> "Base Height". Problems with Terrain2STL Unfortunately, the area for the model cannot be adjusted in wigth or height. If so, one could make a elongated map. An option would be to use a program such as Meshmixer to adjust the model to your own wishes and needs. During the generation of large models, Terrain2STL crashed sometimes. Nevertheless, the page is helpful and free of charge. You can support the developer here. Option 2: Sightline MapsFree Preview of the 3D model in the browser Colored 3D model (OBJ-Datei) will be exported STL file is too detailed an can be, depending of the selection, several GB large You can create the STL file on the website sightlinemaps.com The service is free, you only need to register with your email. In the following image all 4 steps are marked that are required to create a topographic STL file. The scale of the height can be adjusted on the next page. Download the single colour STL file for normal FDM and SLA printer. With the OBJ file you can create a coloured 3D print or use the topographic model in a 3D software. You will receive the Download link via email within 5 to 10 minutes.3D Print a Topographic Map with the Vase-Mode Why print the topographic map with the vase-mode? The main reason is that the printing time is reduced by almost the half and there will be no blobs at the end of the layers. Vase-Mode: 33 minures Normal: 52min (without Infill) When you print the model in the vase-mode, you need to align it vertically. This way, the details will be printed best (left image). In case you have problems during as your model falls over use a raft. 3D model of the Zugspitze, 5.5 cm x 6 cm x 0.8 cm, 50 min print duration, 0.1mm Layer height, Prusa i3 MK2 printer 3D model with a primer layer and a layer of white. ...and to make it look more naturally I painted the 3D model with acrylic paint.
- 10 Aug, 2017
- 3 Min. Lesezeit
3D-Landkarten mit dem 3D-Drucker erstellen - topographische karte, Miniatur Berg
Du hast einen der höchsten Berge bestiegen und möchtest ein kleines 3D-Modell von der Landschaft? Solch ein Miniatur Berg ist auch ein tolles Geschenk für Bergsteiger, Skifahrer, oder eine Erinnerung an einen schönen Moment. In dieser Anleitung wird erklärt, wie du dir eine Miniaturlandschaft mit einem 3D-Drucker drucken kannst und worauf du achten musst. InhaltWas ist eine topografische Karte? Eine topografische Karte (auch topographische Karte) ist eine mittel- bis großmaßstäbige Karte, die zur genauen Abbildung der Geländeformen (Topografie) und anderer sichtbarer Details der Erdoberfläche dient. Das Gelände wird in der Regel durch Höhenlinien dargestellt, ergänzt um markante Höhenpunkte (Gipfel, Sättel usw.) und den Verlauf der Gewässer.Wie aus einer Google topographischen Karte eine STL 3D-Druck Datei erstellen? Variante 1: Terrain2STLkostenlos schnell und einfach stürzt bei großen Flächen manchmal ab keine Vorschau der STL-Datei Markierung läßt sich nur Rechteckig erstellen Am einfachsten läßt sich eine STL-Datei aus einer topographischen Karte mit der Webseite Terrain2STL erstellen.Die gewünschte Stelle per Drag&Drop mit der Google Karte suchen.Unter Location auf "Center to View" klicken. Es wird ein rotes Viereck in der Mitte der Karte angezeigt. Das ist der Bereich für das 3D Modell.Unter "Model Details" kannst du die Feinheiten des 3D-Modells der Karte anpassen. Box Size: Größe des markierten Bereiches Box Scaling Factor: der markierte Bereich läßt sich damit Vergrößern, Details im 3D-Modell werden damit aber reduziert Box Rotation: der markierte Bereich kann damit gedreht werden Vertical Scaling: höhere Werte verstärken den Höhenunterschied im 3D-Modell Unter "Water and Base Settings" -> "Base Height" läßt sich noch die Höhe des Boden anpassen. Probleme mit Terrain2STL Leider läßt sich die Markierung für das Modell nicht in der Höhe oder Breite anpassen. So könnte man eine längliche Karte erstellen. Man kann natürlich in einem Programm wie Meshmixer das Model nach eigenen Wünschen anpassen. Beim erstellen von großen Modellen in Terrain2STL bleibt die Seite öfters hängen. Dennoch ist die Seite sehr hilfreich und kostenlos. Den Entwickler könnt ihr hier unterstützen. Variante 2: Sightline Mapskostenlos Vorschau des 3D-Modell im Browser farbiges 3D-Modell (OBJ-Datei) wird exportiert STL-Datei zu detaillierte, je nach Markierung mehrere GB groß Auf der Webseite sightlinemaps.com kannst du eine STL-Datei erstellen lassen. Der Service ist kostenlos. Du musst dich hier, aber mit deiner E-Mail anmelden. Im folgenden Bild sind die 4 Schritte markiert um eine topographische STL-Datei zu erstellen. Auf der nächsten Seite kannst du noch die Höhenskalierung ändern. Für normale FDM und SLA Drucker, lädst du dir die einfarbige STL-Datei herunter. Mit der OBJ-Datei kannst du ein farbigen 3D-Druck erstellen lassen, oder das topographische Model in einer 3D Software verwenden. Du erhältst nach 5-10 Minuten den Download Link per E-Mail.topographische Karte im Vase-Mode 3D drucken Warum die topographische Karte im Vase-Mode drucken? Der Hauptgrund ist, dass sich die Druckzeit um fast die Hälfte verkürzt und keine Blobs bei den Layerenden entstehen. Vase-Mode: 33 Minuten Normal: 52min (ohne Infill) Wenn du das Modell im Vase-Mode druckst, musst du es senkrecht ausrichten. So werden die Details auch am besten gedruckt (linkes Bild). Falls du beim drucken Probleme hast das dein Modell umfällt, verwende eine Raft. 3D-Modell der Zugspitze, 5,5cm x 6cm x 0,8cm, 50min Druckzeit, 0,1mm Layer height, Prusa i3 MK2 Drucker 3D-Modell mit einer Schicht Primer/Grundierung und einer Schicht weiss. ... und um das ganze noch etwas naturgetreuer aussehen zu lassen, habe ich das 3D-Modelll mit Acrylfarbe bemalt.
- 10 Aug, 2017
- 6 min read
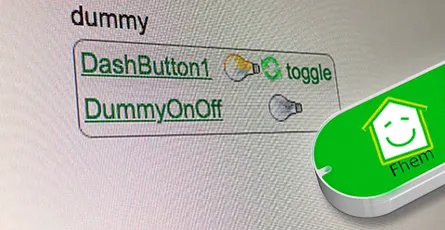
Controll FHEM devices with amazon dash button
I explained in this article how you can execute IFTTT actions with the Amazon dash button. By changing a single line of code you can switch an FHEM device. How does it work? By calling a URL (HHTP Post Request) you can tell FHEM to do soemthing. This way you can switch lights on or off, open or close shutters, turn remote contrles wall plugs on or off and a lot more. The dash button is not suitable for every application as the button has a latency of 5 to 6 seconds until a FHEM device is switched. What's required:Raspberry Pi or Debian/Ubuntu Linux computer Amazon Dash Button Running FHEMHere is a sample video how a Philips Hue lamp is turned on using a Amazon dash button and FHEM. Thanks to Hagen for that video.Contents Option 1: FHEM module dash_dhcpWorks without additional software FHEM server can be connected to the network vial ethernet cable Multiple Amazon dash buttons can be embeddedUpdate your FHEM to the newest version and install the module dash_dhcp. Here is a short tutorial how you can implement a update button in the sidebar of the FHEM web interface.Determine the MAC address of your Amazon dash button. Therefore, log into your router. I have a Fritzbox where all wifi devices are listed under WLAN -> Network. For Mac the free application LanScan can be used to run a scan of your network and detemrin the respective MAC address.Open the FHEM configuration file fhem.cfg and add the following code. Replace the MAC address behind allowed with the one of your dash button. You can write multiple MAC addresses after each other if you separate them by ,. The MAC address should be written in small caps.define DashButton dash_dhcp attr DashButton allowed ac:66:be:e3:fb:fe attr DashButton port 6767 attr DashButton room dashbuttondefine n_DashButton1 notify DashButton:ac-66-be-e3-fb-fe..short IF ([YourFHEMDevice] eq "on") (set YourFHEMDevice off) ELSE (set YourFHEMDevice on) Replace in the notify command YourFHEMDevice with the name of your FHEM device that you want to switch on or off and make sure that the MAC adress is written with dashes. Don't forget to save! Multiple dash buttons can be separated by commas.attr DashButton allowed ac:66:be:e3:fb:fe,ac:66:be:e3:fa:31Now You need to forward the data from port 67 to port 6767. DHCP requests arrive always through port 67 and that port can only be accessed with root access rights. FHEM is usually started without root rights. In case your FHEM server in implemened in the network via a wifi domgle execute the following command in the terminal.sudo iptables -I PREROUTING -t nat -i wlan0 -p udp --src 0.0.0.0 --dport 67 -j DNAT --to 0.0.0.0:6767 In case the FHEM server is implemented via a ethernet cable use the following command.sudo iptables -I PREROUTING -t nat -i eth0 -p udp --src 0.0.0.0 --dport 67 -j DNAT --to 0.0.0.0:6767You should be now able to switch your FHEM device on or off with the Amazon dash button. In order to check if the dash button is recognized by FHEM you can use the Event monitor in the FHEM web interface in the left sidebar. After clicking the dash button, dash_dhcp DashButton ac-66-be-e3-fb-fe: short should appear in the monitor. The forwarding of the ports via iptables needs to be set after a restart. Install the application iptables-persistent that the fowarding is loaded automatically after a restart.sudo apt-get update && sudo apt-get install -y iptables-persistent During the installation of iptables-persistent a couple of settings need to be made. Confirm all with YES. You can now write the port forward for the dash button in the file rules.v4. sudo nano /etc/iptables/rules.v4 Add the forward before the last COMMIT. (Ethernet cable)-I PREROUTING -t nat -i eth0 -p udp --src 0.0.0.0 --dport 67 -j DNAT --to 0.0.0.0:6767 (WIFI Dongle)-I PREROUTING -t nat -i wlan0 -p udp --src 0.0.0.0 --dport 67 -j DNAT --to 0.0.0.0:6767 Exit the Nano text editor with ctrl+x and save the changes. After a restart with sudo reboot the rules.v4 file is loaded automatically and the port forwarding should work. ALTERNATIVE In case the fowarding via rules.v4 does not work, you can try this alternative option. Open the /etc/rc.local file. This file is executed during every system start.sudo nano /etc/rc.local and add the command for the forwarding before exit 0. (Ethernet cable)sudo iptables -I PREROUTING -t nat -i eth0 -p udp --src 0.0.0.0 --dport 67 -j DNAT --to 0.0.0.0:6767 (WIFI dongle)sudo iptables -I PREROUTING -t nat -i wlan0 -p udp --src 0.0.0.0 --dport 67 -j DNAT --to 0.0.0.0:6767Option 2: with NodeJS and DasherFHEM Server can be connected to the network via ethernet cable Multiple Amazon dash buttons can be used Flexible as other services, such as, Zapier or IFTTT can be pinged via HTTP GET and POST Request.- Additional software is requiredAs first step the package lists need to be updated and the required applications git & libpcap-dev need to be installed. sudo apt-get update && sudo apt-get install libpcap-dev Furthermore, the current version of Node.js (v6.5.0) is required. Detailed Tutorial Add the Node.js source to your package list. curl -sL https://deb.nodesource.com/setup_6.x | sudo -E bash - You can now install Node.js. sudo apt-get install -y nodejsAs next step you can download and install the Node.js application "Dasher". Navigate with cd ~/ into your home folder and copy Dasher from Github. git clone https://github.com/maddox/dasher.git Navigate to the Dasher directory cd dasher Now the required programs and dependencies of Dasher need to be installed. npm installDasher requires the MAC address of your dash button which are easily found. Log into your router and have a look at the connected devices. You can also use the program "find-button" that is provided by Dasher. script/find_button Press after "find-button" was started the dash button. The program should show the MAC address. Copy the MAC address and close the program with ctrl+c on a Mac or strg+c in Windows.Now you need to adjust the URL in the Dasher config/config.json file the way you want. nano config/config.json{"buttons":[ { "name": "Dash1", "address": "ac:61:b3:e1:fa:fe", "url": "http://127.0.0.1:8083/fhem?cmd=set%20DashButton1%20toggle", "method": "POST", "json": true, "body": {"value1": "any value", "value2": "another value"} } ]} The IP 127.0.0.1 points always to the local computer, i.e. himself. As alternative you can write http://localhost:8083/fhem?cmd=set%20DashButton1%20toggle.Start Dasher and press the button to check if everything works. If everything is fine the terminal should show "Dash1 pressed". Dasher and your button work and FHEM can be configured. You can close the program with ctrl+c. sudo npm run startConfigure FHEM for the Dash Button Open the FHEM configuration file fhem.cfg and add the following code. Define in FHEM a Dummy for the dash button. Here is a good help for beginners.define DashButton1 dummy attr DashButton1 webCmd toggleCreate a notify that turns your FHEM device on or off. Replace YourFHEMDevice with the name of your FHEM device. Save the cfg file. In case you have closed Dasher, you can start it with sudo npm run start and press the dash button.define n_DashButton1 notify DashButton1.* IF ([YourFHEMDevice] eq "on") (set YourFHEMDevice off) ELSE (set YourFHEMDevice on) Explenation: The Dummy DashButton1 will be define n_DashButton1[name of the notify] notify[the command] DashButton1.*[in case of a change of the Dummy Reading, then] IF ([YourFHEMDevice] eq "on") [check if Reading of YourFHEMDevice is on, then] (set YourFHEMDevice off) [set YourFHEMDevice Reading to off] ELSE (set YourFHEMDevice on) [otherwise set YourFHEMDevice Reading to on] To configure the dash button to turn off multiple FHEM devices, use the following configuration. Again, replace YourFHEMDevice and YourFHEMDevice1 with your FHEM devices names. You can write as many devices as you want behind each other as long as they are separated by ;;.define n_DashButton1 notify DashButton1.* set YourFHEMDevice off;; set YourFHEMDevice1 offSet up Dasher Autostart After every system start the Dasher Programm would need to be reconfigured by hand. Set up a Init script for Dasher that the Dasher runs as a service runs in the background and is started when the system is started. Tutorial You can see here roughly the time the setup needs to react.
- 10 Aug, 2017
- 2 min read
Fhem config file (fhem.cfg) write protected
After the last major update of FHEM, the FHEM configurtion file (fhem.cfg) is write protected and cannot be changed. This protection was set in order to protect system settings and files to be changed by new users. If you click in the FHEM user interface onto Edit files and then fhem.cfg as you are used to you will see the content of the file but cannot edit it. The notification "You can enable saving this file by setting the editConfig attribute, but read the documentation first for the side effects." advises you to read the documentation before making any changes.If you are confident with the FHEM configuration file and know what you are doing you can cancel the write protection by setting the arribute editConfig to the value of 1. The easiest way to set the editConfig attribute to 1 is by typing the command attr WEB editConfig 1in the command text field in the upper region of the user interface and hitting ENTER.After that you just need to save the config file. Therefore, click onto Save config on the left side.Hint: Before making any changes to the fhem.cfg file make sure you make a backup copy of that file. In case anything goes wrong and you somehow destroy the configuration file you are able to revert to the initial state.Below you can find the initial, unedidted content of the fhem.cfg file of FHEM 5.7 attr global userattr cmdIcon devStateIcon devStateStyle icon sortby webCmd widgetOverride attr global autoload_undefined_devices 1 attr global logfile ./log/fhem-%Y-%m.log attr global modpath . attr global motd SecurityCheck:\ \ WEB,WEBphone,WEBtablet has no basicAuth attribute.\ telnetPort has no password/globalpassword attribute.\ \ Restart FHEM for a new check if the problem is fixed,\ or set the global attribute motd to none to supress this message.\attr global statefile ./log/fhem.save attr global updateInBackground 1 attr global verbose 3define telnetPort telnet 7072 globaldefine WEB FHEMWEB 8083 global attr WEB editConfig 1define WEBphone FHEMWEB 8084 global attr WEBphone stylesheetPrefix smallscreendefine WEBtablet FHEMWEB 8085 global attr WEBtablet stylesheetPrefix touchpad# Fake FileLog entry, to access the fhem log from FHEMWEB define Logfile FileLog ./log/fhem-%Y-%m.log fakelogdefine autocreate autocreate attr autocreate filelog ./log/%NAME-%Y.logdefine eventTypes eventTypes ./log/eventTypes.txt# Disable this to avoid looking for new USB devices on startup define initialUsbCheck notify global:INITIALIZED usb create
- 26 Jul, 2017
- 5 Min. Lesezeit
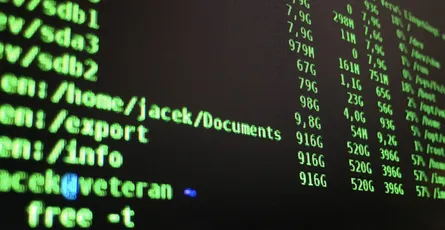
35 Raspberry Pi Linux CLI/Terminal Befehle + Pro-Tipps
Inhalt Tips für Pro's Zum letzten Ordner navigieren cd -Mit diesem Befehl kannst du schnell zum vorherigen Ordner navigieren. Nicht zu verwechseln mit cd .. womit man zum nächst höheren Ordner navigiert. Letzte Befehle anzeigen Mit der Pfeiltasten oben kannst du die letzten Befehle anzeigen. So kannst du lange sich wiederholende Befehle schnell ausführen. Die History wird in der Datei ~ / .bash_history gespeichert. Aktuellen Befehl nicht der History hinzufügen Wenn du nicht willst, dass der aktuelle Befehlt in der History erscheint, musst du einfach ein Leerzeichen vor dem Befehlt schreiben. [Leerzeichen] [Befehl]Kalender im Terminal anzeigen calZeigt den Kalender zum aktuellen Monat an.Letzte Befehle durchsuchen (Autocomplete) STRG + R drücken Damit kannst du schneller einen bestimmten Befehl aus der History aufrufen. Tippe ein Teil des Befehls und der Terminal vervollständigt den Rest. Du kannst die Suche mit STRG + C abbrechen. Allgemein Über SSH sich mit dem Raspberry Pi verbinden ssh pi@raspberrypi.localWenn sich ein Raspberry im selben Netzwerk befindet wie dein Rechner, dann kannst du mit diesem Befehl eine SSH Verbindung herstellen. Das Standart Passwort für den Benuzter Pi ist raspberry Falls es nicht klappt, kann es sein das dein Raspberry Pi nicht im selben Netzwerk ist, oder es mehrere Raspberry Pi im Netzwerk vorhanden sind. Es kann auch sein das SSH am Raspberry Pi nicht aktiviert ist. Standardmäßig ist SSH bei Raspbian deaktiviert. Alternativ kannst du nach dem @ auch die IP des Raspberry Pi schreiben. ssh pi@Ip-Des-RaspberryWenn dein Raspberry Pi über das Internet öffentlich erreichbar ist, solltest du aus Sicherheitsgründen den Standart SSH Port ändern. Hänge den Parameter -p an den Befehl an, um eine SSH Verbindung mit geändertem SSH Port aufzubauen (ersetze 7777 mit deiner Port Nummer). ssh pi@Ip-Des-Raspberry -p 7777Terminal Ausgabe löschen clearLöscht die Ausgabe der vorherigen Befehle. Einstellungen Raspberry Pi Konfigurations Tool starten sudo raspi-config Nach dem ersten Starten des Raspberry Pi solltest du die Grundeinstellungen anpassen. Alle wichtigen Einstellungen kannst du mit dem Konfigurations Tool ändern. Hier eine grobe Übersicht der Einstellmöglichkeiten: Sprache, Zeichensatz, Zeitzone, deutsches Tastatur-Layout, Raspberry Pi Übertackten, Standard Passwort des Benutzers Pi, SSH aktivieren und die Software aktualisieren. Zeitzone einstellen sudo dpkg-reconfigure tzdataSoftware und Updates Raspberry Pi Software/Programme aktualisieren sudo apt-get update && sudo apt-get upgradeZuerst must du mit dem Befehl apt-get update die Paketlisten aktualisieren. Danach kannst du erst die Programme updaten. Für beide Befehle benötigst du Root Rechte. Mit den Zeichen && kannst du zwei Befehl miteinander Verbinden und sich nach einander ausführen lassen. Firmware und Kernel aktualisieren/update sudo rpi-updateFalls nicht unbedingt nötig, solltest du kein Firmware/Kernel update machen. Es kann dein laufendes System zerstören. Die Firmware und der Kernel sind unabhängig von Raspbian, OpeneElec oder eine andere Distribution. Raspbian Desktop Oberfläche (GUI) starten startxAlle installierten Programme/Packet anzeigen dpkg -lVersionsnummer und Beschreibung eines Package anzeigen apt-cache show Unnötigen Programme/Pakete löschen und den RPI neu starten sudo apt-get autoremove && sudo rebootSystem Raspberry Pi herunterfahren und ausschalten sudo shutdown -h -P nowWeitere Informationen findest du in dem Artikel Raspberry Pi richtig herunterfahren und neustarten. Prozess/ Programm beenden pkill [programmname]Der Befehl ist nützlich, wenn mal ein Programm nicht mehr reagiert und auf normalen Weg beendet werden kann. Angemeldete Benutzer uns Systemauslastung anzeigen wDer Befehlt zeig die aktuell angemeldeten Benutzer im System, wie lang das System läuft und wie die Systemauslastung ist. Raspberry PI CPU Temperatur anzeigen echo $((`cat /sys/class/thermal/thermal_zone0/temp`/1000))Raspberry Pi GPU Temperatur anzeigen /opt/vc/bin/vcgencmd measure_temp|cut -c6-9Dateisystem & Speicher Freien Speicherplatz und verwendeten Speicherplatz anzeigen df -hFreien RAM Speicherplatz anzeigen free -mPartitionen anzeigen/auflisten lsblkDateisystem überprüfen sudo shutdown -F -r now Der Raspberry Pi wird herunter gefahren und nach dem Neustart wird das Dateisystem überprüft. Den Bericht findest du danach unter folgendem Pfad. /var/log/fsck/ Liste alle versteckten Datei in eine Ordner auf ls -laxohOrdner und Dateien verwalten Mehrere Dateien in einen Ordner verschieben mv -t ZielOrdner datei1 datei2 datei3Alle Dateien und Ordner kopieren/verschieben außer ein bestimmter mv !(auzuschließendeDatei1| auzuschließendeDatei2) ZielOrdnerDer obige Befehl verschiebt alle Dateien und Ordner, mit Ausnahme von zwei Dateien (auzuschließendeDatei1 und auzuschließendeDatei2). Du kannst auch Ordner damit ausschließen. Ersetze mv mit cp um die Dateien zu kopieren. Eine bestimmt Datei oder Ordner finden/suchen sudo find / -type d -name 'httpdocs'Der Befehl such ab dem Hauptverzeichnis den Ordner (-type d für directory) mit dem Namen (-name) httpdocs. Wenn du eine Datei suchen willst musst du (-type f) für file angeben. Falls deine Datei Leerzeichen enthält, wird der Name in '' Zeichen geschrieben. Mit dem ersten Parameter nach finde (hier /) gibst du an wo gesucht werden soll. Wenn du / angibst, wird das ganz System durchsucht. sudo benötigst du nur wenn du in Systemordnern und Ordner andere Benutzer suchen willst. Log-Datei leeren sudo truncate logfileName --size 0Manchmal möchte man eine Log-Datei leeren um Speicherplatz zu sparen, oder um eine besser Übersicht für neue Einträge zu erhalten. Ersetze logfileName mit dem Namen deiner Log-Datei. Gruppe einer Datei oder Ordner ändern sudo chgrp GROUP NAMEErsetze GROUP mit dem neuen Gruppen-Namen und NAME mit dem Datei- oder Ordnernamen. Besitzer einer Datei oder Ordner ändern sudo chown -R USER:GROUP NAMEErsetze USER mit dem neuen Besitzer und NAME mit dem Datei- oder Ordnernamen. :GROUP kann auch weggelassen werden um keinen neuen Gruppen-Namen anzugeben. Zip Datei entpacken (mit Passwort) unzip -P PASSWORT '*.zip'Ersetze PASSWORT mit deinem Passwort und *.zip mit dem Dateinamen deines Zip Archives. Mit *.zip entpackst du alle Zip Dateien im aktuellen Ordner. Falls deine Zip Datei kein Passwort besitzt kannst du -P PASSWORT weglassen. Rar Datei entpacken (mit Passwort) unrar e -p PASSWORT '*.rar'Ersetze PASSWORT mit deinem Passwort und *.rar mit dem Dateinamen deines Rar Archives. Mit *.rar entpackst du alle Rar Dateien im aktuellen Ordner. Falls deine Rar Datei kein Passwort besitzt kannst du -p PASSWORT weglassen. Zip-Datei entpacken unzip DATEI.zip -d ZIELORDNERZip Datei erstellen / Ordner in eine Zip Datei komprimieren zip -r filename.zip ORDNERNAME/Wenn du noch weitere nützliche Befehle oder Tipps kennt, schreibt sie bitte in die Kommentare. Ich füge sie dann dem Artikel hinzu.
- 08 Jun, 2017
- 4 Min. Lesezeit
Arduino Pro Micro als Keyboard/Tastatur Controller - Teensy 2.0 alternative
Wer eine Tastatur oder Gamepad selber bauen möchte, benötigt dafür einen Controller. Dieser wandelt die Tastensignale um und sendet sie an den Computer weiter. Die Firmware auf dem Controller legt fest, welche Taste welche Funktion/Zeichen hat. In dieser Anleitung erkläre ich dir, wie du die Keyboard Firmware QMK auf den Arduino Pro Micro kopierst/flash (Mac OSX und Linux). Vor-Nachteile des Arduino Pro Micro zu einem Teensy 2.0günstiger (ca. 10€ Amazon ca. 3€ Aliexpress) als ein Teensy 2.0 (13-30€ Amazon ca. 14€ Aliexpress) etwas kleiner Micro USB (Teensy 2.0 hat ein Mini-USB Anschluss) etwas umständlicher zu flashen weniger Ports (Mit dem Arduino Pro Micro kannst du eine Tastatur mit max. 81 Tasten 9x9 steuern.)Du benötigst die 5V Version des Arduino Pro MicroAls erstes musst du die Firmware für deine Tastatur erstellen. Dabei legst du das Layout der Tastatur fest (wo welche Tasten sind und welche Funktion sie haben). Eine ausführliche Beschreibung (Englisch) findest du hier docs.qmk.fm Das Erstellen des Layouts geht aber auch einfacher. Auf der Seite keyboard-layout-editor.com kannst du dir leicht dein eigenes Keyboard Layout zusammen klicken. Die Seite unterstützt nicht alle Funktionen der QMK Firmware. Diese sind aber meistens Pro Funktionen. Auf der Seite wird das Layout für mein Gamepad angezeigt, welches ich in einem späteren Tutorial erklären werde. Du kannst oben auf Preset -> Blank Layout klicken um ein neues Tastatur-Layout zu beginnen. Wenn dein Layout fertig ist, klickst du unten auf Raw data und kopierst dir den Text in der Box. Auf kbfirmware.com kannst du die QMK Firmware online erstellen/kompilieren lassen. Kopiere dazu den Text aus dem vorherigen Schritt in die Textbox über Import und klicke auf Import. Jetzt wird dir der Verdrahtungsplan angezeigt. Detaillierter englischer Beitrag (Keyboard Matrix Help von Dave Dribin). Im Tab Compile kannst du dir die Hex-Datei (Firmware) herunterladen. Du benötigst das Programm avrdude, um den Arduino Pro Micro mit der Firmware zu bespielen/flashen. Mehr Infos zu avrdude findest du auf mikrocontroller.net/articles/AVRDUDE. Mac OSX Am Mac kannst du avrdude über Homebrew installieren. Installiere Homebrew (Infos auf der Seite) und installieren dann avrdude mit folgendem Befehl. brew install avrdude Linux Auf Linux kannst du avrdude über den Paket-Manager installieren. sudo apt-get update && sudo apt-get install avrdudeVerbinde den Arduino Pro Micro mit dem Computer über das USB Kabel. Öffne den Terminal/CLI und gib folgenden Befehl ein. ls /dev/tty* | grep usb Jetzt wird dir der Port des Pro Micro angezeigt.Das Pro Micro muss in den Bootloader Modus gebracht werden um dir Firmware aufspielen zu können. Gib folgenden Befehl noch einmal ein, aber drück noch nicht Enter! ls /dev/tty* | grep usb Nimm dir eine Büroklammer (auseinander Biegen), oder ein kurzes Kabel und verbinde den RST und GND Port. Das Pro Micro Board wird neu gestartet und 8 Sekunden im Bootloader Modus bleiben. Danach wird die Firmware wieder gestartet. Führe jetzt den obigen Befehl innerhalb der 8 Sekunden aus. Es sollten dir jetzt zwei Ports angezeigt werden. Die zwei Ports sind ein Indikator dafür, dass sich das Arduino Pro Micro im Bootloader-Modus befindet. Den dazugekommenen Port (bei mir /dev/tty.usbmodem1421) können wir für das flashen der Firmware verwenden. Falls du Probleme hast, versuch einen anderen USB-Port an deinem Computer, oder wechsle das USB-Kabel. An meinem MacBook Air musste ich den rechten USB-Port verwenden.Jetzt kannst du die Firmware mit avrdude flashen. Wechsel dazu in den Ordner indem die zuvor heruntergeladene Firmware Hex-Datei liegt. Ersetze PRO-MICRO-PORT und DATEINAME-DER-HEX mit deinen Angaben. avrdude -p atmega32u4 -P PRO-MICRO-PORT -c avr109 -U flash:w:DATEINAME-DER-HEX Bei mir sieht der Befehl folgendermaßen aus. avrdude -p atmega32u4 -P /dev/tty.usbmodem1411 -c avr109 -U flash:w:layout.hex Verbinde wieder den RST und GND Port und führe den Befehl aus. Wenn es geklappt hat, solltest du eine ähnliche Ausgabe im Terminal sehen. Die Keyboard Firmware ist jetzt auf deinem Arduino Pro Micro. Verlöte deine Tasten zu der Keyboard-Matrix die dir in Schritt 3 angezeigt wurde. Löte die Reihen und Spalten an den Ports des Pro Micro und fertig ist deine selbst erstellte Tastatur.
- 29 Apr, 2017
- 5 min read
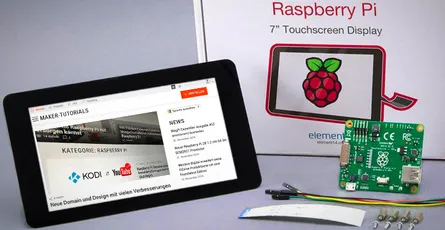
Official Raspberry Pi 7" Touch Screen LCD Display assembly guide - install and tips
This tutorial will show you how to assemble your Raspberry Pi Touchscreen, which power supply options are available and a few helpful hints. Required parts:original 7 inch LCD Touchscreen for Raspberry Pi A Raspberry Pi A+,B+, Pi 2, or Pi 3 Micro USB power adapter with a minimum of 2A Micro SD card with the most recent Raspbian, or Noobs versionContentsInstall/connect Raspberry Pi Touchscreen With the new 7 inch version the controller board is already connected to the display. You just need to connect the Raspberry Pi to the controller board.Connect the red jumper cable with the 5V pin and the black cable with GND of the touchscreen's controller board. This ways the Raspberry Pi is supplied with power through the touchscreen. Connect the flat ribbon cable (DSI) with the silverish contacts to the brown side. You can now attach the Raspberry Pi into the controller board and fix it with the screws. Attach now the red jumper cable to the GPIO pin 4 and the black cable to the GPIO pin 6. The flat ribbon cable (DSI) need to be plugged into the connector with the label "Display" (contacts to the inside). Finally you need to plug the micro usb power adapter into the controller board of the touchscreen. The setup may not be supplied with power through the Raspberry Pi as the internal fuse of the Raspberry Pi cannot handle the 400 mA that the touchscreen requires.It is possible to use the touchscreen and another screen (HDMI output) at the same time. Error Sources If the screen stays black after the start check the DSI cable (white flat ribbon cable). THE DSI connects the Raspberry Pi and the controller board of the touchscreen.Shut down the Raspberry Pi and check if the cable is connected in the correct direction. At the Raspberry Pi the silverish contacts need to point to the inside (white side of the connector). At the touch controller board the contacts need to point to the brown side of the connector.Update the operating system. sudo apt-get update && sudo apt-get dist-upgradeWhen downloading, the image can look blurry - that's normal.Alternative Power Supplies There are 3 possibilities to supply the touchscreen and the Raspberry Pi with power.Jumper Cable As described above, connect the +5V and Ground pin of the controller board of the touchscreen with the GPIO pins of the Raspberry Pi. Now the Raspberry Pi is supplied by power through the display. This variant is simple and cheap but it is impossible to attach a extention board.Y Micro USB cable You can use a micro USB Y-cable to supply both micro USB inputs at the same time. This way you can use a extension board at the Raspberry Pi requireing only one power supply.Two Power Supplies Use two micro USB poer supplies, to supply the touchscreen and the Raspberry Pi separately with power. If you use a power demanding extension board it could be required to use two power supplies. In that case the display and the Raspberry Pi need to be turned on at the same time!Rotate Image If you want to use the touchscreen in portrait mode or turned by 180° follow the steps below. I use the case from Pimoroni. For this the images needs to be rotated by 180°.Open the config.txt file with the Nano text editor. sudo nano /boot/config.txtAdd the following text at the beginning of the config.txt. lcd_rotate=2 lcd_rotate=0 Normal lcd_rotate=1 90 Degree lcd_rotate=2 180 Degree lcd_rotate=3 270 Degree lcd_rotate=0x10000 mirror horizontally lcd_rotate=0x20000 mirror verticallyQuite the editing with the shortcut ctrl+ and save the changes with y.The image should be rotated after a restart of the system. sudo rebootSet up Right Click The right click via touch needs to be set up. Two fingers for the "right mouse button" This tutorial describes how you can set up that a two-finger touch executes a right click. Long press of "right mouse button This option does not work with Raspbian Jessie.Open the file xorg.conf with the nano text editor. sudo nano /etc/X11/xorg.conf Section "InputClass" Identifier "calibration" Driver "evdev" MatchProduct "FT5406 memory based driver" Option "EmulateThirdButton" "1" Option "EmulateThirdButtonTimeout" "750" Option "EmulateThirdButtonMoveThreshold" "30" EndSection Close the editor with ctrl-x and confirm the changes with y.Restart the system sudo rebootInstall a On-Screen or Virtual Keyboard You can choose between different on-screen keyboards. I use Florence as the Matchbox keyboard has problems under Jessie and causes a constant CPU usage of 25%.Florence sudo apt-get install florence You can now activate the Florence virtual keyboard under Universal Access. In my case Florence crashed always which could be fixed after installing at-spi2-core. sudo apt-get install at-spi2-coreMatchbox Keyboard sudo apt-get install matchbox-keyboard Active the on-screen keyboard under " MENU > Accessories > Keyboard".Adjust Brightness of Backlight You can adjust the brightness of the backlight with the terminal.If you want to save power you can use the following command to adjust the brightness. sudo sh -c "echo 'Value of Brightness' >> /sys/class/backlight/rpi_backlight/brightness"Replace Value of Brightness with a number between 0 and 255. At 0 the backlight is off and at 255 the brightest value is achieved. Hide mouse poniter As descibed in the tutorial "Midori Browser in Fullscreen Mode" you can install the application unclutter to hide the mouse pointer. sudo apt-get install unclutterUnclutter starts automatically after a system start. The mouse pointer should disappear automatically after 1-2 seconds. Technical DataCompatible with Raspberry Pi A+, B+, 2 & 3 17,8 cm (7") touch display, capacitive Dimensions (LxWxH): 192.96 x 112.76mm Visible Area: 154.08 x 85.92mm Resolution: 800 x 480 Pixel Contrast: 500 Brightness: 250 cd/m2 24 bit Colours 10 Finger multi touch display Bachlight adjustable via PWM Backlight lifetime of 20000 hours Operation temperature: -20°C bis +70°C Storage temperature: -30°C bis +80°C Viewing angle: upper (50), lower (70), right (70), left (70)A technical drawing with detailled dimensions can be found here.
- 29 Apr, 2017
- 2 min read
Raspberry Ri Touch Screen setup right click with twofing - Raspbian Jessie
Unfortunately, the Raspberry Pi 7 Touchscreen does not support right-click or long touch if used with Raspbian Jessie. You can add this functionality by using a two-finger touch on the Touchscreen with the program Twofing.Contents Install TwofingYou need a few programs in order to compile Twofing. In case one of those programs is already installed apt-get will automatically recognize this.sudo apt-get update && sudo apt-get install build-essential libx11-dev libxtst-dev libxi-dev x11proto-randr-dev libxrandr-devDownload Twofing. wget http://plippo.de/dwl/twofing/twofing-0.1.2.tar.gzExtract the downloaded file. tar -xvzf twofing-0.1.2.tar.gzNavigate to the folder that was created during the extraction. cd twofing-0.1.2Start the compilation and install Twofing make && sudo make installOptional I used an original Raspberry Pi 7 Touchscreen with Raspberry Jessie and an error occured during the first start of Twofing.twofing, the two-fingered daemon Version 0.1.2.20120708/dev/twofingtouch: No such file or directory You can fix the error as following. Open the 70-touchscreen-egalax.rules file with the nano text editor. sudo nano /etc/udev/rules.d/70-touchscreen-egalax.rules Delete the complete content and add the following lines.KERNEL=="event*",ATTRS{name}=="FT5406 memory based driver",SYMLINK+="twofingtouch",RUN+="/bin/chmod a+r /dev/twofingtouch" Exit the text editor with CTRL+X and confirm the changes with YRestart the Raspberry Pi. sudo rebootDelete the obsolete folder of Twofing in the home folder. rm ~/twofing-0.1.2Start Twofing in debug mode and test with two fingers if the right-click works on the Touchscreen. twofing --debug You can exit the program with CTRL+C. When running the command through SSH and not directly on the Raspberry Pi, the command twofing --debug will not work. You must first set that Twofing uses the Touchscreen. Therefore, add the following command export DISPLAY=:0 and restart Twofing afterwards. twofing --debug In case you connected an additional monitor through HDMI you need to check the index number of the Touchscreen. You can get the index numbers of all connected monitors using who. Source: http://raspberrypi.stackexchange.com/a/27881/14517Twofing autostart In order to not start Twofing after a restart manually you can add a autostart file.Navigate to the autostart folder of your home folder. cd ~/.config/autostartCreate a file with the name twofing.desktop and open it. nano twofing.desktopAdd the following text to the file.[Desktop Entry] Type=Application Name=Twofing Exec=twofing StartupNotify=false Exit the text editor with CTRL+X and confirm the changes with Y
- 22 Apr, 2017
- 3 min read
Auto start Midori Browser in Fullscreen Kiosk Modus - Raspberry Pi Linux
I will show you in this tutorial how to start the Midori Browser in full screen mode (kiosk mode) automatically after the Raspberry booted. The graphical shell (desktop) of Rapsian will not be required or started. A pratical applicaton of this would be, for example, an info monitor on an exhibition. In this project, I want to realise a small contol center for FHEM. Therefore, a PiTFT with capacitive touch screen will be used. This, however, is covered in a later tutorial.This tutorial assumes that the Raspberyy Pi or Debian Linux computer starts in terminal/console mode and not in desktop mode loading the graphical shell. Contents Midori Full Screen AutostartRun the following command with the console to update the package list. After that the Midori browser and matchbox will be installed. sudo apt-get update && sudo apt-get install -y midori matchboxCreate a new shell script file with the name_startMidori.sh_ in the home folder and open the Nano text editor. Name and save location can be chosen as you like. nano startMidori.shAdd the following code and exit the Nano text editor ctr+x. To save the changes press Y and Enter.#!/bin/sh xset -dpms # disable DPMS (Energy Star) features. xset s off # disable screen saver xset s noblank # don't blank the video device matchbox-window-manager & midori -e Fullscreen -a https://wordpress-x0o8gcg88www8k084ks8k088.c.benroe.deMake the script excecutable. sudo chmod +x startMidori.shYou can test the script if you run the following command. sudo xinit ./startMidori.sh You can exit the Midori browser with the key combinationCTRL + ALT + F1. In case you called the scriped via SSH, you can exit the script via CTRL + c.In order to automatically excecute the script when the Raspberry starts we need to edit the rc.local file. This script is excecuted when the Raspberry starts. sudo nano /etc/rc.local Add the following code before exit 0. For HDMI: sudo xinit /home/pi/startMidori.sh & For PiTFT: FRAMEBUFFER=/dev/fb1 xinit /home/pi/startMidori.sh & The & at the end is important that the subsequent lines are excecuted. You can run the script with a time delay if you sourround the command in brackets and preprend /bin/sleep 10 && schreibst. The 10 means a delay of 10 seconds. (/bin/sleep 10 && xinit /home/pi/startMidori.sh) &Unfortunately, the system needs to sign in automatically to be able to run the script. You can set this up easily if you use Raspbian Jessie using sudo raspi-config and the selecting Console Autologin under boot options. You need to use the following command to the console if you use and older Raspbian version. sudo nano /etc/inittab Search the following line 1:2345:respawn:/sbin/getty 115200 tty1 and comment it with #. #1:2345:respawn:/sbin/getty 115200 tty1 After this line add the following command. 1:2345:respawn:/bin/login -f pi tty1 /dev/tty1 2>&1 This line enables that the user pi logs in without authentication.Now you just need to restart the Raspberry pi … sudo reboot … and the Midori browser should open with the desired webpage in full screen mode. You will exit the Midori Browser using CTRL + ALT + F1.Optional: Rotate screen If you want to show the screen in vertical mode or rotate by 180 degrees you can set this up using the following steps.Open the config.txt file with the Nano editor sudo nano /boot/config.txtAdd the following test at the beginning of the config.txt file. display_rotate=2 display_rotate=0 Normal display_rotate=1 90 degrees display_rotate=2 180 degrees display_rotate=3 270 degrees display_rotate=0x10000 Mirror horizontal display_rotate=0x20000 Mirror verticalExit the editing with the shortcut ctrl+x and save the changes with y.After a restart the screen will be shown rotated as you wanted. sudo rebootOptional: Hide mouse pointerInstall the program unclutter. sudo apt-get install unclutterAdd unclutter & to the startMidori.sh script. sudo nano startMidori.sh#!/bin/sh xset -dpms # disable DPMS (Energy Star) features. xset s off # disable screen saver xset s noblank # don't blank the video device unclutter & matchbox-window-manager & midori -e Fullscreen -a https://wordpress-x0o8gcg88www8k084ks8k088.c.benroe.deA detailed article about "[Raspberry Pi: Run Applications at System Start](http://Raspberry Pi: Programme beim Systemstart ausführen)"
- 22 Apr, 2017
- 2 min read
Automatic mount hard drive or usb stick on Raspberry Pi
Requirements:Raspbian or similar distributionUSB hard drive or Memory stick with a partition (NTFS/Fat32/HFS+/Ext4)As a first step you need to update the package lists of Raspbian and install the drivers for NTFS and HFS+. sudo apt-get update && sudo apt-get -y install ntfs-3g hfsutils hfsprogsCreate a new folder in the directory /media in which you later on will mount the memory stick or USB hard drive. You can name the folder as you like, however, do not use special characters or spaces. Furthermore, change the owner of the folder to pi. In case you use a different user name you need to replace pi in the command below by the name you use.sudo mkdir /media/usbhdd sudo chown pi /media/usbhdd "In oder to attach a file system a mount point has to exist. A mount point is an empty folder through which additional file systems are mouted and accessed." ubuntuusers.deAttach the storage medium to the Raspberry.Now you need the path to the partition of the storage medium (in this case it is /dev/sda1). sudo fdisk -lFor the moment you manually include the storage medium with the following command. Replace /dev/sda1 with the path to the partion of the storage medium that we just figured. Ext4 sudo mount /dev/sda1 /media/usbhdd NTFS sudo mount -t ntfs-3g -o uid=pi,gid=pi /dev/sda1 /media/usbhdd/ HFS+ sudo mount -t hfsplus -o force.uid=pi,gid=pi /dev/sda1 /media/usbhdd/ FAT32 sudo mount -t vfat -o uid=pi,gid=pi /dev/sda1 /media/usbhdd/ From this point on you can already access the storage medium with cd /media/usbhdd/.</>We need the UUID of the hard drive that the storage medium will be automatically mounted after a restart. Enter the following command into the console: sudo blkid "UUID stands for Universally Unique Identifier and is a standard to identify information in computers. Each Linux file system has a UUID through which it can be identified. As an alternative the file systems can be identified through a device file /dev/sdaX but the labels can change in this case. " ubuntuusers.deOpen the file fstab with the Nano text editor sudo nano /etc/fstab and add one of the lines for your file system. Replace the UUID that you determined in the previous step. Exit the Nano editor afterwards with Strg+x (Win) ctrl+x (Mac) and confirm the changes with y or j ( depending on your language settings.#Ext4 UUID=13aa0627-fb13-4d2f-8d3f-53aea43b9439 /media/usbhdd ext4 defaults 0 0#NTFS UUID=10BF-F2D6 /media/usbhdd/ ntfs-3g defaults,umask=000,users 0 0#HFS+ UUID=10BF-F2D6 /media/usbhdd/ hfsplus defaults,umask=000,users 0 0#FAT32 UUID=10BF-F2D6 /media/usbhdd/ vfat defaults,umask=000,users 0 0 More information about fstab can be found here.Done! You can now access your files on the usb hard drive or memory stick and the drive will be mounted automatically after a restart.
- 22 Apr, 2017
- 1 min read
Enable UART Port on Raspberry Pi
By standard the UART interface is configured as serial console. If you want to use the UART interface for other things, e.g. for a GPS module, the standard function needs to be deactivated. Open the cmdline.txt file with the Nano text editor. sudo nano /boot/cmdline.txt and remove the following part from the file. console=ttyAMA0,115200 kgdboc=ttyAMA0,115200 The content of the file should look like this dwc_otg.lpm_enable=0 console=tty1 root=/dev/mmcblk0p2 rootfstype=ext4 elevator=deadline rootwait Exit the editor with ctrl+x and save the changes using y.Open inittab sudo nano /etc/inittab and search for the following line. T0:23:respawn:/sbin/getty -L ttyAMA0 115200 vt100 Insert a # at the beginning of the line to comment this line. Doing so the line should look like this. #T0:23:respawn:/sbin/getty -L ttyAMA0 115200 vt100 Exit the editor the same ways as in the previous step.From Kernel 3.18.x on the following step must be excecuted aditionally. sudo nano /boot/config.txt Search for the following line and remove the # at the beginning of the line. #dtparam=spi=on Exit the editor the same ways as in the previous step. Show kernel version uname -aRestart RPI. sudo reboot

- 17 Mar, 2017
- 6 Min. Lesezeit
günstiges CO2-Messgerät AirCO2ntrol im Test #1 - Raspberry Pi FHEM USB
Das CO2-Messgerät AirCO2ntrol von TFA Dostmann ist ein günstiges und einfach zu benutzendes CO2 Messgerät für Innenräume. Nicht wie bei anderen günstigen CO2-Messgeräten, wo der CO2-Wert über einen Algorithmus errechnet wird, ist im TFA Dostmann CO2-Messgerät AirCO2ntrol ein richtiger CO2-Sensor verbaut. Ein weiterer Vorteil ist, dass die Messwerte über das USB-Kabel ausgegeben werden. Mit der Software co2monitor für Linux/Raspbian (Raspberry Pi) und CO2mini Logging für Windows, können die Messwerte gespeichert werden (data logging). Es gibt auch ein FHEM Modul (fhem-co2mini). Auf Amazon (ca. 68,99€) und wettershop.de (ca. 72€) kann das CO2 Messgerät AirCO2ntrol gekauft werden.Inhalt Was ist CO2? CO2 ist die chemische Kurzbezeichnung für Kohlendioxid. Es ist ein farb- und geruchloses Gas. Die Kohlendioxidkonzentration in der Luft wird in ppm (englisch: parts per million, deutsch: Volumenteile pro Million Volumenteile) angegeben. Die CO2-Konzentration in der Raumluft gilt als Indikator für die Luftqualität in Innenräumen.≤ 800 (Hohe Raumluftqualität) 800–1000 (Mittlere Raumluftqualität) 1000-1400 (Mäßige Raumluftqualität) > 1400 (Niedrige Raumluftqualität)(Absolute CO2-Konzentration in der Innenraumluft in ppm) Quelle¹ Die CO2-Konzentration in Räumen hängt von folgenden Faktoren abRaumvolumen Anzahl der Personen im Raum Aktivität der Personen im Raum Verbrennung im Raum LuftwechselTest des CO2-Messgeräts AirCO2ntrol von TFA Dostmann Das CO2-Messgerät wird in einer kleinen Box mit den wichtigsten Informationen, wie Anwendungsbeispielen, technischen Daten und einer Skala für gute bis schlechte Luftqualität geliefert. Im Lieferumfang ist das CO2-Messgerät AirCO2ntrol, ein Micro-USB Kabel (1,5m) und eine Anleitung in Deutsch, Englisch, Französisch, Italienisch, Niederländisch sowie Spanisch. Das Gehäuse ist solide verarbeitet und in den Farben weiß und grün verfügbar. Durch die zwei kleinen Füße steht das Messgerät etwas angekippt und das Ablesen des Displays von oben wird erleichtert. Nach dem Auspacken kann das CO2-Messgerät sofort verwendet werden. Es muss nicht kalibriert werden und benötigt keine lange Aufwärmphase. Da kein Netzteil mitgeliefert wird, musst du das Messgerät über den USB Port deines Computers mit Strom versorgen. Oder du verwendest ein USB-Netzteil, wie das vom iPhone. Alternativ kannst du ein Raspberry Pi Micro USB-Netzteil oder eine Powerbank verwenden. Die Stromversorgung über USB hat den Vorteil, dass nicht unbedingt eine Steckdose in der Nähe sein muss, um das Gerät mit Strom zu versorgen. Nach dem Einschalten zählt das CO2-Messgerät von 5 auf 0 und zeigt danach die CO2 Konzentration in der Luft und die Raumtemperatur an. Der CO2-Wert (ppm) und die Temperatur (℃/℉) werden abwechselnd (15 sec./ 5 sec.) auf dem Display angezeigt. Das Display hat keine Hintergrundbeleuchtung, was Strom spart. An der Vorderseite sind 3 Led's für die Qualität der Luftqualität (grün: gute Luftqualität, geld: mittlere Luftqualität, rot: schlechte Luftqualität). Durch die Led's kann man den Status der Luftqualität auch von weitem erkennen. Kinder oder Personen die nicht mit den CO2 Werten vertraut sind, haben durch die Led's einen einfachen Indikator für die aktuelle Luftqualität. In dunkler Umgebung sind die Led's etwas zu hell und stören etwas (im Schlafzimmer, oder neben dem Fernseher). Versteckte Funktionen Die Rückseite läßt sich leichte mit einem Schraubenzieher entfernen. Mit dem rechten Knopf (EnterKey) kannst du von Celsius auf Fahrenheit umstellen. Achtung wenn ihr an den Einstellungen herrumspielt, kann es sein, dass euer Gerät neue Kalibriert werden muss. Offiziell werden diese Funktionen nicht vom Hersteller unterstützt. Bitte keine Anfragen an den Kundendienst von TFA. Mit dem Linken Knopf (ModeKey) kannst du ein paar versteckte Funktionen umstellen.Alti: Dort kannst du die Höhe des Messgeräts in Meter über dem Meeresspiegel einstellen. So wird der unterschiedliche Druck ausgeglichen. Al1/Al2: Dort kannst du den Schwellenwert für die Gelbe und Rote Led verändern. Die Standardwerte sind 800ppm und 1200ppm 8bc: Aktiviert/Deaktivert die Selbst-Kalibrierung. Ist der Wert auf on, Kalibriert sich das Messgerät alle 8 Tage selbst. Es wertet den niedrigsten gemessenen Wert als Frischluft (400ppm). Ist der Wert auf onCE, Kalibriert sich das Messgerät einmal in 8 Tagen selbst. Ist der Wert auf oFF, Kalibriert sich das Messgerät nicht selbst. rcFS: führt einen Factory Reset durch. Das Gerät wird zurückgesetzt.Auf der Platine sind zwei Lötpunkte, an denen ein Summer angelötet werden kann. Wenn der zweite Schwellenwert (Rote Led) erreicht ist, gibt das Messgerät alle 2 Sekunden einen Warnton ab. Bitte schreibt ein Kommentar unter den Artikel, wenn ihr dazu ein Tutorial möchtet. Technische DatenTemperatur Messbereich: 0 bis +50℃ (+32℉ bis 122℉) Kohlendioxid Messbereich: 0 bis 3000ppm Auflösung: 1ppm bei 0-1000ppm / 10ppm bei 1001-3000ppm Abmessungen: 116mm (Breite) x 24mm (Tiefe) x 42mm (Höhe) Aufwärmzeit: < 60 Sekunden Messmethode: NDIR (Nicht-Dispersive-Infrarot Technologie) Temperaturabhängigkeit: ±0,3-±4ppm pro ℃, bezogen auf 25℃ Gewicht: 65g Anschlüsse: Micro-USBStromkosten des CO2-Messgerät AirCO2ntrol Über Nacht (ca. 10 Stunden) habe ich das CO2-Messgerät an einem Energiekosten-Messgerät (Energy Master Basic von ELV) angeschlossen.1,727KWh Jahresverbrauch 0,40€ Stromkosten für ein Jahr (0,23€ pro 1KWh) min. 0,1W / max. 0,4WDie Stromkosten von ca. 0,40€ für ein Jahr Dauerbetrieb, finde ich sehr günstig. Ich hätte mit mehr gerechnet. CO2-Messgerät AirCO2ntrol Kalibrieren Das CO2-Messgerät ist ab Werk Kalibriert und muss normalerweise nicht nachträglich Kalibriert werden. Falls doch mal die Messwerte stark abweichen, kann das AirCO2ntrol Messgerät wie folgt Kalibriert werden. Am einfachsten kann es im Freien an der Frischluft Kalibriert werden. Dort sollte der Wert zwischen 350ppm und 450ppm betragen. Oder man verwendet eine CO2 Kapsel mit einem Schlauch zur Öffnung an der Seite. Damit sollte der Messwert 1000ppm betragen. Offiziell wird diese Funktion nicht vom Hersteller unterstützt. Bitte keine Anfragen an den Kundendienst von TFA.Lade dir die Software zum Kalibrieren von hier herunter http://www.zyaura.com/support/support_software.htmEntpacke die RAR-Datei. Im Ordner ZyAura_USB_HUB_PC_software musst du die ZG.eye Datei in ZG.exe umbenennen.Öffne oben in der Menüleiste auf CalibrationWähle die Quelle für den Referenz-Messwert. 1000 ppm wenn du eine CO2 Kapsel zur verfügung hast, oder Out door um das Gerät im Freien zu Kalibrieren (350~450 ppm).Klick auf Execute Leite jetzt das CO2 Gas aus der Kapsel zur Kalibrieröffnung an der Seite, oder stell das Messgerät ins Freie. Klicke auf Start. Wenn du die Kalibrierung im Freien durchführst, solltest du das Gerät min. 30 Minuten Kalibrieren.Der Offset sollte nicht mehr als 50ppm betragen. Dann kannst du auf Stop/Exit klicken.Quellen ¹https://www.umweltbundesamt.de/sites/default/files/medien/pdfs/kohlendioxid\_2008.pdf